Back Office: Discounts Report
Navigation: Sign
into the Back Office and select a Store. On the left-side, select Reports
then Discount.
The Discount reports page is broken down by the following tabs:
Discount
Store Credit
Discount
Report Type > Summary
- Discount – Select the Name of the Discount from the dropdown, or select All (Default).
- Sales Created By – Select an Employee who entered the Discount(s) (as established by their Role that has access to Discounts when set up in User Management), or All (Default). If an Employee is selected, the first 8 characters of their username will appear on the table. Scroll up or down to find the Employee sorted alphabetically, or Search to find more quickly.
- Discount Coupon Type – Select the Coupon Type (Promo, Comp or Donation) to base the listed Discounts on, or select All (Default).
- Summary Table - Displays the results when you click Apply, with the following columns:
- Discount Name – The Name of the Discount as established in Back Office.
- Discount Total – The whole number followed by 2 decimals will be the discount total format. The net discount total for the discount selected will be shown in this row.
- % of Total – Total percentage of the discount value with the total sale will be shown here.
- Count – The number of times (whole numbers only) the discount has been applied.
- Average – The Discount Total divided by the Count value (up to 2 decimal points).
- Discount Coupon Type – The Discount Type (Promo, Comp, Donation).
- Total Discounts – The total for the columns Discount Total, % of Total, Counts, and Average.
- Total Checks – The Total number of Checks based on your selection
- % of Check Discounted – The [(Total Number of Discounted Checks / Total Checks) * 100].
- Gross Sales – The value of the following formula:
- Sum of all payments + Gross Void + Discount + Discount Tax + Void Discount + Void Discount Tax - (GC Sold + HA Sold + Membership Sold + GiveX Sold + Gratuity + Delivery Compensation).
- % Discount of Gross Sales – The value of the formula: (Total Discount / Gross Sale) * 100.
- Checks Discounted – The sum of all checks discounted will be shown.
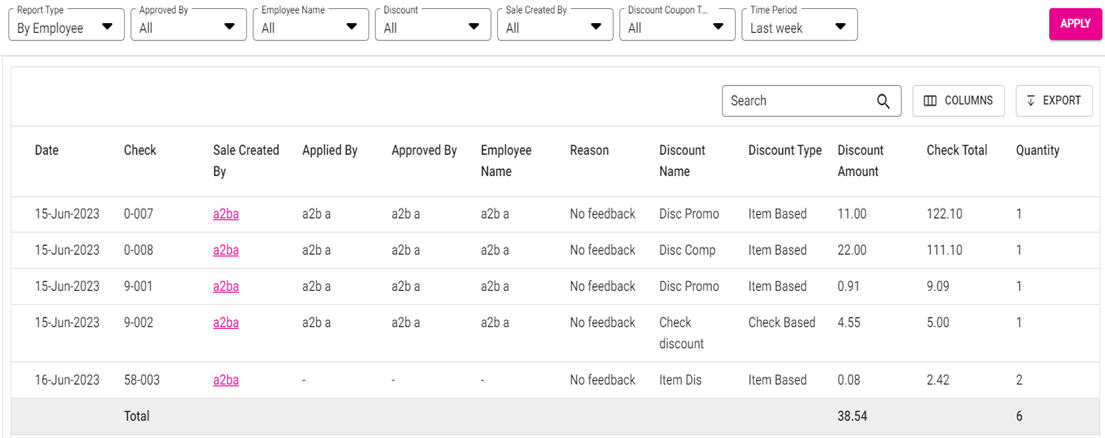
Report Type > By Employee
Generates
a series of dropdowns pertaining to Employees, as established from the Discounts
page in Back Office.
- Approved By – Select an Employee who closed the check (as established by their Role that has access to Discounts when set up in User Management), or All (Default). If an Employee is selected, the first 11 characters of their username will appear on the table. Scroll up/down to find the Employee sorted alphabetically, or Search to find more quickly.
- Employee Name – Select an Employee who entered the Discount(s) (as established by their Role that has access to Discounts when set up in User Management), or All (Default). If an Employee is selected, the first 11 characters of their username will appear on the table. Scroll up/down to find the Employee sorted alphabetically, or Search to find more quickly.
- Discount – Select the Name of the Discount from the dropdown, or select All (Default). If an Employee is selected, the first 11 characters of their username will appear on the table. Scroll up/down to find the Discount sorted alphabetically, or Search to find them more quickly.
- Sales Created By – Select an Employee (as established by their Role that has access to Discounts when set up in User Management), or All (Default). If an Employee is selected, the first 8 characters of their username will appear on the table. Scroll up/down to find the Employee sorted alphabetically, or Search to find them more quickly.
- Discount Coupon Type – The Discount Type (Promo, Comp, Donation), or select All (Default).
- Report Type > By Employee Table – After clicking Apply, the following columns are shown:
- Date – The Date the sale was made (DD-MM-YYYY format).
- Check – Node and Check Number (Node-CheckNumber format).
- Sale Created By – The Employee who created the Sale. Clicking it opens a new window.
- Applied By – The Employee who applied the Discount.
- Approved By – The Employee who closed the check.
- Employee Name – The respective employee’s name will be in this column.
- Reason – The Reason and feedback for the discount.
- Discount Name – Discounts name entered from the back office will be shown in this column.
- Discount Type – The discount type will be shown in this column - (Item based discount/Check based discount/ Open check /Open item / Mix and match discount).
- Discount Amount – The discount for the sale will be displayed in this column.
- Check Total – The net value of the sale will be displayed.
- Quantity – The number of sale item from which the discount was applied for will be shown.
- Total – Displays the Sum of the Discount Amount and Quantity columns, broken down by Sale Created By value.
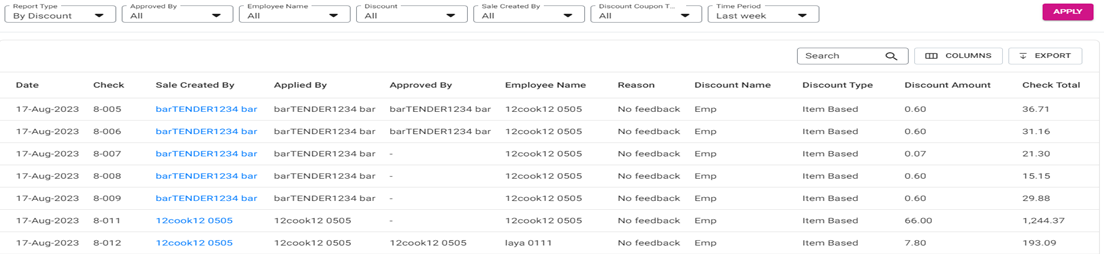
Report Type > By Discount
Generates a series of dropdowns pertaining to Discounts, as established from the Discounts page in Back Office.
- Approved By – Select an Employee who closed the check (as established by their Role that has access to Discounts when set up in User Management), or All (Default). If an Employee is selected, the first 11 characters of their username will appear on the table. Scroll up/down to find the Employee sorted alphabetically, or Search to find more quickly.
- Employee Name – Select an Employee who entered the Discount(s) (as established by their Role that has access to Discounts when set up in User Management), or All (Default). If an Employee is selected, the first 11 characters of their username will appear on the table. Scroll up/down to find the Employee sorted alphabetically, or Search to find more quickly.
- Discount – Select a Discount name, or All (Default). If an Discount is selected, the first 11 characters of their username will appear on the table. Scroll up/down to find the Employee sorted alphabetically, or Search to find more quickly.
- Sale Created By – Select an Employee who entered the Discount(s) (as established by their Role that has access to Discounts when set up in User Management), or All (Default). If an Employee is selected, the first 8 characters of their username will appear on the table. Scroll up or down to find the Employee sorted alphabetically, or Search to find more quickly.
- Discount Coupon Type – Discount Coupon Type – Select the Coupon Type (Promo, Comp or Donation) to base the listed Discounts on, or select All (Default).
- By Discount Table – After clicking Apply, the following columns are shown:
- Date – The Date the sale was made (DD-MM-YYYY format).
- Check – Node and Check Number (Node-CheckNumber format).
- Sales Created By – The Employee who created the Sale. Clicking it opens a new window.
- Applied By – The Employee who applied the Discount.
- Approved By – The Employee who closed the check.
- Employee Name – The respective employee’s name will be in this column.
- Reason – The Reason and feedback for the discount.
- Discount Name – Discounts name entered from the back office will be shown in this column.
- Discount Type – The discount type will be shown in this column - (Item based discount/Check based discount/ Open check /Open item / Mix and match discount).
- Discount Amount – The discount for the sale will be displayed in this column.
- Check Total – The net value of the sale will be displayed.
- Quantity – The number of sale item from which the discount was applied for will be shown.
- Total – Displays the Sum Total of the Discount Amount and Quantity columns.
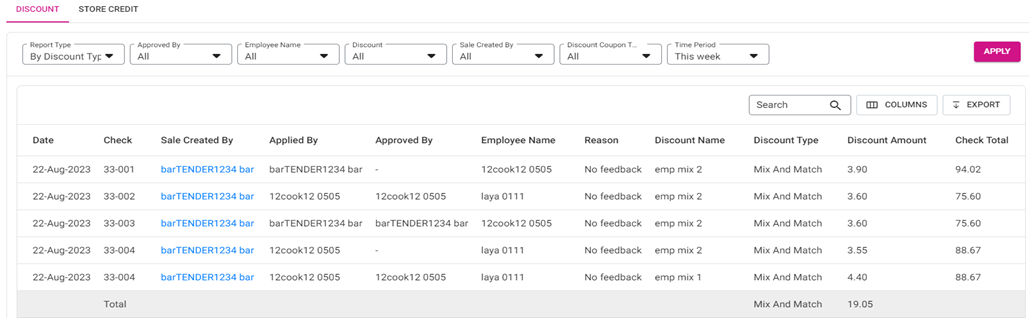
Report Type > By Discount Type
Generates a series of dropdowns pertaining to Discount Types, as established from the Discounts page in Back Office.
-
Approved By – Select an Employee who closed the check (as established by their Role that has access to Discounts when set up in User Management), or All (Default). If an Employee is selected, the first 11 characters of their username will appear on the table. Scroll up/down to find the Employee sorted alphabetically, or Search to find more quickly.
-
Employee Name – Select an Employee who entered the Discount(s) (as established by their Role that has access to Discounts when set up in User Management), or All (Default). If an Employee is selected, the first 11 characters of their username will appear on the table. Scroll up/down to find the Employee sorted alphabetically, or Search to find more quickly.
-
Discount – Select a Discount name, or All (Default). If an Discount is selected, the first 11 characters of their username will appear on the table. Scroll up/down to find the Employee sorted alphabetically, or Search to find more quickly.
-
Sale Created By – Select an Employee who entered the Discount(s) (as established by their Role that has access to Discounts when set up in User Management), or All (Default). If an Employee is selected, the first 8 characters of their username will appear on the table. Scroll up or down to find the Employee sorted alphabetically, or Search to find more quickly.
-
Discount Coupon Type – Discount Coupon Type – Select the Coupon Type (Promo, Comp or Donation) to base the listed Discounts on, or select All (Default). -
By Discount Type Table - After clicking Apply, the following columns are shown:
-
Check – Node and Check Number (Node-CheckNumber format).
-
Sales Created By – The Employee who created the Sale. Clicking it opens a new window.
-
Applied By – The Employee who applied the Discount.
-
Approved By – The Employee who closed the check.
-
Employee Name – The respective employee’s name will be in this column.
-
Reason – The Reason and feedback for the discount.
-
Discount Name – Discounts name entered from the back office will be shown in this column.
-
Discount Type – The discount type will be shown in this column - (Item based discount/Check based discount/ Open check /Open item / Mix and match discount).
-
Discount Amount – The discount for the sale will be displayed in this column.
-
Check Total – The net value of the sale will be displayed.
-
Quantity – The number of sale item from which the discount was applied for will be shown.
-
Total – Displays the Sum Total of the Discount Amount and Quantity columns.
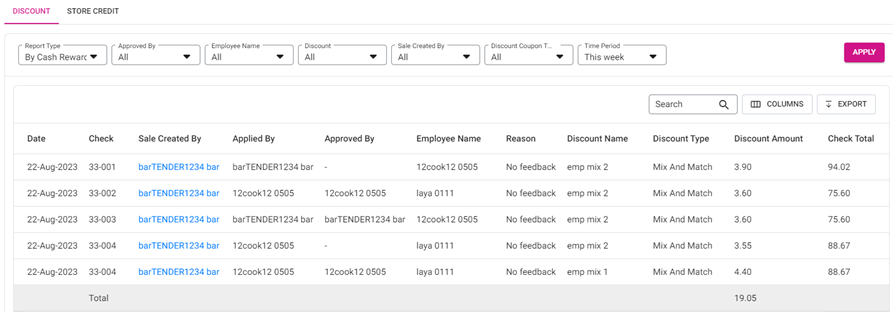
Report Type > By Cash Reward
Generates a series of dropdowns pertaining to Cash Rewards, as established from the Discounts page in Back Office.
-
Approved By – Select an Employee who closed the check (as established by their Role that has access to Discounts when set up in User Management), or All (Default). If an Employee is selected, the first 11 characters of their username will appear on the table. Scroll up/down to find the Employee sorted alphabetically, or Search to find more quickly.
-
Employee Name – Select an Employee who entered the Discount(s) (as established by their Role that has access to Discounts when set up in User Management), or All (Default). If an Employee is selected, the first 11 characters of their username will appear on the table. Scroll up/down to find the Employee sorted alphabetically, or Search to find more quickly.
-
Discount – Select a Discount name, or All (Default). If an Discount is selected, the first 11 characters of their username will appear on the table. Scroll up/down to find the Employee sorted alphabetically, or Search to find more quickly.
-
Sale Created By – Select an Employee who entered the Discount(s) (as established by their Role that has access to Discounts when set up in User Management), or All (Default). If an Employee is selected, the first 8 characters of their username will appear on the table. Scroll up or down to find the Employee sorted alphabetically, or Search to find more quickly.
-
Discount Coupon Type – Discount Coupon Type – Select the Coupon Type (Promo, Comp or Donation) to base the listed Discounts on, or select All (Default). -
By Cash Reward Table – After clicking Apply, the following columns are shown:
-
Date – The Date the sale was made (DD-MM-YYYY format).
-
Check – Node and Check Number (Node-CheckNumber format).
-
Sales Created By – The Employee who created the Sale. Clicking it opens a new window.
-
Applied By – The Employee who applied the Discount.
-
Approved By – The Employee who closed the check.
-
Employee Name – The respective employee’s name will be in this column.
-
Reason – The Reason and feedback for the discount.
-
Discount Name – Discounts name entered from the back office will be shown in this column.
-
Discount Type – The discount type will be shown in this column - (Item based discount/Check based discount/ Open check /Open item / Mix and match discount).
-
Discount Amount – The discount for the sale will be displayed in this column.
-
Check Total – The net value of the sale will be displayed.
-
Quantity – The number of sale item from which the discount was applied for will be shown.
-
Total – Displays the Sum Total of the Discount Amount and Quantity columns.
Report Type > Discount Applied By
Generates a series of dropdowns pertaining to how Discounts are Applied By, as established from the Discounts page in Back Office.

-
Approved By – Select an Employee who closed the check (as established by their Role that has access to Discounts when set up in User Management), or All (Default). If an Employee is selected, the first 11 characters of their username will appear on the table. Scroll up/down to find the Employee sorted alphabetically, or Search to find more quickly.
-
Employee Name – Select an Employee who entered the Discount(s) (as established by their Role that has access to Discounts when set up in User Management), or All (Default). If an Employee is selected, the first 11 characters of their username will appear on the table. Scroll up/down to find the Employee sorted alphabetically, or Search to find more quickly.
-
Discount – Select a Discount name, or All (Default). If a Discount is selected, the first 11 characters of their username will appear on the table. Scroll up/down to find the Employee sorted alphabetically, or Search to find more quickly.
-
Sale Created By – Select an Employee who entered the Discount(s) (as established by their Role that has access to Discounts when set up in User Management), or All (Default). If an Employee is selected, the first 8 characters of their username will appear on the table. Scroll up or down to find the Employee sorted alphabetically, or Search to find more quickly.
-
Discount Coupon Type –– Select the Coupon Type (Promo, Comp or Donation) to base the listed Discounts on, or select All (Default). -
Report Type > Discount Applied By Table – After clicking Apply, the following columns are shown:
-
Date – The Date the sale was made (DD-MM-YYYY format).
-
Check – Node and Check Number (Node-CheckNumber format).
-
Sales Created By – The Employee who created the Sale. Clicking it opens a new window.
-
Applied By – The Employee who applied the Discount.
-
Approved By – The Employee who closed the check.
-
Employee Name – The respective employee’s name will be in this column.
-
Reason – The Reason and feedback for the discount.
-
Discount Name – Discounts name entered from the back office will be shown in this column.
-
Discount Type – The discount type will be shown in this column - (Item based discount/Check based discount/ Open check /Open item / Mix and match discount).
-
Discount Amount – The discount for the sale will be displayed in this column.
-
Check Total – The net value of the sale will be displayed.
-
Quantity – The number of sale item from which the discount was applied for will be shown.
-
Total – Displays the Sum Total of the Discount Amount and Quantity columns.
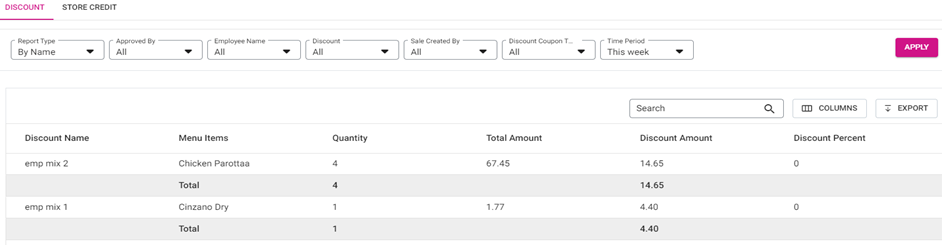
Report Type > By Name
Generates a series of dropdowns pertaining to Discount Names, as established from the Discounts page in Back Office.
- Approved By – Select an Employee who
closed the check (as established by their Role that has access to Discounts
when set up in User Management), or All (Default). If an Employee is selected,
the first 11 characters of their username will appear on the table. Scroll
up/down to find the Employee sorted alphabetically, or Search to find more
quickly.
-
Employee Name – Select an Employee who entered the Discount(s) (as established by their Role that has access to Discounts when set up in User Management), or All (Default). If an Employee is selected, the first 11 characters of their username will appear on the table. Scroll up/down to find the Employee sorted alphabetically, or Search to find more quickly.
-
Discount – Select a Discount name, or All (Default). If an Discount is selected, the first 11 characters of their username will appear on the table. Scroll up/down to find the Employee sorted alphabetically, or Search to find more quickly.
-
Sale Created By – Select an Employee who entered the Discount(s) (as established by their Role that has access to Discounts when set up in User Management), or All (Default). If an Employee is selected, the first 8 characters of their username will appear on the table. Scroll up or down to find the Employee sorted alphabetically, or Search to find more quickly.
-
Discount Coupon Type – Select the Coupon Type (Promo, Comp or Donation) to base the listed Discounts on, or select All (Default). -
By Name Table – After clicking Apply, the following columns are shown, organized by Discount Name:
-
Discount Name – The name of the Discount (established in Back Office).
-
Menu Item – The name of the Menu Item (established in Back Office) the Discount has been applied to.
-
Quantity – The number of times the Discount has been applied to the item.
-
Total Amount – The net sale amount of the item.
-
Discount Amount – The amount in Discount applied to the item.
-
Discount Percent – The value of the formula = (Discount Amount / Total Amount) * 100.
-
Total – The sum of values in Quantity and Discount Amount, for each Discount Name.
- Sales Created By Window – When a Sales Created By value is clicked, a new window opens:
- Upon clicking the Sale Created By employee, it routes to a separate window which shows the sale made by the respective employee with the fields: Check no, Customer, Transaction date, Floor no, Table no, Net sales, Total tax, Incl tax, CC service charge, Discount, Gross receipt, closed by, Closed on, and Grand sales. Click Back to revert to the main table page.
- Check – Node and Check Number (Node-CheckNumber format).
- Customer – The service type of the customer.
- Transaction Date – The Date and Time the check was generated.
- Floor No – The floor number if any for the service.
- Table No – The table number of the service.
- Net Sales – The net sales made for the employee.
- Total Tax – The net tax made for the employee.
- Incl. Tax – The inclusive tax made by the employee.
- CC Service Charge – The cc service type generated.
- Discount – Discount generated for the check.
- Gross Receipt – The net receipt for the services.
- Closed By – The employee who closed the check will be shown.
- Closed On – The POS Node from where the check was closed.
- Grand Sales – The total sales made for the employee.
- Check Number – The check number. clicking it opens a separate window with 4 sections:
- Check Number Window
- Check Summary – Displays a breakdown of the Check, including Check Number, Customer (Name), Date (and Time, DD-MM-YYYY 00:00 AM/PM format), Service Type, Seat Number (based on the Service Type), Gratuity (amount), Discount (amount), Service Charge (if applicable for Credit Card charges), Online Order Service Charge (if applicable for Online Orders), Total and Total Tip (amounts collected for the check), Cash Discount, and Item Service Charge.
- Order Summary – Displays a breakdown of the customer’s Order on the Check, including (Menu) Item, Price and Qty (of the Menu Item), Amount (Price * Quantity), and Sub Total (sum of the values in Amount).
- Tax Summary – Displays a breakdown of the Check, including Type (of Tax), Rate % (of Tax to the Check), Amount (Menu Item Price * % of the Tax), and Tax Total (sum of the values in Amount).
- Payment Summary – Displays a breakdown of the Payment(s), including Payment No (of the Check), Type (of payment: Cash, CC, etc.), Tip (added to the Check), CC Service Charge (when applicable), Amount (paid on the Check), Status (Success or Failed), Auth Code Transaction No [Number] (of the Check), and Payment Ticket (download the Ticket in PDF format). Note: If there are multiple payments, then all of them are displayed.
Store Credit
Displays
information about accumulated Store Credits. Select the Action Type and Time
Period then click Apply.
- Action Type – Select the type of Action on Store Credit you want to be generated.
- Add – The first time a Customer is receiving Store Credit.
- Update – A change in the Store Credit.
- Refund – A refund to the Store Credit Card.
- Redeem – Drawing from the existing amount in of Store Credit.
- Store Credit Table – After clicking Apply, the following columns are shown (if there are no results, the message ‘No transaction for selected time period’ appears).
- Node and Check Number – (Node-CheckNumber format).
- Employee Name & ID – The Name and ID of the Employee who conducted the Store Credit transaction.
- Customer Name – The Name on the Customer’s Account.
- Customer Email – The Email Address on the Customer’s Account.
- Customer Phone – The Phone Number on the Customer’s Account.
- Credit Amount – Based on the Action Type, as a whole number with up to 2 decimal points.
- Date and Time – The date, time and PM/AM of the sale will be shown in this column. The date will be in the following format - DD/MMM/YYYY, Time will be in this format - HH.MM, PM/AM.
- Action Type – The type of action selected (Update, Added, Refunded).
- Source – Source should be either in Webpos or callcenter. The source from which the sale made will be displayed in this column.
Related Articles
Retail Back Office: Discounts Report
Navigation: Sign into the Back Office for your Retail Store. Select Reports > Discount Sales Created By Window – For certain reports, when a Sales Created By value is clicked, a new window opens: Upon clicking the Sale Created By employee, it routes ...Back Office: Comparison Report
Navigation: Sign into the Back Office for your Store. On the left-side, select Reports then Comparison Report. The Comparison Report page displays a comparison between two or more selected Time Periods. Select each Compare Time period (Compare Time ...Retail Back Office: Comparison Report
Navigation: Sign into the Back Office for your Retail Store, then select Reports > Comparison Report. Comparison Report Displays a comparison between two or more (click Compare Time to add more filters, up to a total of 4) selected Time Periods ...Retail Back Office: Account Balance Report Settings
Navigation: Sign into the Back Office then select a Store. On the left-side Navigation Panel, click Settings. On the Settings page, under Reports click Account Balance. The Account Balance page contains multiple fields to fill in. Enter a value in ...Back Office: Account Balance Report Settings
Navigation: Sign into the Back Office for your Store. On the left side, click Settings. On the Settings page, under Reports select Account Balance. The Account Balance report settings page contains multiple fields to fill in to appear on the report. ...