Back Office: Enterprise - Customers
- Sign
into the Back Office.
- On
the left-side Navigation Panel, click Customers.
- Under
Customers are options to access pages for Customers or Memberships:
Customers
Memberships
Customers
- When selected, the existing Customers’ details will be shown as a table with the following columns: Image, Name, E-Mail, Phone Number, Loyalty Points, Reason, Gift Card Number, Stores, and Actions - along with options to conduct a Search, select the Columns to view, and Export the table.
- Above the table are buttons for Import Customer and + New Customer
Select a below option to show further instructions:
Importing Customers
Tip: Excel
Spreadsheet (.xls / .xlsx) format. You can use an export from another store.
- On
the main Customers screen, click ↑
IMPORT CUSTOMERS at the upper-right.
- On
the file explorer window that opens, navigate to where the import file is
saved. Click the file then click Open - or double-click the file – to
import it into the store’s customers.
- You are returned to the main Customers page,
where the ‘Customer import is processing now.’ confirmation
banner appears, and the customers will appear within a few minutes.
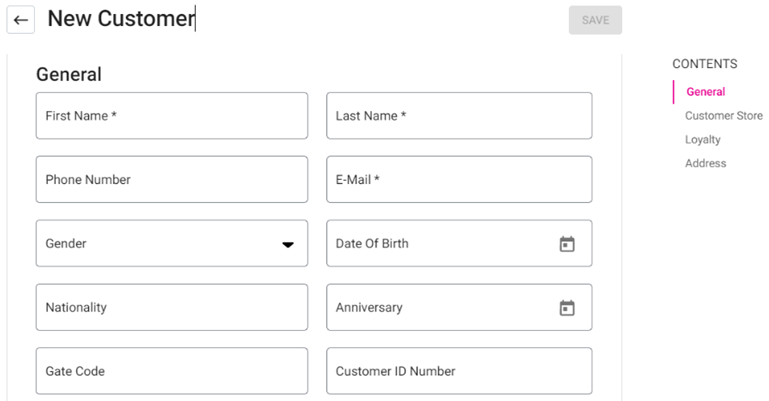
Creating a New Customer
Click + New Customer to create a new customer, and the New Customer page appears. Fill in all the required details – broken down into 4 sections: General, Customer Store, Loyalty & Address.
Note: The Save button at the top-right is enabled only AFTER completing ALL mandatory fields.
General – Enter information in the below fields:
-
First Name – (Mandatory) The customer’s First Name. It cannot exceed 25 characters.
-
Last Name – (Mandatory) The customer’s Last Name. It cannot exceed 25 characters.
-
E-Mail – (Mandatory) The customer’s Email Address. It must be a valid address.
-
Phone Number – The customer’s contact phone number. It must be between 6 and 28 digits.
-
Gender – Select the customer’s gender from the dropdown (Male, Female or Others).
-
Date of Birth – Select the customer’s date of birth (calendar view).
-
Customer ID Number – Enter the customer’s unique ID (letters and numbers accepted).
-
Nationality – Enter the customer’s Nationality.
-
Gate Code – Enter a code needed to enter the customer’s neighborhood (letters and numbers accepted).
-
Anniversary – Select the customer’s anniversary (date picker).
-
User Photo – A picture of the customer. Click the document with the upwards facing arrow to upload the logo image. To remove the image, hover over it and click the Trash Can icon.
-
Notes - User can enter the extra details for the respective customer on it. Letters and numbers allowed with no limit on amount of characters.
-
After completing all mandatory and optional desired fields, click Save at the top-right.
-
Customer Store - The list of stores for the customers will be shown in the dropdown. Select all and remove all. Upon selecting all, the stores from the enterprise account will be selected. Upon deselecting, all the stores will be deselected. When there are more stores in the dropdown, scroll bar will be available.
-
Loyalty Toggle: If Enabled (set to YES), the customer’s amount of points (Loyalty Balance) will appear along with the Reason (based on customization on the Loyalty page). The toggle will be Disabled by default.
Address – Enter the Customer’s address information: -
Address Line 1 – Enter the Number and street name of the address.
-
Apt, Suite, etc. – Enter any additional street address information (Unit, Apt, Suite, etc.).
-
City – Enter the city where the address is located.
-
State – Enter the State where the address is located.
-
ZipCode – The Zip Code where the address is located (must be between 4 and 9 characters).
-
Country – Select the country where the address is located from the dropdown.
Editing an Existing Customer
- Click the three dots (•••) under the right-side Actions
column of a customer’s row, then select Edit Customer. The Edit
Customer page appears.
- Upon clicking on Edit Customer, fields under the sections General, Customer Store, Loyalty & Address can be updated (see the Creating a New Customer section for more info). Once complete, click Update at the top-right to apply the changes. The button will be disabled until all mandatory fields are filled and at least one update is made.
Viewing Customer Metrics
-
Click the three dots (•••) under the Actions column of a customer’s row, then select View Customer Metrics. The Customer Metrics page appears, which displays the following details:
- Top Row
-
Name and Image
-
Address
-
Phone Number
-
Email Address
-
Enroll Date
-
Second Row (with colorized tiles)
-
Number Of Visits from the customer to the store.
-
Sale Amount (in local currency) generated by the customer.
-
Loyalty Points accrued by the customer (with equivalent value in local currency money can be shown here [customized from Loyalty page]).
-
Number of times the customer provided Positive Feedback.
-
Number of times the customer provided Negative Feedback.
-
Last Month Sales Graph
-
The X (Horizontal) axis is broken down by Month (with the past 12 Months).
-
The Y (Vertical) axis is broken down by amount of sales (in local currency).
-
Mouse over a month’s bar to display its exact amount of Net Sales.
-
Avg. Daily Spent Graph
-
The X (Horizontal) axis is broken down by Day (with the past 7 Days).
-
The Y (Vertical) axis is broken down by amount of sales (in local currency).
-
Mouse over a day’s bar to display its exact amount of Net Sales.
-
Check Table – Contains columns for Check No, Date Created, and Check Amount. A Time Period can be selected from the dropdown, then click Apply to view checks from that range.
-
Check No – The check’s assigned number [NodeNumber-CheckNumber format].
-
Date Created – The Date the check was created [DD-MMM-YYYY format].
-
Check Amount – The amount for the check will be shown in this column.
-
Click on the <- (Back) button to revert to the main Customers page.
-
Check Information – Click on a Check No (check number) to view the breakdown of that check (you may have to scroll a bit down the page for the individual Check information to appear).
-
The Check Information page contains sections for Check Summary, Order Summary, Tax Summary and Payment Summary. Also, there is an option to Email a Receipt Copy.
-
The customer’s Email Address will automatically populate the field, or another email address can be entered. Click Send Receipt to email a copy of the receipt to the address in the field.
-
Check Summary Table – Includes a breakdown of Check information:
-
Check Number: The check’s assigned number [NodeNumber-CheckNumber format].
-
Customer: The Name of the Customer.
-
Date: The date payment was completed [DD-MM-YYYY HH:MM PM/AM format].
-
Service Type: The selected type of service for the order (the Seat Number will be based on this).
-
Seat Number: The assigned seat number (based on the selected Service Type).
-
Example: If the Service Type is Bar Tab, a Seat Number will be displayed but if QSR is selected a Seat Number won’t be displayed. If multiple seats are on the order, they’ll all be displayed.
-
Server Name: The name of the Server who handled the Check and processed the payment.
-
Gratuity: The amount of gratuity added (in local currency, up to 2 decimal values).
-
Discount: Any amount of discount taken off the check (in local currency, up to 2 decimal values).
-
CC Service Charge: The amount of service charge if a Credit Card was used on the check.
-
Online Order Service Charge: The amount of service charge if the check was via online ordering.
-
Total: The Total amount collected for the check.
-
Total Tip: The Total amount of tip collected for the check.
-
Cash Discount: Any Discount applied to the check due to cash payment.
-
Item Service Charge: Any service charges incurred from specific item(s) ordered.
-
Order Summary Table – Displays a breakdown of the items ordered on the Check:
-
Item: The Name of the Menu Item ordered on the check.
-
Price: The Price of the ordered Menu Item.
-
Qty: The number of times the Item was ordered on the Check.
-
Amount: The value equal to Price x Quantity.
-
Sub Total: The sum of all Amount values in the table.
-
Tax Summary Table – Displays a breakdown of the Taxes applied to the Check:
-
Type: The name of the Tax applied to the Check.
-
Rate %: The Percentage of the Check the tax applies to.
-
Amount: The value equal to Price of the Menu Item x Rate %.
-
Tax Total: The sum of all Amount values in the table.
-
Payment Summary Table – Displays a breakdown of the payment(s) applied to the Check:
-
Payment No: The Number assigned to the Payment applied to the check.
-
Type: The Type of payment applied to the check (Cash, CC, etc.)
-
Tip: Any Tip added to the check during payment.
-
CC ServiceCharge: The amount of service charge if the Payment Type was Credit Card (CC).
-
Amount: Amount paid by the payment towards the check.
-
Status: Status of the check success or failed should be displayed
-
Auth Code: Auth Code of the check should be displayed
-
Transaction No: Transaction of the number of the check should be displayed
-
Payment Ticket: A link to the Payment Ticket in PDF format. Click the link to downlaod the file.
-
Note: If there are multiple payments on the check, all of them will be displayed.
Editing Loyalty Points
- Click
the three dots (•••) under the Actions column of a customer’s row, then
select Edit Loyalty Points.
- The
Edit Loyalty Points pane appears, which displays the fields for Loyalty
Points and Reason:
- Enter the new amount of Loyalty Points (or use ▲ / ▼ to
increase / decrease the value).
- Enter the Reason for updating the amount of Loyalty points (no character limit).
- If there are no changes, cancel button can be pressed, which is present at the bottom of the left corner.
- When satisfied with both fields, click Update at the bottom-right. You’re returned to the main Customers page and the ‘Customer Loyalty Points Updated Successfully’ banner appears.
- If no edit is needed, click X Close at the top-right (or Cancel at the bottom-left) of the pane.
Deleting a Customer
- Click
the three dots (•••) under the Actions column of a customer’s row, then
select Delete.
- The
Delete pop-up appears.
- Click Delete to confirm deleting the Customer’s record, or X Close / Cancel to keep it.
Memberships
When
selected, the Membership page appears with 3 tabs: Type (default),
Plan, and Account.
Select one of the below tabs for more information:
Type Tab
- The Type tab contains the list of membership types in table format – with columns for Date, Type, Description and the Action column with options for Edit and Delete.
-
Also, the + Membership Type button appears at the upper-right.
Creating a new Membership Type
- Click + Membership Type at the upper-right.
- The New Membership Type pane appears - with fields for Type, Price Level and Description.
- Enter the values for each field:
- Type – (Mandatory) Enter the type’s name. It must be unique and no greater than 25 characters.
- Description – Enter a description of the type of membership. No character limit.
- Price Level – (Mandatory) Select one option from the list of 10 levels, or Default.
- When you’re satisfied with the values entered in the fields,
click Save. You’re returned to the main Memberships page with the
Type tab and the ‘Membership
Type Added Successfully’ banner appears.
Actions
- Edit
- Under
Actions, click the corresponding Edit (pencil) button for
a type’s row.
- The
Update Membership Type pane appears. The Update button at the
bottom-right will be disabled by default, until the Type field is filled
in and any updates to field values are made. Click X Close / Cancel
to keep the Type as-is.
- After
clicking Update, you’re returned to the main Memberships page
with the Type tab, and the ‘Membership Type Updated Successfully’
banner appears.
- Delete
- Under
Actions, click the corresponding trash can button for a type’s
row.
- The Delete pop-up appears. Select Delete to
confirm deleting the Membership Type, or X Close / Cancel
to keep it.
Plan Tab
- The Plan
tab contains the list of membership types in table format – with columns for Date,
Name, Type, Tax Exemption, Allowance, Allowance
Period and the Action column with options for Edit and Delete.
- Also, the + Membership Plan
button appears at the upper-right.
Creating
a New Membership Plan
- Click
the + Membership Plan button at the upper-right. The New Membership Plan pane appears:
- Name – (Mandatory) Enter the
name of the plan, with a limit of 25 characters.
- Type – (Mandatory) Select the
type of plan (from the list of entered and saved Types) from the dropdown. All
the entered and saved types from the previous tabs will be shown. New types can
be created in the Type tab.
- Allowance – Enter the value for the
new membership plan. Numbers only allowed.
- Allowance Period – Select a period (Monthly, Quarterly, etc.) from the dropdown.
- Monthly Allowance Period – The membership plan’s allowance period will be monthly and the allowance amount will be charged monthly.
- Quarterly Allowance Period – The membership plan’s allowance period will be quarterly and the allowance amount will be charges quarterly.
- Half-Yearly Allowance Period – The membership plan’s allowance period will be for 6 months and the allowance amount wil be charged every 6 months.
- Yearly Allowance Period – (Default) The membership plan’s allowance period will be yearly and the allowance amount wil be charged for a year. It’s set automatically in application settings.
- Tax Exemption Toggle – Upon enabling, the tax exemption will be included for the membership plan. When disabled , there will be no tax exemption.
- Allowance Overdraft – The additional or extra amount more than the allowance amount can be used for the respective membership plan. Only numbers can be entered and no limits of digits in this field.
- When ready and all mandatory fields are filled in, click Save at the bottom-right. The Save button will be disabled (greyed out) until all mandatory fields are filled-in.
Actions
- Edit
- Under
Actions, click the corresponding Edit (pencil) button for
a plan’s row.
- The
Update Membership Plan pane appears. The Update button at the
bottom-right will be disabled by default, until the Name, Type,
and Allowance Period fields are filled in and any updates to field values
are made. Click X Close / Cancel to keep the Plan as-is.
- After
clicking Update, you’re returned to the main Memberships page
with the Type tab, and the ‘Membership Type Updated Successfully’
banner appears.
- Delete
- Under Actions, click the corresponding trash can button for a Plan’s row.
- The Delete pop-up appears. Select Delete to confirm deleting the Membership Type, or X Close / Cancel to keep it. If deleted, you’re returned to the main Memberships page with the plan's row removed.
Note: If the Membership Plan is attached to an item, deleting it will not be allowed, with an alert message appearing.
Account Tab
- The Account tab displays a table of Customers with a Membership account on file.
- Also, the + Membership Account button appears at the upper-right.
Creating a new Membership Account
- Click the + Membership Account button at the upper-right. The New Membership Account pane appears:
- Customer – (Mandatory) Select from the list of added customers in the dropdown.
- Membership Plan – (Mandatory) Select from the list of added plans in the dropdown.
- Card Number – Enter the membership account’s card number. Letters and numbers are allowed, but it cannot exceed 25 characters nor be identical to an existing number.
- Description – Enter any needed additional information for the new Account.
- Issue Date – Select the issue date of the membership account from Date picker which will be enabled after selecting the Membership Plan and window will be closed after selecting.
- Expiry Date – The date will auto-populate based on the Membership Plan selection, and can't be edited.
- Examples: If
it's a monthly plan, the Expiry Date will populate as the ending date of the same month as the Issue Date. If it's a yearly plan, the Expiry Date will populate as the end date of the same year as the Issue Date.
- Balance Account – The balance amount set for the respective membership plan will be shown in the dropdown. Field cannot be edited here.
- Add Members – (Mandatory) Select one or more members from the dropdown.
- Note: If the customer already has a membership account within the store, a new account can’t be created and the following alert message appears: ‘Add member [Member Name] already has a membership account in store level’ and the window will close.
- After filling in all mandatory fields and all other needed fields, click Save.
Actions
- Edit
- Select the corresponding pencil icon of a customer's row. The Update Membership Account pane appears.
- Update the Account's information as needed (see the above Creating a new Membership Account section for more information).
- Once information in any field has been updated (and all mandatory fields are still filled in), select Update at the bottom-right.
- Once updated, you're returned to the Account tab on the Memberships page, and the 'Membership Account Update Successfully' confirmation banner appears at the upper-right.
- Delete
- Select the corresponding trash can icon of a customer's row. The Delete pop-up appears.
- To confirm deleting of the Account, click Delete.
- You're returned to the Account tab within the Memberships page, with the Account being removed and the 'Membership Account Removed Successfully' banner appearing at the upper-right of the page.
- Click Cancel / X Close to keep the Account when returning to the tab and page.
Related Articles
Retail Back Office: Enterprise - Customers
Navigation: Sign into the Back Office. On the left-side Navigation Panel, select Enterprise then Customers. When selected, the existing Customers’ details will be shown as a table with the following columns: Image, Name, E-Mail, Phone Number, Loyalty ...Retail Back Office: Enterprise - Customers
Navigation: Sign into the Back Office. On the left-side Navigation Panel, select Enterprise then Customers. When selected, the existing Customers’ details will be shown as a table with the following columns: Image, Name, E-Mail, Phone Number, Loyalty ...Back Office: Enterprise - Reports
Sign into the Back Office. On the left-side Navigation Panel, click Enterprise. Then click Enterprise Reports. Under Enterprise Reports are options to access specific reporting Dashboards: Enterprise Reports Sale Report The Sale Report dashboard ...Back Office: Enterprise Settings - Addons
Sign into the Back Office. On the left-side Navigation Panel, click Enterprise. Then click Settings. On the Settings page, under Addons: Loyalty Loyalty Settings Select whether to Enable Loyalty. If Yes: Select the Loyalty Currency (Stars ...Retail Back Office: Enterprise - Reports
Navigation: Sign into the Back Office. On the left-side Navigation Panel, click Enterprise. Select Enterprise Reports, and the dropdown contains options to access specific reporting Dashboards: Enterprise Reports Sale Report The Sale Report dashboard ...