Back Office: Label Template Settings
Navigation: Sign
into the Back Office and select a Store. On
the left side, select Settings. On the Settings page, under Printer Templates select Label Templates.
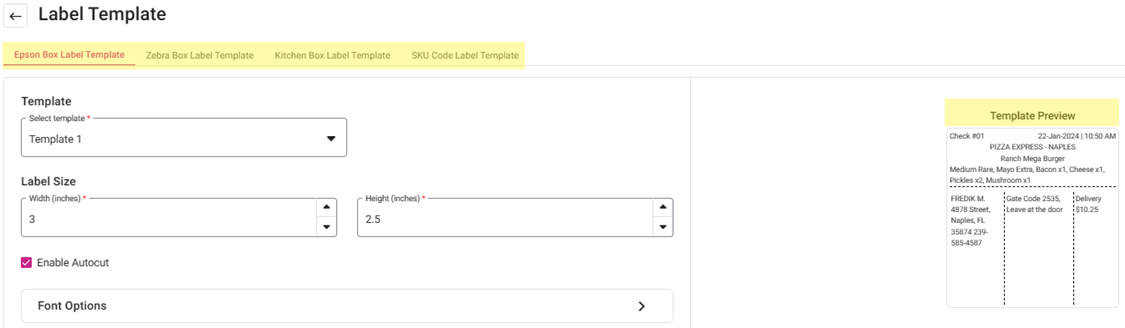
The Label Template screen contains template options as tabs, along with a Template Preview. Any selected options within the Templates will immediately appear on the corresponding Preview (without having to save first).
Epson Box Label Template
Zebra Box Label Template
Kitchen Label Template
SKU Code Label Template
Epson Box Label Template
- Select the Template from the dropdown (1, 2, or 3).
- Select the Label Size (Width and Height [inches]).
- Select whether to Enable Autocut.
- Click Font Options to reveal the font customization options.
2 width – Extra Space Between Values
Emphasis – Bolds the text
Elite – Smaller text - Check & Date – Select one of Normal, 2 width, Emphasis, Elite.
- Menu Item Name – Select one of Normal, 2 width, Emphasis.
- Customer Info – Normal is the only option.
- Business Name – Select one of Normal, 2 width, Emphasis, Elite.
- Modifiers – Select one of Normal, 2 width, Emphasis.
- When finished, click Save.
Zebra Box Label Template
Zebra Box Label Template
- Select the Template from the dropdown (1, 2, or 3).
- Select the Label Size (Width and Height [inches]).
- Select whether to Enable Autocut.
- Click Check Details to configure how the Check will appear on the Label.
- Select Fields - Click any of the following check boxes to display them on the label: Business Name, Check Number, Date & Time, Menu Item Number, Server Name, Order Type, Pay Status.
- Dash Dividers - Select where to insert a line divider made up of dashes (-): Check Details, Order Type & Pay Status.
- Font Options - Select from the dropdowns for how you want the text to appear (Options are: Small, Small-Bold, Normal, Normal-Bold, Large, Large-Bold):
- Business Name (example of Large size)
- Order Type & Pay Status (example of Small-Bold size)
- Check Details (example of Normal size)
- Click Menu Item Info to configure how the Menu Items will appear on the label.
- Click any of the following check boxes to display them on the label: Menu Item Name, Menu Item Serving Size, Modifiers, Item Notes.
- Select from the dropdowns for how you want the text to appear: Item Name & Serving Size, Modifiers & Notes.
- Options are: Small, Small-Bold, Normal, Normal-Bold, Large, Large-Bold.
- Click the Bottom Divider check box to establish a dotted line below the Menu Items.
- Click Customer Info to configure how the Customer’s Info will appear on the label.
- Select the checkboxes of what info you would like to display: Customer Name, Customer Address, Delivery Notes, and Phone Number.
- Click the Right Divider checkbox to establish a dotted line below the Customer Info section.
- Select the Font Options (size and thickness) for Customer Name and Customer Details.
- Click Order Summary to configure how the Order charges will appear on the label.
- Select the checkboxes of what info you would like to display: Sub Total, Discounts, Delivery Fee, Tax, Tip, Total, and Balance Due.
- Select the Font Options for Order Summary and Balance Due.
- When finished, click Save.
Kitchen Label Template
- Enter the value of the Width and Height of the label (in inches) or use ▼/▲ to increase/decrease the value.
- Click the Enable Autocut checkbox to automatically cut the paper after printing the receipt.
- Click Check Details.
- Select the checkboxes of what info you would like to display on the label: Date & Time, Order Number, Order Type, Sale Number, and Customer Name.
- Dash Dividers - Click the Bottom Divider checkbox to separate the Check Details section.
- Font Options - Select from the Check Details dropdown how you want the info text to be displayed.
- Click Menu Item Info.
- Select the Font Options for Item Name and Modifiers (how you want the text to be displayed).
- Click the Menu Item Name Bottom Divider checkbox to separate the Menu Item and Modifiers.
- When finished, click Save.
SKU Code Label Template
- Select the type of Template (Inventory Label or Shelf Label).
- Enter the value of the Width and Height of the label (in inches), or use ▼/▲.
- Click Check Details.
- Select whether to include the Store Name and SKU Number.
- Note: Item Name, Price and Barcode are locked to always appearing.
- Select the Font Options of how you want the Check Details fields to appear: Store Name, SKU Number, Item Name, Barcode, and Price.
- When finished, click Save.
Related Articles
Retail Back Office: Label Template Settings
Navigation: Log into the Back Office for your Retail Store. On the left-side Navigation Panel, click Settings. On the Settings page, under Printer Templates, select Label Templates. The Label Template screen allows you to customize what prints on ...Back Office: Third Party Integrations Settings
Navigation: Sign into the Back Office. On the left-side click Settings. On the Settings page, under Integrations, click Third Party Integrations. The Third Party Integrations page displays all integrations available for the Store - such as Urban ...Retail POS: Printer Hardware Settings
Back Office For more information on Printer and Receipt Template settings, see the following Knowledge Articles: Receipt Printers Front End Receipt Template Label Template POS On the Hardware Settings page, select the Printer Settings tab. It ...POS: Operation - Printer Hardware Settings
Back Office For more information on Printer and Receipt Template settings, see the following Knowledge Articles: Receipt Printers Kitchen Printers Kitchen Receipt Template Assigning a Kitchen Printer to a Menu Item Navigation: Log into BO, select a ...Back Office: Label Printer Hardware Settings
Sign into the Back Office. On the left-side Navigation Panel, click Settings. On the Settings page, under Hardware click Label Printers. The Label Printers page appears. To add a new Label Printer, click + New Label Printer (or to edit an existing ...