Back Office: Products/Items - Discounts (Mix-and-Match)
Navigation: Log into the Back Office of your Store, then select Products/Items > Discounts.
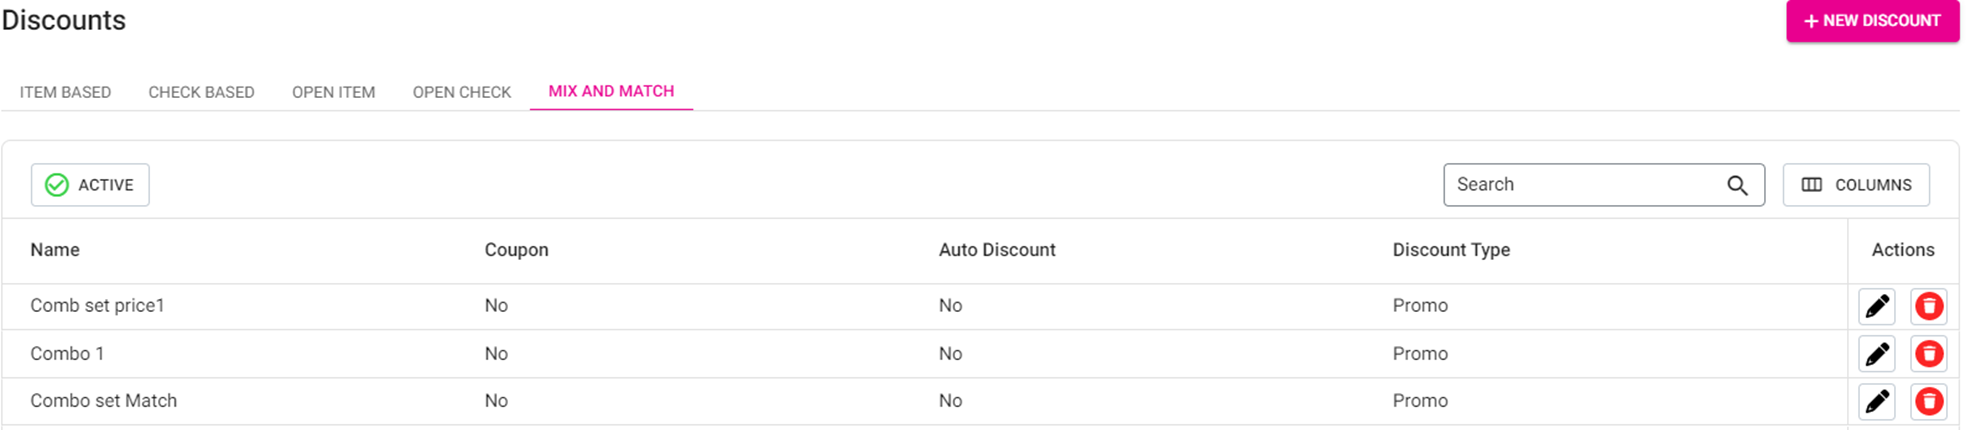
On the Discounts page, select the Mix and Match tab. It displays a table with the current Mix and Match Discounts with the columns Name, whether it a Coupon is involved, whether it's an Auto Discount, and then the Discount Type. For Actions, you can Edit or Delete.
- If there currently are no Mix and Match Discounts, the message 'No Discounts found' appears.
Create (or Edit) a Mix and Match Discount
- On the Discounts page, select the Mix and Match tab, then click + New Discount. You’re taken to the Mix and Match page.
- POS Display Button
- Click the small colorized square next to the large one. The Standard Colors pane appears. Select the Standard Color and use the slider to adjust the shade.
- Click the Upload New Image button. Navigate to the image you want to use to represent the Discount, then either double-click the file or click and click Open.
- jpg or .png
- Maximum of 2 MB
- 400x400 resolution
- The uploaded image will have the Discount’s Name at the bottom.
- Enter the Name, Priority (typically 1), whether to Apply Before or After Tax. Select whether Combo Discounts apply. If Yes, a number of Discount Settings farther down will be removed and the Combo Discounts section will appear below the Discount Rate section. Enter a Description of the Combo Discount if necessary.
- Select whether to Combine With Other Discount. If Yes, then Apply For Discounted Price appears and is enabled.
- Select a Discount Type (Promo, Comp, Donation or Loyalty Discount).
- If Combo Discounts was set to Yes, then only the Combine With Other Discount selection will appear).
- If Loyalty Discount is selected, then the range of below options is limited).
- Select whether this is an Employee Discount (if Yes, then only the Include Additional Modifiers will be left to select.
- Select whether this Discount is Coupon Only. If Yes, then enter the Coupon Code (letters and numbers only).
- Select whether this is an Auto Discount.
- Select whether to Include Additional Modifiers.
- Select whether to Combine With Other Discount. If Yes, then Apply For Discounted Price appears and is automatically enabled (Yes).
- Select whether there is a requirement to Attach a Customer to enable the Discount.
- Select a Membership Plan (if applicable).
- Select the Categories and Menu Items.
- Select the Discount Rate Type:
- Set Price – Enter the Amount.
- Percentage – Enter the Percentage (%). Type the amount or click ▲ or ▼ to adjust by 1.
Combo Discount
- If there’s a Combo Discount (Yes was selected for Combo Discounts at the top of the page), click + Add Match. The Add Combo Discount pane appears.
- Enter the Name and Quantity.
- Select the Level Type (Category, Sub Category or Menu Item).
- Category – Select the Category from the dropdown. Select whether the Discount applies to All Serving Sizes in the Category, and if No then select the Serving Size(s) from the dropdown. If necessary, select the Menu Items to Exclude and whether to Include any Modifier Price.
- Sub Category – Select the Sub Category from the dropdown. Select whether the Discount applies to All Serving Sizes in the selected Sub Category, and if No then select the Serving Size(s) from the dropdown. If necessary, select the Menu Items to Exclude and whether to Include any Modifier Price.
- Menu Item – Select the Menu Item from the dropdown. Select whether the Discount applies to All Serving Sizes for the selected Menu Item, and if No then select the Serving Size(s) from the dropdown. If necessary, whether to Include any Modifier Price.
- Click Save. The Discount will be created and appear in the Combo Discount table. Under Actions, click the Pencil to Edit the Combo Discount or the Trash Can to Delete it.
- Select the Availability
- Always – Discount will be available at all times.
- Days Of Week – Select the Days the Discount applies. If there’s any times during those days to Restrict the Discount, then select Yes for Restriction Time and enter the Start and End Times the Discount is unavailable.
- Days Of Month – Select the Days of each Month the Discount will be available. If there’s any months you don’t want the Discount to be available, select Yes for Restriction Months then select the months you want the Discount to be unavailable. If there’s any times during those month’s days to Restrict the Discount, then select Yes for Restriction Time and enter the Start and End Times the Discount is unavailable.
- Date Range – Enter the Start and End Dates. If there are any days during that range to Restrict the Discount, then select Yes for Restriction Days and select the Days the Discount is unavailable. If there’s any times during that range to Restrict the Discount, then select Yes for Restriction Time and enter the Start and End Times the Discount is unavailable.
- Specific Date – Enter the single date the Discount will be available. If there’s any time during that to Restrict the Discount, then select Yes for Restriction Time and enter the Start and End Times the Discount is unavailable.
- Date Range with Time – Enter the Start and End Dates followed by the Start and End Times. If there are any days during that Range to Restrict the Discount, then select Yes for Restriction Days and select the Days the Discount is unavailable.
- Select the Visibility – Choose whether to Restrict Visibility by Role. If Yes, select the Roles that are eligible for this Discount. Click Show All to view all the Role options.
- When the Discount is ready, click Save and Publish. The Mix and Match Discount is set up, and you’re returned to the main Discounts screen.
Related Articles
Retail Back Office: Products/Items - Discounts (Mix and Match)
Navigation: Log into the Back Office of your Retail Store, then select Products/Items > Discounts. On the Discounts page, select the Mix and Match tab. It displays a table with the current Mix and Match Discounts with the columns Name, whether it a ...POS: Check Options - Mix And Match Discount
Background in Back Office On the Products/Items > Discounts page, ensure you're on the Mix And Match tab (should be the right-most option). See the Mix and Match Discount KB Article. POS Screen When a Mix And Match Discount is applied:Back Office: Products/Items - Discounts (Open Item)
Sign into the Back Office. On the left-side Navigation Panel, click Products/Items then click Discounts. Open Item Discount On the Discounts page, select the Open Item tab. On the Open Item page, click Edit. Tip: You can Activate or Deactivate the ...Back Office: Products/Items - Discounts (Open Check)
Sign into the Back Office and select a Store. On the left-side Navigation Panel, click Products/Items then click Discounts. On the Discounts page, select the Open Item tab. On the Open Item page, click Edit. Tip: You can Activate or Deactivate the ...Back Office: Products/Items - Discounts (Check-Based)
Sign into the Back Office and select a Store. On the left-side Navigation Panel, click Products/Items then click Discounts. On the Discounts page, select the Check Based tab, then click + New Discount. You’re taken to the Check Based page. Tip: You ...