Back Office: Products/Items - Taxes
Navigation: Sign
into the Back Office. On
the left-side, select Products/Items then Taxes.
The Taxes screen that appears displays a table containing all currently existing Taxes within the Store, with the following columns:
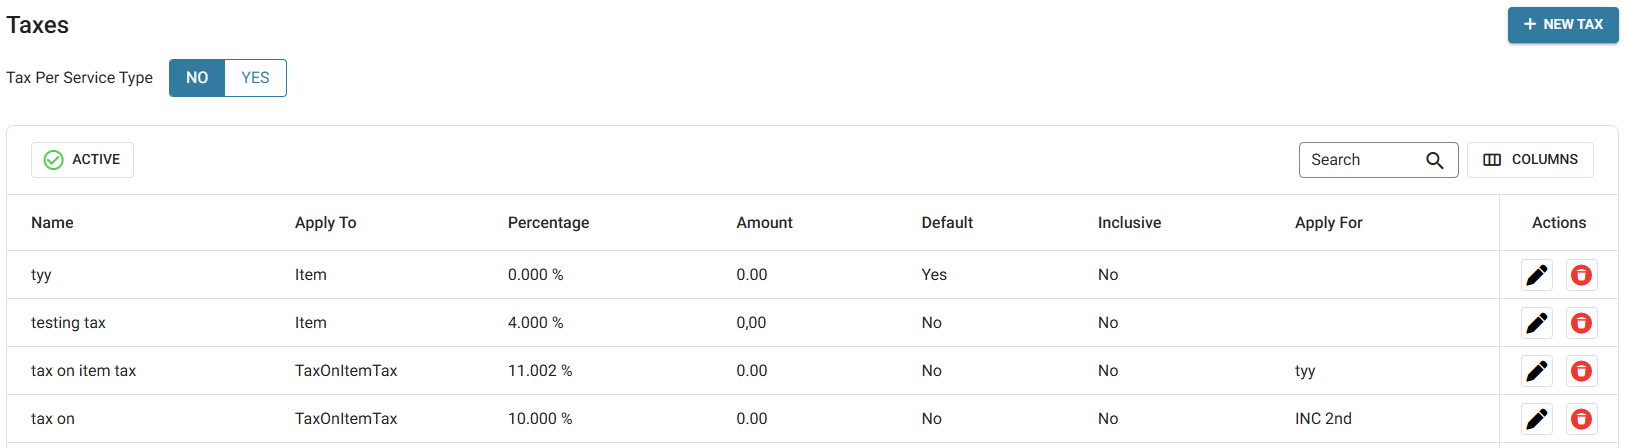
- Name - The name of the tax.
- Apply To - Where the tax is applied during a transaction.
- Percentage - (if applied by percentage) the portion of the item's value applied as tax.
- Amount - (if applied by amount) the amount applied as tax.
- If the Tax Per Service Type toggle is enabled (set to YES) the following columns are displayed:
- Type - specifies Amount or Percentage
- Value - specifies how the Tax is applied, broken down by Service Type
- Default - Whether the tax is applied to any transaction by default.
- Inclusive - Whether the tax is inclusive.
- Apply For - If applicable, what other tax where this tax is applied.
Create or Update a Tax
- Click + New Tax (or the corresponding pencil icon to update an existing Tax).
- On the New/Update Tax screen:
- Enter the Name (Mandatory) and any applicable Code.
- Select the Tax Type:
- Note: Once a Tax has already been saved, the Tax Type can't be updated.
- Amount – Enter the Amount ($) (Note: this can only be applied to an Item).
- Percentage – Enter the Percentage (%) (Note: this can be applied to any option).
- Select whether to Include the Tax in the Daily Summary Report.
- If the Tax Type is Percentage, select which type to Apply To:
- Item
- Select whether it is Inclusive.
- Select whether it is the Default Tax.
- Select whether it is Quantity Based. If Yes, click + Add Percentage then enter the Quantity thresholds and corresponding Percentage. (Note: Quantity Based negates the Inclusive option).
- Check
- Enter the Check Amount ($).
- Enter whether to Apply On Subtotal.
- Tax On Item Tax
- Select the applicable Item(s) (Click Show All to expand the options).
- Tax On Check Tax
- Select which option to Apply.
- When finished, click Save (or Update) at the upper-right.
- You're returned to the main Taxes page, where the confirmation appears at the upper-right. If a Tax was created, it will be added as a row in the table.
Deleting
An Existing Tax
- Identify the Tax to be deleted (deactivated). Under the Actions column, click the corresponding Trash Can icon.
- On the Delete pop-up that appears, click Delete to confirm.
- If you’d like to keep the Tax as Active, click Cancel or X Close.
- The Tax will be deactivated (removed from the Active status table) and the confirmation banner appears at the upper-right.
Related Articles
Retail Back Office: Products/Items - Taxes
Navigation: Log into the BO for your Store, then select Product/Items > Taxes The Taxes page displays all the Taxes that are created in Products/Items will appear here in table view. Tax refers to a charge placed on the Order based on the Retail ...Back Office: Products/Items - Products/Items
Navigation: Sign into the Back Office for your Store. On the left-side, select Products/Items then Products/Items. The Products/Items page displays all established Menu Items or Retail Items under the Store. Create or Update an Item To create a new ...Retail Back Office: Products/Items - Products/Items
Navigation: Log into the BO for your Store, then select Product/Items > Product/Items The Products/Items page appears, which displays a table for Retail Items. Create a New Retail Item (or Update an Existing Retail Item) Click + New Retail Item at ...Back Office: Products/Items - Gratuities
Navigation: Sign into the Back Office and select a Store. On the left-side, click Products/Items then click Gratuities. The Gratuities page displays all Gratuities currently existing under the Store. Create Or Update A Gratuity Click + New Gratuity ...Back Office: Products/Items - Modifiers
Navigation: Sign into the Back Office. On the left-side, select Products/Items then Modifiers. The Modifiers page displays all established Modifiers under the Store. Create or Update a Modifier Create a new Modifier by clicking + New Modifier at the ...