Back Office: Store Inventory Settings
Navigation: Sign into the Back Office for your Store. On the left side, click Settings. On the Settings page, under Inventory, select Store Inventory.
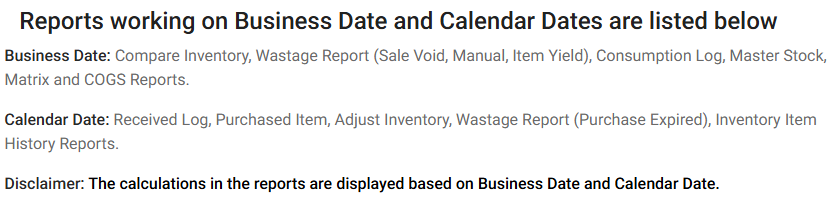
On the Store Inventory screen: at the top is a listing of the reports utilizing the Business
Date and Calendar Date.
Further down are options to customize your store's inventory settings:
- Business Date – Select the Date (calendar view) when Inventory Business Date reports and operations will run.
- Impact in Cost Price Changes in Retail Item – Select how the items will be impacted, either Selling Price or Markup Percentage.
- Selling Price – Makes changes to selling prices.
- Markup Percentage - Makes changes to percentages.
- Email Summary Alert – If Enabled (YES), a low stock notification will be sent to the entered Email Address(es). To add multiple Addresses, put a comma (,) between them.
- If Disabled (NO), no low stock notification will be sent.
- Vendor's CC – If Enabled (YES), a vendor copy of the low stock notification will be sent to the entered Email Address(es). To add multiple Addresses, put a comma (,) between them.
- If Disabled (NO), no notification will be sent.
- Enable Summary Alert - If Enabled (YES), a summary notification will be sent to the entered Email Address(es). To add multiple Addresses, put a comma (,) between them.
- Enabled Stock Expired Alert – If Enabled (YES), you’ll be alerted when the Store's stock is close to expiration.
- If Disabled (NO), there will be no low stock alert.
- Auto Remove Expired Stock – If Enabled (YES), any of the Store's expired stock will be removed automatically.
- If Disabled (NO), it will not be auto-removed.
- To save any updates to the Store Inventory settings, click Update at the upper-right. A spinning circle animation will appear in the middle of the screen for a moment, then once complete the confirmation banner appears at the upper-right.
Related Articles
Retail Back Office: Store Inventory Settings
Navigation: Sign into the Back Office for your Retail Store. Click Settings, then on the Settings page under Inventory select Store Inventory. The Store Inventory screen displays settings for the store's inventory tracking and notifications. At the ...Back Office: Inventory Taxes Settings
Navigation: Sign into the Back Office for your Store. On the left side, click Settings. On the Settings page, under Inventory, select Taxes. On the Taxes screen: Enable Taxes Toggle – If Enabled (YES), the ‘Taxes Enabled Successfully’ banner appears ...Retail Back Office: Matrix Report Inventory Settings
Navigation: Sign into the Back Office for your Retail Store. Click Settings, then on the Settings page under Inventory select Matrix Report Settings. On the Matrix Report screen: Profit Threshold Amount – (Mandatory) Enter the threshold value Amount ...Back Office: Matrix Report Inventory Settings
Navigation: Sign into the Back Office for your Store. On the left side, click Settings. On the Settings page, under Inventory, select Matrix Report Settings. On the Matrix Report screen that appears: Profit Threshold Amount – (Mandatory) Enter the ...Back Office: Enterprise Settings - Central Inventory
Sign into the Back Office. On the left-side Navigation Panel, click Enterprise. Then click Settings. On the Settings page, under Central Inventory, select Inventory Costing. The Inventory Costing page appears. The Inventory Costing page has options ...