How to Select Menu Item Options
LingaPOS App>Login>POS
o Key in your 4 digit PIN number configured in the Back Office
o
Press the  button

o Add a Menu Item or Retail Item to the Order screen by clicking on the item

o Click on the item in the Order screen to bring up the Menu Options
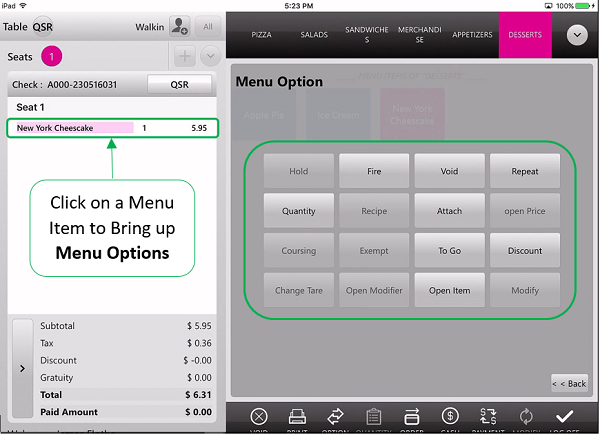
o Some of the options you have available include:
§ Fire – Sends the item immediately to the kitchen printer
§ Void – Removes the item from the Order screen
§ Repeat – Adds one more of the same item to the Order screen
§ Quantity – Allows you to quickly change the quantity of the item
§ Attach – Can attach preconfigured or free form messages to the item for the kitchen to see
§ To Go – Designates the item as To Go
§ Discount – Brings up any applicable discounts that were configured in the back office
§ Open Item – Allows you to add an open menu or retail item where you choose the Coursing, Name, and Price
Related Articles
Including Available Time for Category / Subcategory / Menu & Retail Item
Introduction: This document explains about including available time option for category, subcategory, menu item & retail item Requirement: Provision in back office to set available time for menu item so that it can be made available in the mentioned ...Creating a Retail Item
Select “Retail Item” in the Products and Items tab Fill in all the required information about the item Insert the Item Name Insert the Level of the Item Fill in the Sku Code Fill out the Price/Cost for Item Next fill out the Inventory Details ...Inventory Menu Items
Linking a Menu Item to Inventory: “Inventory”, “Inventory Menu Items”, and select the arrow under controls Select Each Select Inventory Item, Sub Recipe, or Manual Entry, depending on how you would like the item set up After adding items select ...Open Item on the iPad
- From the Order Screen tap on Options - Tap on Open Item o Select Coursing o Item Name o Price o Tax o Printer, if necessary - Tap Done and the item will now appear on the checkHow to Select Order Options
LingaPOS App>Login>POS o Key in your 4 digit PIN number configured in the Back Office o Press the button o Add a Menu Item or Retail Item to the Order screen by clicking on the item o Click on the button on the bottom Navigation Menu to ...