July 16th, 2025 - Stock App Revamp
Introduction
Stock apps are primarily used for business transactions on a global scale, spanning multiple locations. Manually entering, tracking, and counting inventory has become nearly impossible by today’s industry standards, and relying solely on desktop computers for inventory management, control, and tracking is no longer feasible.
The Stock app allows for inventory data entry, searching, and visualization from any location - at any time - using smartphones and tablets.
Key features of the Linga Stock app include:
- Viewing inventory stock through barcode scanning or manual barcode entry.
- Adjusting inventory stock levels.
- Verifying and adjusting vendor-specific inventory items.
Getting Started
Download the Stock
app for both Android and iOS via the LINGA POS® App
Store. To view or update stock
inventory items, the device must be connected to a network.
Prerequisite
Log in to BO, then select Inventory > Adjust
Inventory Reasons. This will make the Adjustment Reasons
available in the Stock app when editing items, allowing you to select a Reason
for the adjustment.
Signing In
- Upon launching the app, the splash screen will appear, followed by the Welcome screen.
- After tapping Get Started on the Welcome screen, you are taken to the Login screen. The app requires the device to be connected to the internet.
- Enter the Email and Password then tap Login. You are taken to the Home screen.
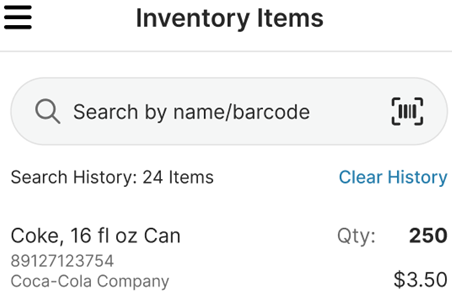
Home Screen
The Home screen appears, with a Search bar and two options: Barcode (Manual and using camera) or Name.
Barcode Search
Search an item with barcode - enter manually or search by camera.
- Scan an inventory item using any input reader scanner (external device for capturing barcode data).
- You can also search for an inventory item by manually entering the barcode.
- If an item is not found during a search, the message ‘Item barcode not found!’ appears at the bottom.
- The item can also be scanned using the device's camera or via the barcode scanner on your device.
- Example: scanning with the flash off and the flash on.
- If the item is not found in the database: the message ‘Scanned item no found [barcode number] item is not in the database’ will appear, with the OK button.
Name Search
You can search for an item by its Name.
- The search results will display all items that match the characters entered in the Search bar.
- The search will begin after three characters are entered in the search bar.
- If the item is not found when searching, the message ‘Item Name not found!’ appears at the bottom.
- You cannot search for an inventory item by entering the Name of a Menu Item.
- You can search only the inventory item and cannot search the Sub Recipe.
Edit/Update Items
- When the entered barcode is valid, the inventory item(s) will appear.
- Select an item, the Item Details screen appears – to edit/update. Select the Vendor Name.
- The Vendor Name will be displayed along with Brand Name.
- Example: If the Product Name is standard and the Vendor Name is Coca-Cola Company. When the Brand Name is empty, then the Vendor Name will be displayed as Coca-Cola Company.
- Select the Reason from the dropdown list of Adjustment Reason options created in Back Office.
- Following fields are editable, and can be changed accordingly:
- Product Name: The product name can be changed as needed.
- Vendor Name: This is a dropdown field that allows selection from a predefined vendor list.
- If the vendor changes, then the quantity, price per unit and price must be updated accordingly based on the selected vendor.
- Brand Name: The brand name can be edited if required.
- Quantity: Can modify the quantity.
- Reason: A reason must be selected when modifying any quantity. This is a mandatory field with the following dropdown options: Increase, Decrease, and Adjustment.
- The following are non-editable (fixed value read-only) fields: Price Per Unit and Price.
- Once all changes are made, click Save to save the changes to be reflected on the Inventory Item. The Item Saved message appears at the bottom.
- If Cancel is clicked, it will redirect to the Item Detail screen.
Clear Search History
Click Clear History,
the confirmation message ‘Are you sure you want to clean all your search
history?’ appears. Click Yes to clear the history.
Delete Items
Swipe right on any item, and the
red button with a trash can icon  appears. Click the icon
to delete the Inventory Item.
appears. Click the icon
to delete the Inventory Item.
Notes
- Changes to the Inventory Item like vendor, quantity or deletion will be reflected in the Back Office.
- Changes in the Back Office to an Inventory Item like vendor, quantity or deletion will be reflected in Stock.
Log Out
Click Logout, the Log
Out pop-up with the message ‘Are you sure you want to log out?’
appears. Click Yes, and you will be signed out from the Stock
application.
Related Articles
August 20th, 2025 - Stock App Revamp Improvements
Stock App – 3.3.4 Stock App Revamp The revamped Linga Stock App introduces a streamlined experience with enhanced barcode and name-based inventory search, complete with improved error handling. Users can now edit items with vendor-specific ...July 8th, 2025 - Release Notes
Release Notes – LINGA POS Versions: POS: 6.1.20 iPad: 5.3(2.14) What’s New POS Linga GO New Model - (see attached doc) Evertec payment integration implemented with new model Verifone V660P. Tips Calculation (Apply Tip for Subtotal / Total) - (see ...Back Office: Inventory - Low Stock
Navigation: Sign into the Back Office then select a Store. On the left-side, select Inventory then Low Stock. The Low Stock page appears, which is broken down into Inventory (default view) and Sub Recipe tabs. It will show all the inventory items/sub ...July 30, 2024 - Release Notes
Cash Tip Declare Screen – Cash Tip Declare screen implementation in Web POS. When the Cash Tip toggle is enabled in BO while creating or editing a user, the Cash Tip Declare Screen will be displayed in the POS when the user clocks out. Split Payment ...Retail Back Office: Inventory - Low Stock
Navigation: Sign into the Back Office for your Retail Store, then select Inventory > Low Stock. The Low Stock page appears with the Item tab. The system will automatically sort all the Low Stock Items by Vendors in table format. The name of the ...