Order Connect - Online Ordering Setup Guide
Introduction
This guide explains how to configure Online Ordering to ensure Stores can be properly integrated with Order Connect. It covers Account Setup, Store Setup, and Ordering Hours.
Subscription Plans
Online Ordering's availability is based on your plan:
- Online Ordering is included with the following plans at no additional cost
- Single Store
- Multi Store
- Online Ordering must be purchased as an add-on for the following plans:
- Basic
- Core
- Pro
- Enterprise
- Linga One
After a Subscription is selected, the Online Ordering option will be available in Back Office.
Initial Online Ordering Setup
Step 1 - Sign In
Sign in to the Back Office.
Step 2 - Configure Store Location
Navigation: Select Settings > Store Information > Location
Enter the store address and location details. The system uses the location to obtain Latitude and Longitude. These details are required for the store to appear on the Online Ordering website.
Step 3 - Enable Online Orders
Navigation: Settings > Account License Setting
- Identify the Store you'd like to enable Online Ordering.
- Enable Online Orders toggle.
- Click Save at the upper-right.
Step 4 - Open Online Ordering
Navigation: Select Stores > Online Ordering
Two sections for Settings are available: Account and Stores
Account Settings
Select Account to configure settings for the entire account. The available sections are: General, Order, Check Out, Theme, and Links.
General
Configure:
- Account Name - (Mandatory) Defaults to the store name. There is a maximum of 25 characters with only letters and numbers allowed.
- Language - Select the required language from the drop-down. Languages uploaded through the Admin page will be available.
- Store Logo - Upload an image file of your logo that will appear when Online Ordering (.jpg or.png file, up to 2mb, 400px by 400px [recommended])
- Banner Background - Upload an image file that will appear as a background banner when Online Ordering (.jpg or.png file, up to 2mb, 1300px by 280px [recommended])
- Web URL - The URL of your Store's Online Ordering webpage
- Store Display Limit Distance - Select an option that will represent the radius from the customer's location where your available Stores will appear.
Store Settings
Select Stores to view all stores under
the account. To view the Settings for a specific Store, identify the Store the under Actions column click the three dots icon followed by Settings.
On a Store's Settings page, see the following sections: General, Ordering Hours, and Order Settings
General
- Store Name - (Mandatory, defaults to the existing Store Name) There is a maximum of 25 characters, with only numbers and letters allowed.
- Phone Number - (Mandatory) The Store's contact phone number, with numbers only.
- Store URL - The store's Online Ordering URL.
- Description - Enter any additional information about your Store you'd like to provide, then check the box if you'd like for it to appear on the banner.
- Store Logo - Upload an image file of the Store's logo that will appear when Online Ordering (.jpg or.png file, up to 2mb, 400px by 400px [recommended]). The existing image can be deleted.
- Banner Background - Upload an image file of the banner image that will appear when Online Ordering (.jpg or.png file, up to 2mb, 1300px by 280px [recommended]). The existing image can be deleted.
- Store Address - This is taken from the Store Location Settings and cannot be edited here.
- To update it: navigate to the Store's Back Office and select Settings > Store Information. Under the Location section: confirm the address including Street, City, State, Zip and update as needed. Click GET MY LOCATION on the map to the right to show the entered location on the map.
Ordering Hours
Select the Time Zone from the dropdown.
Configure operating hours for the following services - Store Time, Delivery Time, and Pickup Time. Select a tab to adjust the Days and Hours of operation.
- Each tab contains a row representing each day of the week followed by corresponding From and To times and whether the Store is Open or Closed (times will be greyed out) during that time. Click the plus (+) sign to add a Time Period during that same day.
Holiday Hours
To configure any Holiday operation hours for your Store: set the Holiday Hours toggle to YES then:
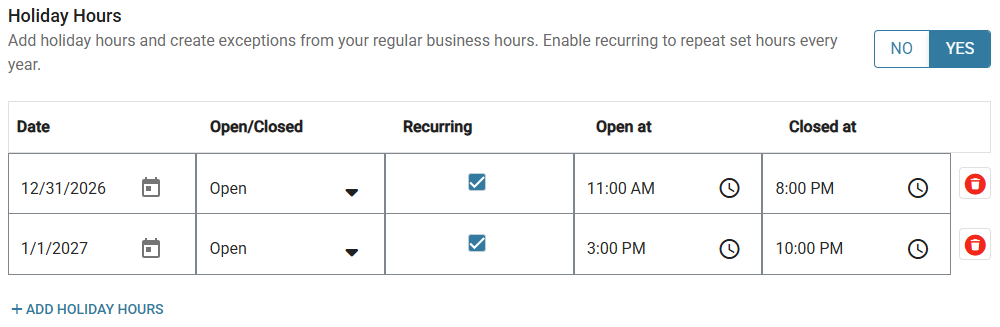
- Specify the Date by selecting it (calendar view)
- Specify whether the store will be Open/Closed on the selected Date by selecting from the dropdown
- Whether it's recurring every year by selecting (Yes) or de-selecting (No) the checkbox
- If the Store is Open on this Date, set the times the store will Open at and be Closed at
- To add a new Date for Holiday Hours, click + ADD HOLIDAY HOURS below the table and fill in the fields as above
- To remove an existing Date: click the corresponding red trash can icon to the right of the Date's row
Order Settings
Configure the following options:
- Enable Delivery - Select whether delivery service is available. If YES, then Delivery will be available from this store. Set a Min Spent Amount (optional) to set a mandatory minimum (in set currency) for deliveries.
- Enable Pickup - Select whether pickup service is available. If YES, then pickup will be available from this Store.