Products/Items - Products/Items - Menu Items
Products/Items>Products/Items>Menu Item
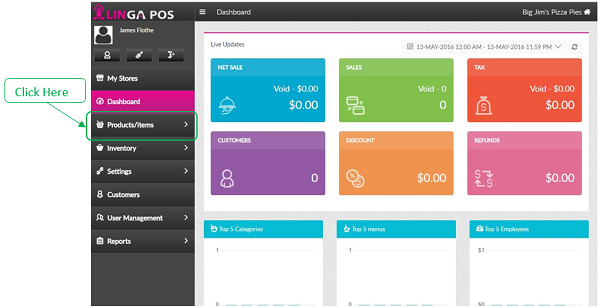
o Sign into the LingaPOS back office online at mystore.lingapos.com
o Click on the Products/Items tab on the Navigation Panel
o Click on the Products/Items tab
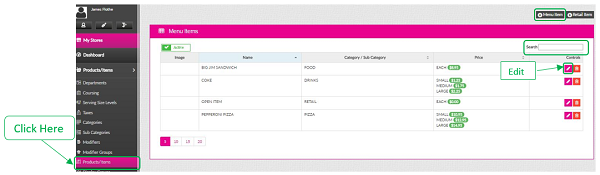
o Click on the Edit button to configure an existing Item or click on the +Menu Item to create a new one
o Just start typing the first few letters of a Menu Item in the search box to find it quicker
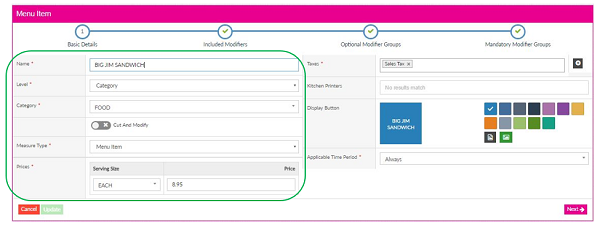
o Enter the Menu Item in the Name box
o Choose whether you want the item attached at the Category or Sub Category level by clicking on the Level dropdown box
o Choose what Category or Sub Category you want the item attached to by clicking on the Category dropdown box
o Click on the Cut and Modify slider if you want the ability to have different Modifiers on different sections of the Menu Item. (i.e. Pizza with half cheese and half pepperoni)
o Click on the Measure Type dropdown box to select the measure type. Options are:
Menu Item, Serving Size, Open Item, Scale, Game, and Other Charge.
o If you only offer that Menu Item in one size, then choose Menu Item for the Measure Type and Each for the Serving Size under Price. Enter the Price next to the Serving Size of Each.
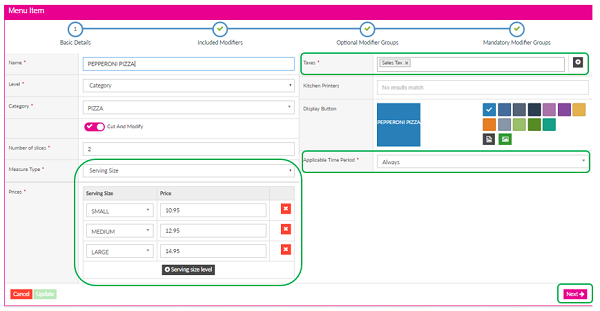
o If you offer multiple Serving Sizes for that Menu Item, then select Serving Size from the Measure Type dropdown and add each of your Serving Sizes below along with their associated prices
o Click on the Include Category Taxes slider if this item has the same tax rate as all the items in the Category or click on the Taxes box below to choose the appropriate tax
o Click on the Applicable Time Period box to choose a different option if the Menu Item is not always available (i.e. certain days or times)
o Click on the Kitchen Printers box and select the printer you want this item sent to when ordered. You can leave this blank if you configured the Kitchen Printer under Settings>Printer Configuration>Kitchen Printers to Apply To All Categories
o Click on the next step of the progress bar “Included Modifiers” or the Next button to move on
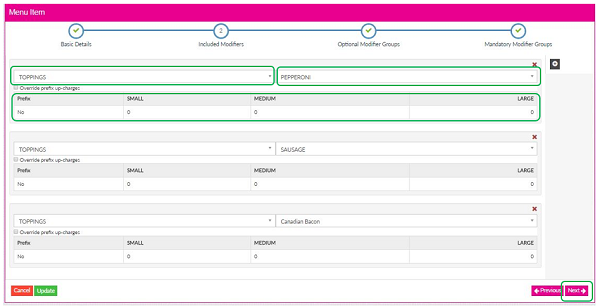
o Click on the + to add Included Modifiers to this Menu Item
o First choose the Modifier Group on the left dropdown box and then the Modifier on the right drop down box
o Any associated Prefixes will automatically fill in with the Modifier
o You can repeat the first few steps to add additional Included Modifiers
o Click on the next step of the progress bar “Optional Modifier Groups” or the Next button to move on
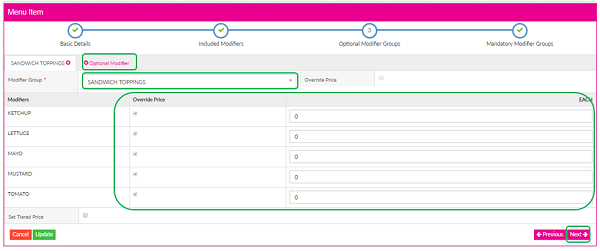
o Click on the +Optional Modifier to add Optional Modifiers to this Menu Item
o Select the Modifier Group from the dropdown box
o You can choose to override any of the prices
o You can repeat the first few steps to add additional Optional Modifiers
o Click on the next step of the progress bar “Mandatory Modifier Groups” or the Next button to move on
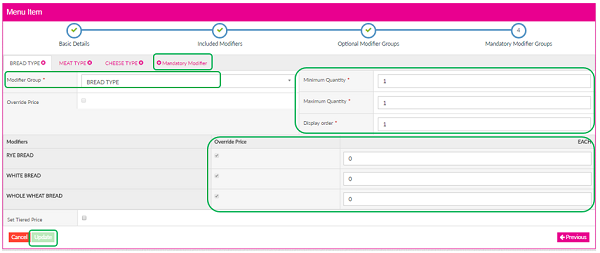
o Click on the +Mandatory Modifer to add Mandatory Modifiers to this Menu Item
o Select the Modifier Group from the dropdown box
o Choose the Minimum Qty. Minimum Qty of 1 means that they have to choose at least 1 Modifier from that group
o Choose the Max Qty. Maximum Qty of 1 means that they can only choose 1 modifier from that group
o Choose the Display Order. This is the order in which the user will be prompted in the LingaPOS iPad application when they are selecting the Modifiers for a Menu Item. (I.e. Big Jim’s Sandwich>Bread Type>Meat Type>Cheese Type.
o You can choose to override any of the prices
o You can repeat the first few steps to add additional Mandatory Modifiers
o Click on any of the steps of the progress bar to review or modify settings or press the Update button to finish
Related Articles
Products and Items - Menu Items
How to Create a New Menu Item: Select “Products/Items”, “Products/Items” and then select “+Menu Item” Note: Before creating an Item, you must have all the fields created before attaching The following information must be filled out: - Name ...Inventory Menu Items
Linking a Menu Item to Inventory: “Inventory”, “Inventory Menu Items”, and select the arrow under controls Select Each Select Inventory Item, Sub Recipe, or Manual Entry, depending on how you would like the item set up After adding items select ...Sort Menu Config
Select “Products/Items” then “Sort Menu Config” Sort Menu Config for Categories: Select the gear icon on the top right corner of the box You will be able to either “Custom Sort” the categories or select “Sort A-Z” or “Sort Z-A” and select “Save” ...Create A Menu (Products & Items)
Departments Departments are the highest-level overview of items you sell at your store. Departments can be used for high-level reporting, for example, Food vs Beverage To add a department, first click the “+ Department” on the top right. Enter at ...Removing Menu Items / Retail Items