Products/Items - Products/Items - Retail Items
Products/Items>Products/Items>Retail Item
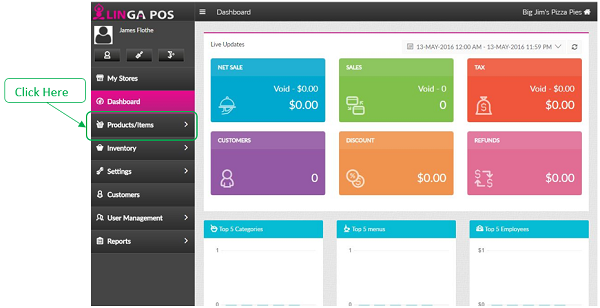
o Sign into the LingaPOS back office online at mystore.lingapos.com
o Click on the Products/Items tab on the Navigation Panel

o Click on the Products/Items tab

o Click on the Edit button to configure an existing Item or click on the+Retail Item to create a new one
o Just start typing the first few letters of a Menu Item in the search box to find it quicker

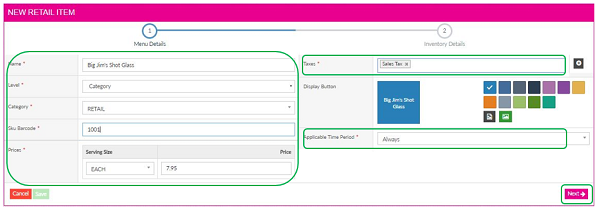
o Enter the name of the Menu Item in the Name box
o Choose whether you want the item attached at the Category or Sub Category level by clicking on the Level dropdown box
o Choose what Category or Sub Category you want the item attached to by clicking on the Category dropdown box
o Enter the Sku Barcode. If the product does not come barcoded from the manufacturer then you can assign it a unique identifier for your own purposes.
o Enter the Price next to the Serving Size of Each
o Select the appropriate Tax options in the Taxes box
o Click on the Applicable Time Period box to choose a different option if the Menu Item is not always available (i.e. certain days or times)
o Click on the next step of the progress bar “Inventory Details” or theNext button to move on

o Inventory Category – Choose from the dropdown or click + to add a new Category
o Primary Storage – Choose from the dropdown or click + to add a new Primary Storage location
o Secondary Storage – Choose from the dropdown or click + to add a new Secondary Storage location
o Vendor – Choose from the dropdown or click + to add a new Vendor
o Brand Name – Optional
o Selling Unit – Choose from the dropdown. Most retail items will be Each.
o Par Level – This is the minimum units that you want in stock before you need to reorder
o Price – Cost from the vendor
o Click on the Previous button to review the Menu Options or click on the Save button to finish
Related Articles
Creating a Retail Item
Select “Retail Item” in the Products and Items tab Fill in all the required information about the item Insert the Item Name Insert the Level of the Item Fill in the Sku Code Fill out the Price/Cost for Item Next fill out the Inventory Details ...Retail Item Pricing
Implementation in Back Office: Page Navigation; My Stores >> Products/Items >> Products/Items >> Retail Item. As of now in the case of a zero-markup percentage, users can keep the cost and selling price the same. They need to enter ...Products and Items - Menu Items
How to Create a New Menu Item: Select “Products/Items”, “Products/Items” and then select “+Menu Item” Note: Before creating an Item, you must have all the fields created before attaching The following information must be filled out: - Name ...Removing Menu Items / Retail Items
Products/Items - Products/Items - Menu Items
Products/Items>Products/Items>Menu Item o Sign into the LingaPOS back office online at mystore.lingapos.com o Click on the Products/Items tab on the Navigation Panel o Click on the Products/Items tab o Click on the Edit button to ...