Retail Back Office: Requests Scheduler
- Managers
(Admin level) can approve requests for Time Off or Shift Swapping.
- Employees
can approve Shift Swapping requests from their co-workers.
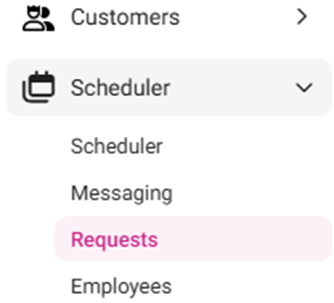
Navigation: Log
into Back Office for your Retail Store, then select Scheduler then Requests
The
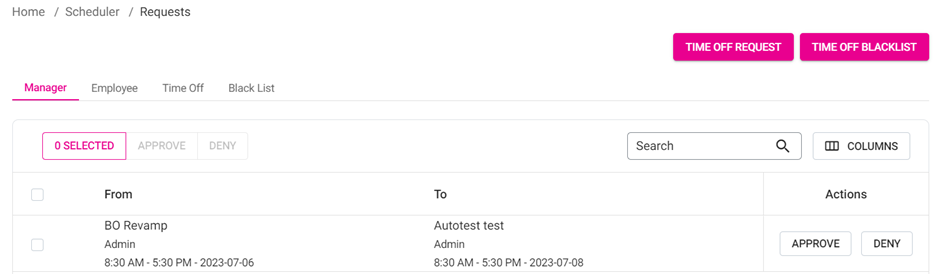
Requests page contains tabs for Manager, Employee,
Time Off and Black List.
Manager / Employee
Time Off
Black List
Manager / Employee
Displays
all Requests awaiting approval.
- Only Shift Swap requests appear in both tabs. Admin/Manager requests appear in the Manager tab and Employee requests appear in the Employee tab.
- Select one or more Requests by clicking the corresponding left-side checkbox(es).
- Select Approve or Deny – for a single request under the corresponding Actions, or above next to the # Selected button to Approve/Deny all selected Requests.
Time Off
Displays
employee Time Off requests, which can be created by selecting Time Off Request.
- Note: Requests can be created only for the Employee who is currently logged in.
- Select one or more Requests by clicking the corresponding left-side checkbox(es).
- Select Approve or Deny – for a single request under the corresponding Actions, or above next to the # Selected button to Approve / Deny all selected Requests.
New Time Off Request
- Click on the Time Off Request button. The New Time Off Request pane appears:
Start Date – (Mandatory) Select the date the time off would start (calendar view).
End Date – (Mandatory) Select the date the time off would end (calendar view).
- Period – Select a period from the dropdown:
- 3 Months – Once approved, from given to 3 months it will be effective.
- 6 Months – Once approved, from given to 6 months it will be effective.
- Limitless – Once approved, from given to all dates until changed.
Notes – (Mandatory) Enter the reason for the time off.
Partial Time Off – If Enabled (set to YES), the following fields appear:
- Time Off – Select whether the request will be After or Before the selected Time.
- Time – Select the Time (clock pop-up) when the request will apply (before or after). Select the hour and minute, then whether it’s AM or PM. Click OK to apply the time or Cancel to keep the default of 12:00PM.
- Multiple time off periods can be entered within a single request. Select + New Time Off to enter a new time off period within a request. Select Delete to remove it.
- Select Save to save and submit the request. It will appear on the Scheduler > Messaging page under the Sent Items tab.
- Click Cancel to cancel the request. You’ll be returned to the main Requests screen.
Black List
Block out a Date Range from Employees being able to submit a Time Off Request.
This tab displays the Black List, with
the Date Range (Start and End dates in [YYYY-MM-DD]
format), and any Notes containing further details.
- Select the Delete (trash can) option under Actions. The Delete pop-up appears, where you can confirm to Delete or Cancel.
- To create a new Blacklist, select Time Off Blacklist at the upper-right next to Time Off Request. The New Time Off Blacklist pane appears.
- Start Date – (Mandatory) Select the date (calendar view) that the Black List starts.
- End Date – (Mandatory) Select the date (calendar view) that the Black List ends.
- Notes – You can provide the reason/justification for the Blacklist.
- Once both mandatory fields have been filled in, select Save.
- You’re returned to the Black List tab on the Requests screen. The ‘Time Off BlackList Added Successfully’ confirmation banner and the newly created Black List appears.
- Select Cancel / X Close to return to the Requests screen without saving the Black List.