Settings - Printer Configuration - Receipt Printers
Settings>Printer Configuration>Receipt Printers
o Sign into the LingaPOS back office online at mystore.lingapos.com
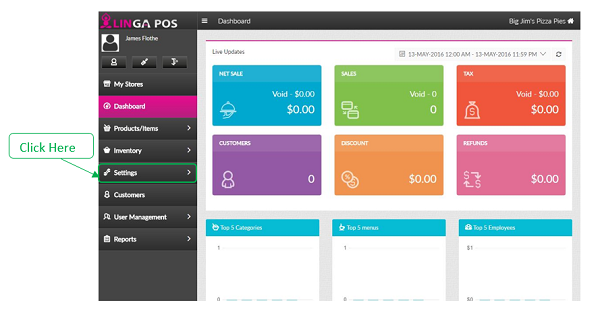
o Click on the Settings tab on the Navigation Panel

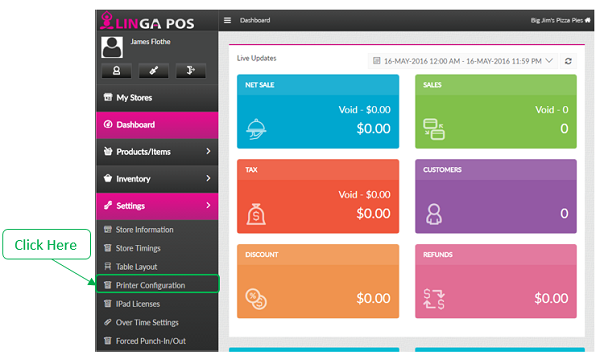
o Click on the Printer Configuration tab

o
Click on the tab
o Click
on the edit button to configure an existing printer or
click on the +Receipt Printer button to add a new printer
o Name - Enter the Name of the printer
o IP Address - Enter the IP Address of the printer
o Default - Enable this if you this to be your default receipt printer
o Press the Update button when finished to save changes
Related Articles
Printer Settings and Configuration
Settings > Printer Configuration Front End Receipt- Configure what you would like to include on the customer check. If you would like to add your logo be sure to use black and white and no bigger than 300x300. Kitchen Receipt Template- Chose what ...Adding a Receipt Printer
Adding a Receipt Printer to the Back Office: Select “Settings”, “Printer Configuration”, “Receipt Printers” Select “+Receipt Printer” Type in the IP address from the ticket and press “Update”Itemized Receipt
Requirement: An option to print the itemized receipt should be included. Implementation in Back Office: Page Navigation: My Stores >> Settings >> Printers >> Receipt Printer. A new toggle option “Enable Itemized Receipt” should be included in the ...Settings - Printer Configuration - Kitchen Printers
Settings>Printer Configuration>Kitchen Printers o Sign into the LingaPOS back office online at mystore.lingapos.com o Click on the Settings tab on the Navigation Panel o Click on the Printer Configuration tab o Click on the tab o Click ...Store Settings Enhancement
Introduction: This document explains regarding the changes done in the settings menu of the back office. Implementation in Back Office: Page Navigation: My Stores >> Settings >> Store The settings menu includes the following tabs, 1) Store ...