Uber Eats Integration
Subscribe and Configure
in Back Office
To get started with this integration, an OLO add-on license is required. Please ensure that the OLO web order license is purchased and Enabled under the Account's License Settings.
Page Navigation:
Log into Back Office. On the left-side pane, select Home
then Integration Hub.
- On
the Integration Hub page, select Browse
and Subscribe Integrations.
- Under the Online Ordering section: for Uber Eats
select Add.
- The Disclaimer page appears. After selecting the Terms and Conditions box at the bottom-left, click Confirm at the upper-right.
- On
the Current Integrations page: navigate to the row with Ubereats, then under the right-side Actions column select the Settings (gear) icon.
- The
Settings pop-up shows two 2 tabs: Settings
and Action.
- On
the Settings tab: enter the Uber Eats Location ID, which will be
unique for each Account. This Uber Eats Location ID will be provided by Uber Eats
to the Account.
- On the Action page: you can set the order platform price level for menu price level, and modifiers percentage. Click Save to save your changes. Then, click Publish Menu to reflect these changes in Uber Eats. If you do not set the order platform price level directly, simply click Publish Menu to publish the store’s menu items to Uber Eats.
- If Authorize is clicked, the Uber Eats page appears for authentication with a pop-up displaying ‘This store is activated for Uber Eats’.
- If
Unauthorize is clicked, the Uber Eats
page appears for authentication with a pop-up displaying ‘This store is
deactivated for Uber Eats’.
- Once
a Store is authorized with Uber Eats: the application allows its menu
items to be published on Uber Eats, as shown in the image below.
- By clicking the Publish Menu Items option, the data will be synchronized with Uber Eats, and a popup will show that the Store Menu Items are successfully pushed to Uber Eats.
- If you click Cancel, you are redirected to the Current Integrations page.
Considerations Before Publishing Menu Items to
Uber Eats
- After creating new menu items or making any changes to existing ones, you should publish them by clicking the green Publish button at the top-right of the screen
- The Web Order service toggle must be enabled under POS settings to receive orders in the POS system
To Hide any Menu Item(s) in
Online Ordering
- Select the Store in BO.
- Navigate to: Products/Items > Products/Items.
- Under the Menu Items tab: select the Menu Item’s corresponding three dots (•••) button under Actions then select Edit.
- On the Update Menu Item page:
- Under the Visibility section (it can be selected on the right-side pane)
- Ensure the Hide Menu Item in Online Order toggle is enabled (set to YES).
- Click Update at the upper-right.
- After Update is selected, navigate to the store’s Uber Eats integration and select Publish. The item selected to be hidden in Online Ordering will not be visible in Uber Eats.
- Any changes to the Menu Items should be first published to POS and in online order before syncing to Uber Eats.
Order Received Through Uber Eats
When an Online Order is received through Uber Eats, it
will be received to our POS. Here, the Order is received, the acceptance takes
place, and the Acknowledgement will be sent to Uber Eats.

- Once an Online Order is placed via Uber Eats, they will transmit the Order to our POS system.
- When the Order is received through Uber Eats, it will be directly sent to the Kitchen for Preparation and the same order will be in Active Order page in POS simultaneously & estimated time will be Uber Eats if the estimated time is configured in BO or admin.
- Discounts will not apply to Uber Eats (they provide their own discounts).
- Since the check cannot be altered from Uber Eats: the Gift Card, Tax Exempt, Open Item, Gratuity options will be disabled.
- Cancel: Cancellation can be done by End Customers only. When any order is cancelled from customer side then the cancellation will reach Uber Eats.
- Store Cancellation is not available in Uber Eats.
- Deny Order: Store will not be able to Deny Orders.
- Serving Size: Only one Serving Size can be applied to one Menu Item.
- Available and Restriction Time will not apply to Menu Items in Uber Eats. The timing will be displayed based on the Store Opening and Closing Hours. A Menu Item can be restricted by enabling the Hide Menu Item in Online Order toggle.
Modifiers
- Below are the modifier changes that needs to be made in specific for Uber Eats integration
- Modifier groups must be unique for mandatory & optional (Eg. Modifier group A cannot be available in both mandatory & optional. It can be either in mandatory or optional) i.e., use separate modifier group for mandatory and optional modifiers. Eg: If we use one modifier group as a mandatory modifier then that modifier group cant use as optional modifier groups but we can use this as a mandatory modifier as other menu items.
- The user cannot be able to add same modifier to the different groups of mandatory and optional modifier (since it will create duplicate modifier)
- When one modifier in optional modifier group is used and the same modifier should not use as mandatory modifier in the same menu item.
- Example: Assume Pizza is a Menu Item having optional and mandatory modifier group. Here Cheese is a modifier, and it is used as optional modifier, and the same cheese should not assign to mandatory modifier for the same menu item Pizza.
- Included Modifiers will not apply to Uber Eats.
- Minimum and Maximum quantity will be applied to a Modifier group. Here, the same Modifier can be chosen multiple times based on the min and max configuration in the Modifier group.
- Prefixes are not allowed in Uber Eats (does not support).
Sort Menu Config
When you want to
align/sort/order the Categories in the Ordering Platform:
- In Back Office (BO) settings, select the Sort Menu Config option (with a Store selected in BO, select Products/Items > Sort Menu Config)
- Arrange the Categories as needed by clicking-and-dragging.
- When the Categories are arranged, click Publish. The arranged Categories will be published in Online Ordering by clicking on Publish Your Menu Changes in POS option. After this click on the Publish Menu Items in the Deliverect Integration in Store Settings to be displayed on the Ordering platform.
- The Categories will be listed in Alphabetical order by default.
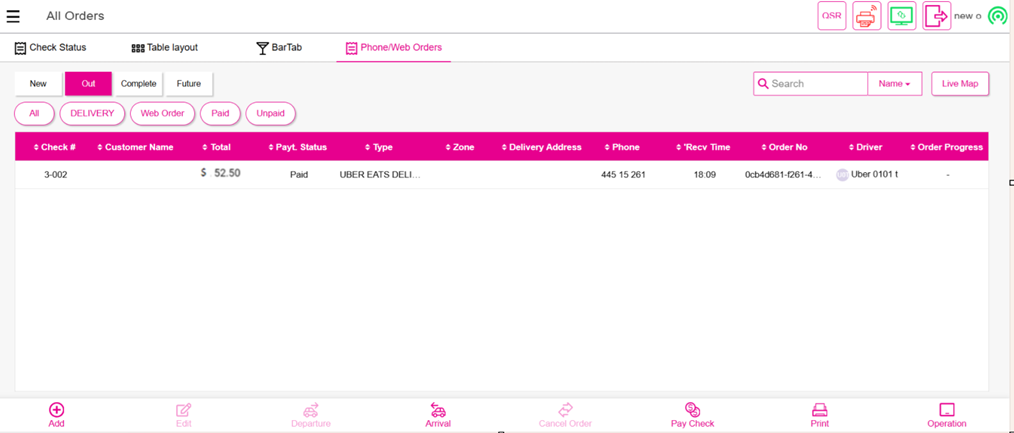
Uber Driver
When any order is placed
through Uber Eats then automatically the order will be assigned directly to Uber
Drivers (where uber driver will reach the store and pick-up the order and
deliver the same to the end customer)
- With reference to the Order ID number, the Uber Driver will reach the store and pick-up the order and deliver the same to the end customer (when order is picked-up from the store by uber driver then the order will be moved to Complete tab).
- When an Uber Driver is assigned, the driver status will be taken care by the uber eats itself.
- The Uber order will be available only in the New tab. The Driver Status will appear as Assigned. If the nearby icon is clicked, you can view the Order Confirmed status along with the Uber Eats Order ID as shown below. In the Complete tab, this icon need not to be shown.
Only online payment will be allowed
Related Articles
POS: Uber Eats Integration
For more information on the Uber Eats (UE) Integration, see the Uber Eats Knowledge Article. Uber Eats Orders Appearing in POS Once an Order is placed from Uber Eats, the message ‘You have 1 online order’ appears in POS. The Check will be listed ...POS: Chowly Integration
You can connect a restaurant's or business' internal systems (such as point-of-sale systems, inventory management, or kitchen display systems) with third-party online ordering and delivery platforms (e.g., Uber Eats, DoorDash, GrubHub) via Chowly's ...POS: Phone / Web Orders - Third Party Integration Differences
Uber Eats, Deliverect, or Chowly Accounts with 3rd party ordering that has been integrated with the POS will see an additional Ready button in the bottom navigation. This button is to notify the 3rd party drivers that the order is ready for pick up ...Magento Integration
Magento Integration – User Manual PLEASE READ THIS MANUAL BEFORE INTEGRATING MAGENTO WITH THE POS APPLICATION TO ENSURE THE SYNCHRONIZATION PROCESS RUNS SMOOTHLY. See the attached file for a copy of this manual, which includes screenshots for a ...Wix Integration Manual
Wix Integration – User Manual PLEASE READ THIS MANUAL BEFORE INTEGRATING WIX WITH THE POS APPLICATION TO ENSURE THESYNCHRONIZATION PROCESS RUNS SMOOTHLY. See the attached file for a copy of this manual, which includes screenshots for a visual ...