POS: Menu Options - Hold an Item
Hold a Menu Item
To Hold a Menu Item on a Check
- On the Menu screen, select a Menu Item.
- On the Menu Option menu that appears to the right, select Hold.
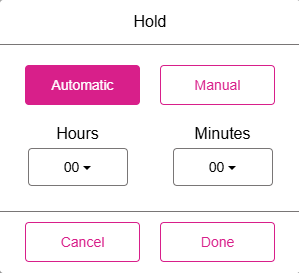
Auto Hold
Auto Hold enables you to select a Time. When the Time Limit is over, the Item will auto send to the Kitchen.
Manual Hold
Manual Hold will require the server to manually fire the item. The Item will stay on hold until it is fired.
Related Articles
POS: Check Options - Holding an Order
To Hold an Item on a Check, see the Hold an Item Knowledge Article. Holding a Whole Check On the Menu screen, select the Option button at the bottom. On the Check Options screen, select Hold. Holding Menu Item(s) Sometimes you need to flag an ordered ...POS: Displaying of Coursing Name
Back Office See the Coursing Knowledge Article POS Select a Menu Item. The Menu Item's related Coursing will appear. Example: Beverages is the name of the Coursing and where the Menu Item Coffee Milk has been selected. Once a Menu Item is selected, ...POS: Clover Payments
Configuration in Back Office Admin On the Admin page, enable the Clover Payment toggle (set to YES). Configuration in Back Office Navigation: Select Settings > Payment > Payment Method Payment Method When creating a new Payment Method (or updating an ...Retail POS: Clover Payments
Configuration in Back Office Admin On the Admin page, enable the Clover Payment toggle (set to YES). Configuration in Back Office Navigation: Select Settings > Payment > Payment Method Payment Method When creating a new Payment Method (or updating an ...POS: Operation - Till Management (Till Tab)
The Till tab displays the following sub-tabs: Set Till Active Till Held Till Closed Till Set Till Set Till Setting a Till is entering the amount to Till starts with. Select Set Till, and the Open Till window appears. Enter the Denomination and Tip ...