Retail POS: Operation - Close Day
Introduction
Close Day is the last step before ending the Business Day.
Note: Only Employees with the proper Role and Permissions settings have access to Close Day.
Navigation: Log in to POS, then select Operations > Close Day
- Or Operation > Till Management, then under the Reports tab press Close Day.
- You will be able to select multiple employees/users from the Sale Recap Summary screen. Depending on the selection, the Sale Summary Report will be displayed.
- When you tap on the Close Day option, the application will validate if there are any Active Receipts, Open Tills, Offline Transactions, Offline status of iPads, Untipped transaction on the respective Business Date.
- The Close the Day Checklist screen will appear.
Offline Transactions
If there are no offline transactions,
then it will appear in green  .
.
If there are offline transactions, the message 'You
have <count> offline transactions' appears along with a red warning symbol  .
.
When you tap on the Offline Transactions warning message,
you will be navigated to the Batch
screen.
Active Tills
If there are no Active Tills, then it will appear in green . If there are Active Tills, then the message 'You
have <count> active tills' appears alongside the red warning symbol .
When you tap on the Active Tills warning message, a screen appears which displays the Active Tills and you can Close or Hold all the Tills.
If there are any active Tills (It
will show all Active Tills from the store), then application will show that 'You have [#] till(s) open' with warning symbol .
If Active Till is selected, then a screen displaying all Active Tills appears.
- You have the ability to Close the Tills from this screen.
- When you select a Till and click Close Till, the respective Till will be closed. If you select Close All Tills, all the Tills available in the screen will be closed.
- When user selects cancel button, page redirect to close day Receipt List screen.
Active Cashiers
If there are no Active Cashiers, then it will appear in green . If there are Active Cashiers, the message 'You have <count> active cashiers' appears alongside the red warning symbol .
When you tap on the Active Cashiers warning message: a screen appears which displays the Active Cashier(s) and you can complete the Cashier Out process.
Note: The Cashier Out process will not be completed if there are any active Receipts or active tills.
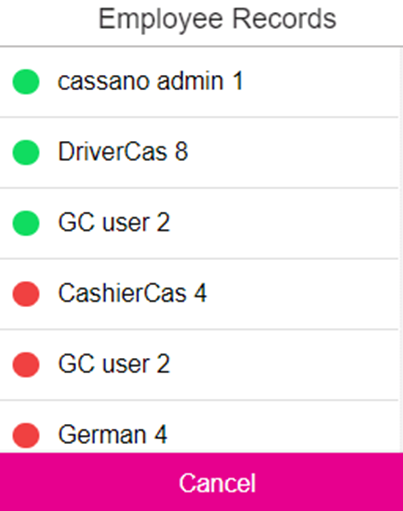
Clocked In Employees
If there are no Clocked-In Employees, then it will appear in green . If there are Clocked-In Employees, the message 'You
have <count> clocked-in employees' appears alongside the red warning symbol .
When you tap on the Clocked-in
Employees warning message: a screen appears which displays the Clocked-In Employees.
Retail Insight
The Refund amount will be reflected in the Return Amount field along with Return Percentage.
Item Sold - The number of items sold during a particular period of time.
Last Sale - The date of the last completed sale.
Return Amount - The number of Items returned during a particular period of time.
Return Percentage - The value = (Total Value of Returned Items / Total Sales) x 100.
Total Receipt Count - The number of individual transactions completed.
Margin Percentage - The value = ([Selling Price - Cost Price] / Selling Price) x 100.
Layaway
The Layaway values will be impacted as per the Sale report.
Related Articles
Retail POS: Clover Payments
Configuration in Back Office Admin On the Admin page, enable the Clover Payment toggle (set to YES). Configuration in Back Office Navigation: Select Settings > Payment > Payment Method Payment Method When creating a new Payment Method (or updating an ...Retail POS: Operation - Till Management (Reports Tab)
The Reports tab under Till Management is used to view the total sales done by the employee in the current system date. The report displays the data about the Total Net Sales, Gross Sale, New Customers, Net Void, and Sale Recap Summary. Print Select ...Retail POS: Operation - Till Management (Audit Tab)
Audit Tab Overview In the Audit tab: you can view Receipt information, such as the Receipt No (Number), Date, Amount, and Type of action from the cash drop, pay in, pay out, and tip paid out tabs in Till Management. It displays a table which contains ...POS: Operation - Close Day
Close Day is the last step before ending the Business Day. Navigation: Log in to POS, then select Operations > Close Day Select Date Select a specific Date for generating the report. This selected Date will appear in the generated report. Only past ...Retail Back Office: User Management - Roles
Navigation: Sign into the Back Office for your Retail Store, then select User Management > Roles The Roles page appears, which displays a table of the currently existing Roles within this Retail Store, with the following columns: Create a New Role or ...