Retail POS: Order Screen
Removing Items
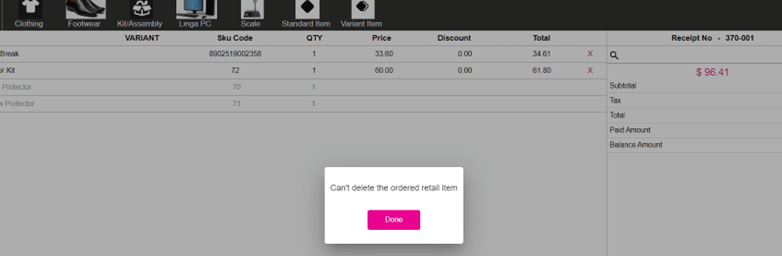
In the main Orders screen, each selected item will be accompanied by a red x which if clicked will remove the item from the Order screen before payment. If the red x is selected after submitting payment, the message 'Cannot delete ordered retail item' appears.
Cart
Located on the right side of the Order screen, it displays the Receipt No (Number) and the below values will be based on the items in the cart. Also the Search box will be available for searching Items/Categories/Subcategories on the Order screen.

- Subtotal - Subtotal of the Receipt.
- Tax – Tax accumulated on the Receipt.
- Total - Total including Tax (but excluding Discount)
- Paid Amount - Amount paid by customer will be displayed.
- Balance Amount - If there is any remaining amount the same will be shown.
No Inventory
If an item on the order screen isn't available in inventory:
- Once the item is added to Cart, a pop-up with the message 'Not Enough Inventory available. Available inventory: [Count)] Click to Continue Anyway' appears.
- The Click to Continue Anyway will only appear when the Allow Negative toggle in BO Retail settings is enabled.
- Upon clicking Continue Anyway, the item will be added to the cart. Besides having insufficient quantity without confirmation, you cannot proceed you must either remove the item or click Continue.
Notes:
- On the Order screen in POS, all the selected items will be listed.
- For the Kit/Assembly item, the parent name appear and below it the items mapped to the Kit/Assembly item appear
- The price of the combo item mapped in the Kit/Assembly item won't appear - only the Item, Variant, SKU Code, and Qty will appear.
Related Articles
Retail POS: Main Screen
The Retail POS screen displays the Categories created in the Retail Back Office along with the Settings (Gear) option at the top left. When a particular Category is selected, all Retail Items under the Category will be displayed, with the following ...POS: Default Screen
When an Employee logs in, the initial screen appears. This is configured in Back Office [User Management > Users] On the Users screen: Create a new User by clicking + NEW USER at the upper-right, or click the corresponding three dots ( ) under the ...POS: Retail Items
Back Office For a Restaurant: only Standard Retail Items can be created in the BO. Log into Back Office, select a Store, then select Products/Items > Products/Items. On the Products/Items page, click + NEW RETAIL ITEM at the upper-right. Note: POS ...Retail POS: Refunded Tab
After Performing Refund All or Refund Item: a new receipt will be generated, and the receipt under Refunded Tab The Parent Receipt will be available under Closed tab and any newly generated refund receipt in Refunded tab. If there is single item on ...Retail POS: Split Payments
Log in to POS, add a Retail Item to an Order then click Payment. On the Payment screen: select the Split option. The various split options and corresponding values will appear (1/2, 1/3, 1/4, etc.) available for submitting payment. Select a Split ...