POS: Operation - Till Management (Till Tab)
The Till tab displays the following sub-tabs:
Set Till
Active Till
Held Till
Closed Till
Set Till
Set Till
Setting a Till is entering the amount to Till starts with.
- Select Set Till, and the Open Till window appears.
- Enter the Denomination and Tip details, then press Continue.
Denomination
Navigation: Log in to the BO for your Store, then select Settings > Till Settings > Denominations
The Denomination will be configured in the Store Settings in BO.
- Denominations can be named, and the amount value can be set from BO.
- Created Denominations can be deleted from BO.
- When the Till is being opened in POS, the Denominations added under the Till Settings will appear.
- Upon entering the value in the number pad screen, the denomination marked in BO will appear in the Open Till page.
- Example: If the denomination marked is $100 in BO and value entered is 5 in number pad – theTotal value will be $500 in the Till page in POS.
- Only Employees with the proper role and permission settings have access to Open Till.
- On tapping the Continue option, user will be navigated to the Active Till.
Active Till
Active Till
When a Till is set, the Active Till screen appears.
Back Office
Navigation: Log into the BO for your Store, then select Settings > Payments > Till Settings
- If the Force Cash Out at Clock Out toggle is enabled (set to YES): an employee must close the Open Cash Out and Till before punching out in POS.
- If not, then a pop-up with the message 'You can’t punch out with open till, do you want to close the till?' with Yes and No options will appear in POS. If Yes, you can close the till. If No, the pop-up will close.
- If disabled, an employee can punch out in POS when there is an Open Cash Out and Till.
- When the Till Type is a User Till, the Till Balance will be incremented only for the respective employee who has created the till in the device.
- When the Till Type is Global Till, the Till Balance will be incremented for other employees too who was using this device.
Hold Till
- When a Till row is selected and Hold Till is selected, a pop-up with the message 'Do you want to hold this till?' appears. Upon confirmation, the selected Till details will be moved to the Held Till screen.
Close Till
- When a Till row is selected and Close Till is selected, a pop-up with the message Do you want to close this till?' appears.
- Click Yes, and the Close Till screen appears.
- Enter the Till amount then press Continue.
- If the Till amount is greater / lesser than the expected cash:
- The Over Shortage pop-up appears.
- Enter any comments in the Discrepancy Notes then press Done.
- The Till details will be moved to the Closed Till.
Notes:
- If the Automatic Global Till toggle is enabled in BO [Settings > Payments > Till Settings] and given the Opening Balance, then the Till Balance in POS will be incremented automatically after completing the first sale.
- Only Employees with the proper Role and Permission Settings have access to Close their own Till or Close all Tills.
Held Till
Held Till
- If a Till needs to be counted during Business Hours or in between employee Shift changes, you may want to hold the Till.
- Holding a Till allows you to keep the previous Till on hold until it’s ready to be closed. A new Till will need to be opened to keep track of new transactions.
Select Held Till, the Held Till screen appears
To close a till, select the respective Till and tap on the Close Till option.
Note: Only employees with the proper role and permission settings have access to Hold Till.
Closed Till
Closed Till
Navigation: Log into the BO for your Store, then select Settings > Payments > Till Settings, then select the Close Till tab.
The Close Till tab displays the list of all the Tills that are not closed in POS. The table will be a daily refresh, and the Tills that are not closed in POS can be manually closed here. If no Close Tills are added then the 'Close Till not found' message appears.
- The Close Till table displays columns for the Till Name along with Till Type, Status, Amount, and Open By.
- The Actions column has the Close button to close the Till.
- When clicked, a pop-up with the message 'Are you sure you want to close!' along with Yes and No options appears. If Yes is clicked: this Till will be closed and the line item will be removed. If No is clicked, no changes occur.
POS
Navigation: Log in POS, then select Operations > Till Management. Select the Closed Till tab and the Closed Till screen appears.
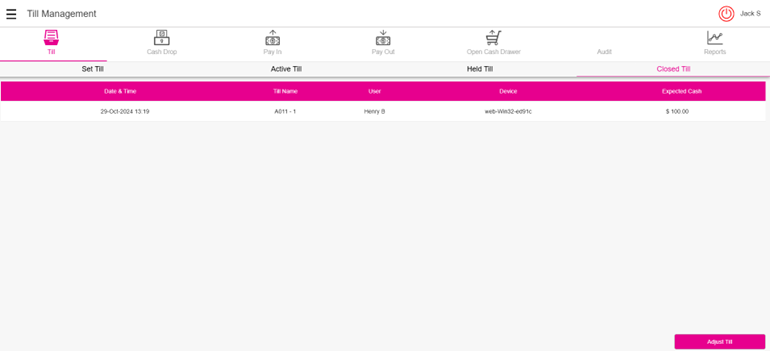
Adjust Till
- Select a Till then click Adjust Till at the bottom-right.
- If Adjust Till is clicked without a Till selected, the 'Select Till to proceed' pop-up message appears.

- The confirmation message 'Do you want to adjust this till?' appears.
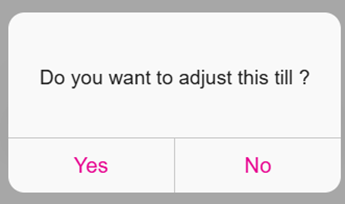
- Click Yes, and the Close Till screen appears.
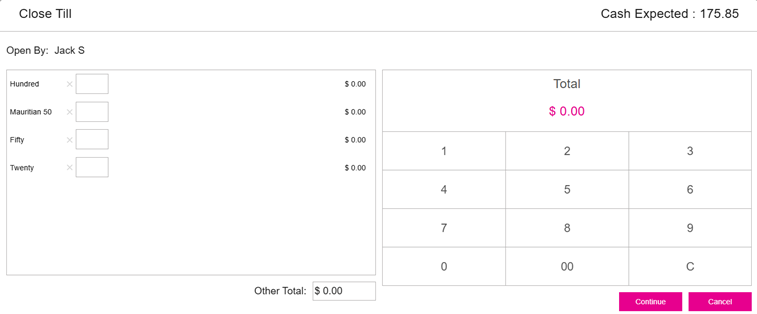
- Enter the Till amount then tap on the Continue option.
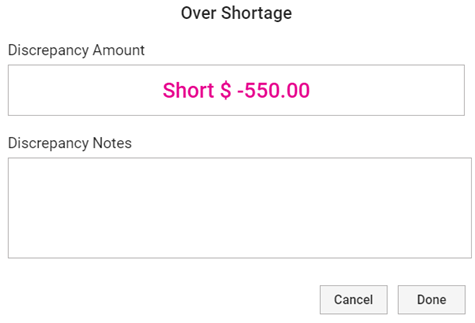
- If the Till amount is greater/lesser than the Expected Cash, the Over Shortage pop-up appears. Enter any needed comments in the Discrepancy Notes, when ready click Done.
- On the Summary page that appears, select Print to print the Summary.
- Select Submit or Cancel to close the Summary and selected Till.
Select a Till then click Adjust Till at the bottom-right.
- If Adjust Till is clicked without a Till selected, the 'Select Till to proceed' pop-up message appears.
Enter the Till amount then tap on the Continue option.
- If the Till amount is greater/lesser than the Expected Cash, the Over Shortage pop-up appears. Enter any needed comments in the Discrepancy Notes, when ready click Done.
On the Summary page that appears, select Print to print the Summary.
- Select Submit or Cancel to close the Summary and selected Till.
Checkout Summary
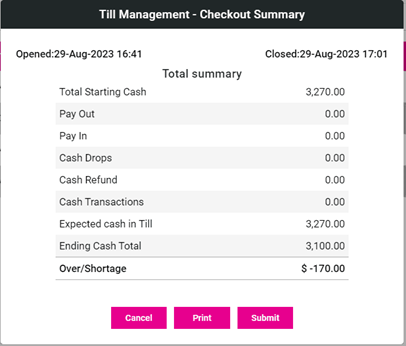
The Checkout Summary screen provides a breakdown of the Cash movement in the Till during a specific Time Period.
- Opened: This shows the date and time when the till was opened.
- Closed: This indicates the date and time when the till was closed.
- Total Starting Cash: This is the amount of cash initially in the till.
- Pay Out: This field shows any amount of cash that was removed from the till for payouts, such as expenses.
- Pay In: This is the amount of cash that was added to the till, aside from regular cash transactions.
- Cash Drops: This indicates the amount of cash that was taken out of the till and dropped.
- Cash Refund: This field represents any cash refunds given to customers from the till.
- Cash Transactions: This total is the amount of cash transactions processed during the period.
- Expected Cash in Till: This is the calculated total of what should be in the till based on all transactions.
- Ending Cash Total: This field displays the actual amount of cash counted in the till at the end of the period.
- Over/Shortage: This shows the difference between the expected cash in the till and the actual ending cash total.
- Enter the comments in the Discrepancy Notes and tap on the Done option. Finally, user will be navigated to the Checkout Summary screen. If tapping on the Cancel option, the Over/Shortage screen will Close.
- Print - The Checkout Summary Screen will be printed.
- Submit or Cancel - The selected Till will be closed, and the Checkout Summary Screen will be closed.
Open Auto Global Till
Back Office
Till Settings
Navigation: Log in to the BO for your Store then select Settings > Payments > Till Settings
- On the Till Settings tab, ensure the Automatic Global Till toggle is enabled (set to YES). After enabling, you can enter the Global till Opening Balance (not mandatory).
- Once enabled, the POS system will automatically open the overall Till in it.
- If disabled, the automatic global till will not be available for the user.
Additional Settings
Navigation: Log in to the BO for your Store then select Settings > Reports > Additional Settings
After enabling the Automatic Global Till toggle, ensure the Employee Tip Out Deducted from Cash Expected on Reports toggle is enabled (set to YES).

Changes in POS
- Log into POS and on the left side pane select POS Settings.
- On the POS Settings page, enable the Set Default Till as Global toggle then select Save Changes.
Viewing Active Tills
Note: After Global Till is enabled, cashiers can make transactions right away. No need to start a Till.
Viewing Open Tills in BO
Open Tills can be viewed under Settings > Payments > Till Settings, then selecting the Close Till tab. The Till created with other open Tills will be displayed.
Employees Must Close Cash Out/Till before Punching Out
Back Office
Navigation: Login to BO for your Store, then select Settings > Payments > Till Settings
For the Force Cash Out at Clock Out toggle:
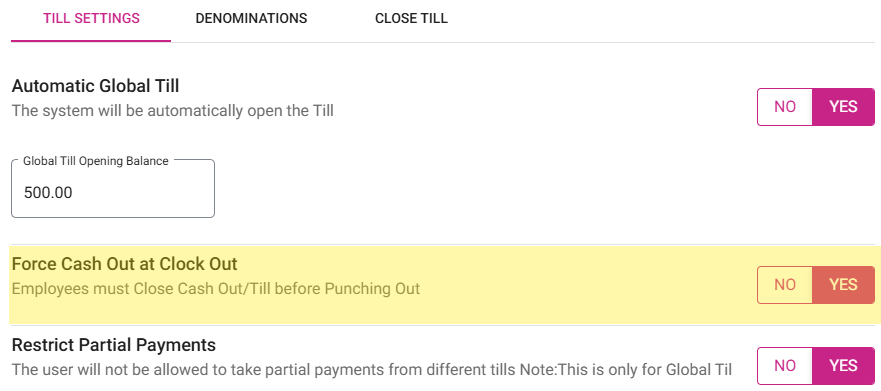
- If enabled, any open cash out and till must be closed before punching out in POS.
- If disabled, a punch out can occur in POS even when there is Open Cash Out and Till.
Changes in POS
If any open cash out or till are not closed before punching out in POS, then a pop-up asking to close the till will appear in POS. When there is an active till: if an employee tries to clock out the below pop-up will appear:
Blind Audit
Blind Audit is provided to restrict the Till functionalities for some employees. If Blind Audit is enabled, then users are not able to view few of the Till functionalities.
Back Office
Navigation: Log into the BO for your Store, then select User Management > Roles.
- Create a new Role or update an existing Role.
- On the Role pane that appears select POS Operations. Note the Blind Audit and Show Report after Blind Audit toggles.
- If the BLIND AUDIT option is enabled, then the SHOW REPORT AFTER BLIND AUDIT option will be enabled by default. The Show Report toggle can be disabled if needed.
- If both CLOSE ALL CASH OUT and BLIND AUDIT options are enabled, the report won't be visible even if the selected Role selects it and cashier outs the other user.
Implementation in POS
If Blind Audit is enabled in BO:
- During Close / Adjust the Till, the cash expected field will be invisible to users.
- The column Till Balance won't be displayed in Active till / Held till.
- Users cannot see the column Expected Cash in the Closed Till screen.
- Audit tab won't be displayed for users.
- When attempting to adjust the Till, the pop-up 'You don’t have access to adjust the till' will appear.
- The over/shortage pop-up should won't appear for users.
- The Till Balance won't appear in the Close Day screen. The Till Balance won't appear in the Close Day reports.
Screen Layout
Expected Cash in the Closed Till screen is not appearing.
If the Show report after Blind Audit toggle is disabled:
- The Till Management - Checkout Summary report (generated upon closing and adjusting the till) will not be viewable.
- The Sales Summary report generated during cashier out and close the day won't appear.
- The Sales Summary report shown in the Report section won't appear.
If the option Show report after Blind Audit toggle is enabled:
- The Till Management - Checkout Summary and Sales Summary reports can be viewed (only after cash out or cashier out).
- The Till cannot be adjusted.
Bank Deposit Amount
Navigation: Log into the BO for your Store, then select Settings > Payments > Till Settings
The Bank Deposit amount is configured under the Till Settings tab.
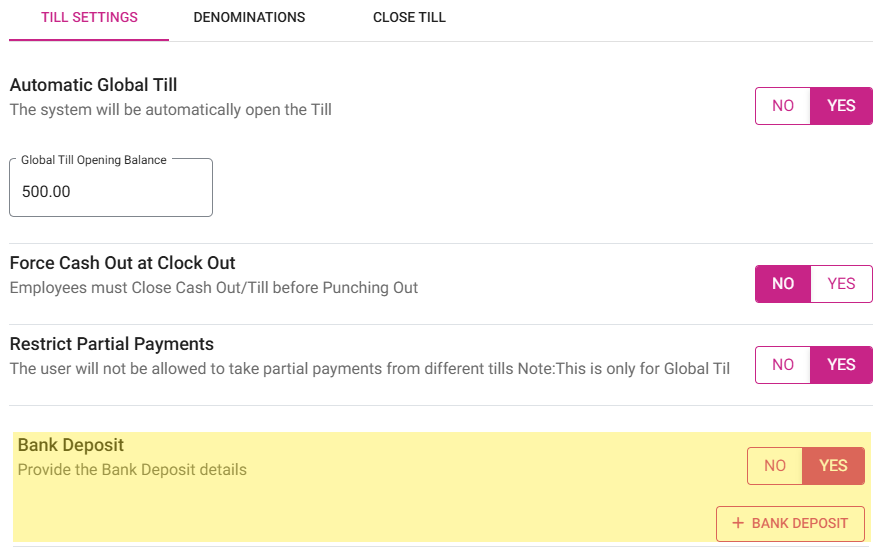
- Click + Bank Deposit.
- On the New Bank Deposit pane that appears: enter the Deposit Amount and Business Date, then click Save.
- The Deposit Amount will appear with the Bank deposit amount line item highlighted in green with a green check mark.
Active Checks
- If there are no active checks: a green check mark
appears.
- If there are active checks: the warning message 'You have <count> active checks' with an exclamation mark
appears.
- Click the warning message, and you will be taken to the Active Checks screen. You can either Void or Cash the checks.
- To void all transactions: click Void
- To cash out all transactions: Cash
- To close each sale separately: click Cancel and go to the sale in check stats screen
Offline Transactions
If there are no offline transactions: a green check mark  appears.
- If there are offline transactions: the warning message 'You have <count> offline transactions' with an exclamation mark
- Click the warning message, and you will be taken to the Batch/Tip Adjustment screen.
Active Tills
If there are no active tills: a green check mark appears.
- If there are active tills: the warning message 'You have <count> active tills' with an exclamation mark
- Click the warning message. You will be taken to the Active Tills screen, where you can Close all the Tills.
Active Cashiers
If there are no active cashiers: a green check mark appears.
- If there are active cashiers: the warning message 'You have <count> active cashier(s)' with an exclamation mark
- Click the warning message. You will be taken to the Active Cashiers screen, where you can complete the Cashier Out process.
- Once a Cashier is selected, the Cashier Out button will be enabled.
- If Cancel is clicked, the pop-up will be closed.
Note: The Cashier Out process will not be completed if there are any active checks or active tills.
Un-Batched Transactions
If there are no un-batched transactions: a green check mark appears.
- If there are un-batched transactions: the warning message 'You have <count> Un-Batched Transaction(s)' with an exclamation mark
- Click the warning message. You will be taken to the Batch/Tip Adjustment screen.
Un-Tipped CC Transactions
If there are no un-tipped cc transactions: a green check mark appears.
- If there are un-tipped cc transactions: the warning message 'You have <count> Un-Tipped CC Transaction(s)' with an exclamation mark
- Click the warning message. You will be taken to the Batch/Tip Adjustment screen.
Clocked in Employees
If there are no clocked-in employees: a green check mark appears.
- If there are clocked-in employees: the warning message 'You have <count> clocked IN employee(s)' with an exclamation mark
- Click the warning message. You will be taken to the Employee Records screen, where the clocked-in employees are listed.
- Click Cancel, and the pop-up will be closed.
Offline Nodes
The number of POS Nodes which are in offline mode for the Store. It only displays the number of offline nodes, and you can submit close day when this point is in red.
- Submit: If clicked, the pop-up message 'Close Day Performed Successfully' appears.
- Cancel: If clicked, the Close Day Checklist screen will be closed.
If any transaction is pending and Submit is clicked, the pop-up message 'Batch is pending. Do you want to open the Batch Screen?' appears, with Yes and No options.
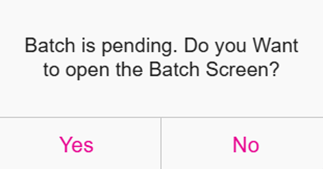
- If Yes is clicked: the Batch screen will open.
- If No is clicked: the pop-up will close and you will remain on the current screen without any changes.
Batch Tip Adjustment
- The payments made by customers using the payment methods Cash, Gift card, Side CC, Loyalty, House Account, NMI Tokenization, Castle and Go, Others will not be displayed in the ‘Batch/Tip Adjustment’ screen.
- The payments made by customers using the payment methods Credit Card, SPPax, Dejavoo, Optomany, MPPG eDynamo, Ingenico will be displayed in the Batch/Tip Adjustment screen.
Processing a Credit Card transaction
There are 2 parts to processing a Credit Card transaction:
- When a customer’s credit card is swiped or entered manually, the transaction details are sent through the transaction authorization path, during which the issuing bank approves the transaction, and a hold is put on customer funds. This occurs in real-time. Resulting credit card authorization codes are stored in a single file by the credit card terminals or credit card processing platform. This file is known as a Batch.
- Later, the second stage: fund transfer occurs. This is when customer credit cards are actually charged. When batch processing is used, the batch of authorization codes is uploaded and processed simultaneously, once a day. This is also known as Closing the batch. Usually, this process is carried out at the end of the workday or business day.
- During batch processing:
- The merchant sends the batch of authorization codes to the credit card processor.
- The credit card processor then forwards these codes to the relevant issuing banks.
- As a hold has already been put on customer funds, all that remains is for the issuing bank to release the funds and send them to the processor.
- The processor then forwards the funds to be deposited into the merchant account. This process usually occurs within 48 hours of the transaction.
- After the funds are transferred from the user’s bank to the merchant account: the transaction is complete and it will appear on the customer’s next CC statement.
Also, the Batch/Tip Adjustment screen is used to make any Tip Adjustment for any transactions except the payment made by Ingenico.
To navigate to this screen: in POS., select Operations > Batch/Tip Adjustment.
- When the tip amount is greater than the check amount in the batch screen and Apply Total is enabled, the balance amount will be updated to the Tip.
- Example: The Check amount is $7.75, and the Tip is updated with the new Amount at $8.00. The balance amount $0.25 will be displayed in the Tip.
- The transactions for which the tip adjustment has been made will be highlighted in green.
- When Process Offline is selected, the transactions which were made while offline will be processed. After processing, the red highlight will be removed.
- Select Submit Batch. The transactions in the grid table will be processed and submitted to the enterprise’s account.
Apply Total
An Apply Total toggle option that allows you to apply the total tip amount across all listed transactions.
Device
A filter option with a drop-down menu to select the payment device. Click the red x X to clear the search filter.
User
Displays the list of usernames, allowing you to select a username from the dropdown to apply the filter.
Search
The Search bar is to filter down or even find specific transactions. You can search the check by type or the check number.
Batch/Tip Adjustment Table
The table contains the following information columns:
- Type: Indicates the card type used for the transaction, such as Discover or Visa.
- Check: The check number associated with each transaction, helping to identify each transaction individually.
- Card Number: Displays a masked card number for security purposes, showing only the last four digits for identification.
- App Code: Likely refer to an authorization or approval code for each transaction, confirming its approval status.
- Server: The name of the server or employee associated with the transaction.
- Amount: The transaction amount for each respective sale.
- Tip: The tip amount applies to each transaction.
- Date & Time: The Date and Time indicating when each transaction occurred.
The bottom of the screen contains the following information:
- Total: Displays the total number of checks.
- Tip Applied: When a tip is applied, the corresponding check is highlighted in green.
- Offline: This shows the number of offline transactions that need processing, with the checks highlighted in light red.
- Total Amount: Displays the sum of the amounts for all listed transactions.
- Tip: Shows the total of all tips applied across transactions in the batch.
Batch Settings
Navigation: Log into the BO for your Store, then select Settings > Batch > Batch Settings
On the Batch Settings page:
Enable Auto Batch - If enabled, select the Time and the batch will run automatically for that selected Time. If disabled, the batch must be submitted manually.
Batch Submit Device - Select the batch submit device from the drop-down list which is already configured with MPPG device.

Default Batch Payment - Select the default batch payment from the drop-down list which is already configured.
Back Office
For the Print Batch Report toggle: if enabled (set to YES), the Batch report will be printed after submitting the batch
- It will be disabled by default
POS
- If the toggle is enabled in BO and the batch is submitted in POS, the Batch report will automatically be printed for submitted Checks.
- If the toggle is disabled in BO and the batch is submitted in POS, Batch report won't be printed after submitting the batch.
- The payments made via Credit Card, SPPax, Dejavoo, Optomany, MPPG eDynamo, and Ingenico will appear in the Batch/Tip Adjustment screen.
Payments
For MPPG, SPPAX, Clover, Tempus, Dejavoo, NMI, Evertec, Ingenico, Chase, Moneris, Optomany payments, the batch report will be automatically printed.
Notes:
- If the customer prints the batch before Submitting batch, then user can take the batch print.
- Based on the Backoffice option, the Batch print will be print after batch.
- The batch will print only for the Manual Batch.
- If user process Offline transaction, it will not print.
Sample Batch Print
Batch
You will be able to view the list of all the Batch that are available in pos.
- Ticket No: This likely represents the transaction or receipt number assigned to each sale, helping in tracking and managing individual transactions.
- Card No: The last four digits of the customer's credit or debit card used for the transaction. The rest of the number is masked for security reasons.
- Amount: The total amount charged to the customer's card for the specific transaction.
- Tip Amount: The additional tip amount added by the customer, if any, over the base transaction amount.
- Actions: This column provides options for performing specific actions related to each transaction. The red trash icon here suggests a delete or void option, allowing the user to remove a transaction if needed.
Batch Settle Date
POS
Navigation: Login to POS, then select Operation > Batch/Tip Adjustment
- User can place sale in POS, check will go to the batch screen and tip can be adjusted. Click Batch Submit, and all the payment will be processed.
- User can complete the auth transactions by clicks on Submit Batch button.
- Under batch screen, all the success and offline transactions will be displayed.
- Tip for the transaction can be changed or applied in the batch screen before batching.
Batch Settle Date and Status
On the Batch/Tip Adjustment screen, the Settle Date and Status of the batch will appear at the bottom of the screen.
The following Batch Statuses may appear:
- Batch Completed - After the batch is processed, this status will appear at the bottom of the screen in the following format:
- Last Batch Started
Batch transaction Day [Yesterday], and Date and Time formats as configured in BO
Batch Completed (status in green) - Batch In Progress - If the batch is processing, this status will appear at the bottom of the screen in the following format:
- Last Batch Started
Batch transaction Day [Yesterday], and Date and Time formats as configured in BO
Batch In Progress status should be in green color. - While the batch process is in progress, the Submit Batch button will be disabled and can't be clicked.
- Batch Incomplete - After the batch is processed, this status will appear at the bottom of the screen in the following format:
- Last Batch Started
Batch transaction Day [Yesterday], and Date and Time formats as configured in BO
Batch incomplete - Resubmit Batch (status in red)
Note:
- Batch Status will appear for MPPG and Tempus payments.
- MPPG payments do not apply to POS, so the Batch Settle Date feature is not available for POS
Refund
Note: Only Employees with the proper Role and Permission settings have access to Refund.
Navigation: Log into POS, then select Operations > Refund
Refund is the repayment of money to the customer.
After a sale is placed then perform close day but then want a refund on the payment:
- Navigate to the Refund screen.
- The Refund screen displays all the checks place on the selected date in a table format with the following columns:
- Time: The Date and Time indicating when each transaction occurred.
- Check No: The check number associated with each transaction, helping to identify each transaction individually.
- Server: The name of the server or employee associated with the transaction.
- Card Number: Displays a masked card number for security purposes, showing only the last four digits for identification.
- Customer: Name of the customer should be displayed.
- Amount: The transaction amount for each respective sale.
- If a check is not selected but Refund is clicked, the message 'Please select the check' appears - with a Done option to close the message.
- To find a specific Check: enter the Check Date / Number in the Search bar then press Search. The Check will appear in the table.
- If no sale is made for the selected date, a pop-up with the message 'No Checks Found' will appear - with a Done option to close the message.
- When a Check is selected then Refund without Receipt or Refund is selected, the Refund pop-up will be displayed where you can provide the amount to be refunded to the customer and the payment type.
Refund Reasons
The pre-defined Refund Reasons are configured in the Back Office.
Navigation: Log into the Back Office for your Store, then select Products/Items > Reasons
Refund Reasons in the POS system are pre-configured in the Back Office, allowing users to select from these predefined options when issuing a Refund. You can choose any one of the pre-defined Refund Reasons - or create a new Reason.
Refund Menu Items
- Select a Check then select Refund Menu Items.
- The Order screen appears and displays the full Check with all Menu Items - along with the Refund Check and Refund Items options.
Refund Check
If Refund Check is selected:
- The Refund screen appears - which displays the Amount of the Check along with all the available payment types.
- Enter a Reason for the refund before selecting a Payment Type.
- If you attempt to select a payment type before entering a Reason: the pop-up message 'Provide reason for Refund' appears - with Done to close the message.
- Enter the Amount to be refunded (type it out or use the number pad), then select a Payment Type.
- With an Amount entered and a Payment Type selected, a pop-up with the message 'Do you want to refund?' appears - with Yes and No options.
- Select Yes. The pop-up will be closed and the Refund Success pop-up appears - with Done to close the pop-up.
- If No is selected, the pop-up will be closed and the Refund process will be cancelled.
- Click Done, and you're returned to the Refund screen.
Refund Items
If Refund Items is selected, you can refund a specific Menu Item price.
- Select the Menu Item to be refunded, then click Refund Item.
- If Refund Item is clicked without having already selected an Item, the message 'Please select any menu item' will be displayed with a Done option to close the message.
- The Refund screen appears - which displays the Amount of the Item to be refunded along with all the available payment types.
- Enter a Reason for the refund before selecting a Payment Type.
- If you attempt to select a payment type before entering a Reason: the pop-up message 'Provide reason for Refund' appears - with Done to close the message.
- Enter the Amount to be refunded (type it out or use the number pad), then select a Payment Type.
- With an Amount entered and a Payment Type selected, a pop-up with the message 'Do you want to refund?' appears - with Yes and No options.
- Select Yes. The pop-up will be closed and the Refund Success pop-up appears - with Done to close the pop-up.
- If No is selected, the pop-up will be closed and the Refund process will be cancelled.
- Click Done at the bottom-right of the Order screen, and you're returned to the Refund screen.
Refund Without Receipt
- Select a Check then select Refund Without Receipt.
- The Refund screen appears - which displays all the available payment types.
- The Amount to be refunded will not be displayed on the pop-up. You must manually enter the amount.
- Enter a Reason for the refund before selecting a Payment Type.
- If you attempt to select a payment type before entering a Reason: the pop-up message 'Provide reason for Refund' appears - with Done to close the message.
- Enter the Amount to be refunded (type it out or use the number pad), then select a Payment Type.
- With an Amount entered and a Payment Type selected, a pop-up with the message 'Do you want to refund?' appears - with Yes and No options.
- Select Yes. The pop-up will be closed and the Refund Success pop-up appears - with Done to close the pop-up.
- If No is selected, the pop-up will be closed and the Refund process will be cancelled.
- If a card payment such as House Account or Membership is selected: you will be redirected to the Card screen. Either manually enter the Card details, swipe the Card or insert the Card.
- Click Done at the bottom-right of the Order screen, and you're returned to the Refund screen.
Refund
On the Refund screen:
- Select the Check to be refunded, then select Refund at the bottom-right.
- The Refund screen appears - which displays all the available payment types.
- Enter a Reason for the refund before selecting a Payment Type.
- If you attempt to select a Payment Type before entering a Reason: the pop-up message 'Provide reason for Refund' appears - with Done to close the message.
- Enter the Amount to be refunded (type it out or use the number pad), then select a Payment Type.
- With an Amount entered and a Payment Type selected, a pop-up with the message 'Do you want to refund?' appears - with Yes and No options.
- Select Yes. The pop-up will be closed and the Refund Success pop-up appears - with Done to close the pop-up.
- If No is selected, the pop-up will be closed and the Refund process will be cancelled.
- Click Done at the bottom-right of the Order screen, and you're returned to the Refund screen.
Same Day Refund
- Navigate to the Check Status screen, then select the Closed tab.
- Select the Check to re-open, then click Re-Open Check.
- Navigate to the Payment tab, select the payment in the Payment Description box, then delete the Payment.
- Press Back and void the Item(s) you are refunding.
- Navigate back to the Payment and proceed to take payment for the remaining Balance.
Related Articles
Retail POS: Operation - Till Management (Till Tab)
The Till tab contains the following sub-tabs: Set Till Active Till Held Till Closed Till Set Till Set Till Setting a Till is entering the amount to Till starts with. Select Set Till, and the Open Till window appears. Enter the Denomination and Tip ...Retail POS: Operation - Till Management (Audit Tab)
Audit Tab Overview In the Audit tab: you can view Receipt information, such as the Receipt No (Number), Date, Amount, and Type of action from the cash drop, pay in, pay out, and tip paid out tabs in Till Management. It displays a table which contains ...POS: Operation - Till Management (Audit Tab)
In the Audit tab, you can view Check information, such as the Check No (Number), Date, Amount, and Type of action from the cash drop, pay in, pay out, and tip paid out tabs in Till Management. The screen Audit displays a log of actions on Checks, ...Retail POS: Operation - Till Management (Reports Tab)
The Reports tab under Till Management is used to view the total sales done by the employee in the current system date. The report displays the data about the Total Net Sales, Gross Sale, New Customers, Net Void, and Sale Recap Summary. Print Select ...Retail POS: Operation - Till Management (Open Cash Drawer Tab)
The Open Cash Drawer tab is used to open the Cash Drawer. Note: Only Employees with the proper Role and Permissions settings have access to open the Cash Drawer. POS Settings Navigation: Log In POS then select POS Settings Dual Cash Drawer For the ...