Retail Back Office: Admin - Accounts
Navigation: Log in BO Admin then select Accounts > Accounts
The Accounts page is broken down into the following tabs:
Account
Stores
Account
The Accounts tab displays the total number of Accounts, along with a table containing rows representing each Account, with the following columns:
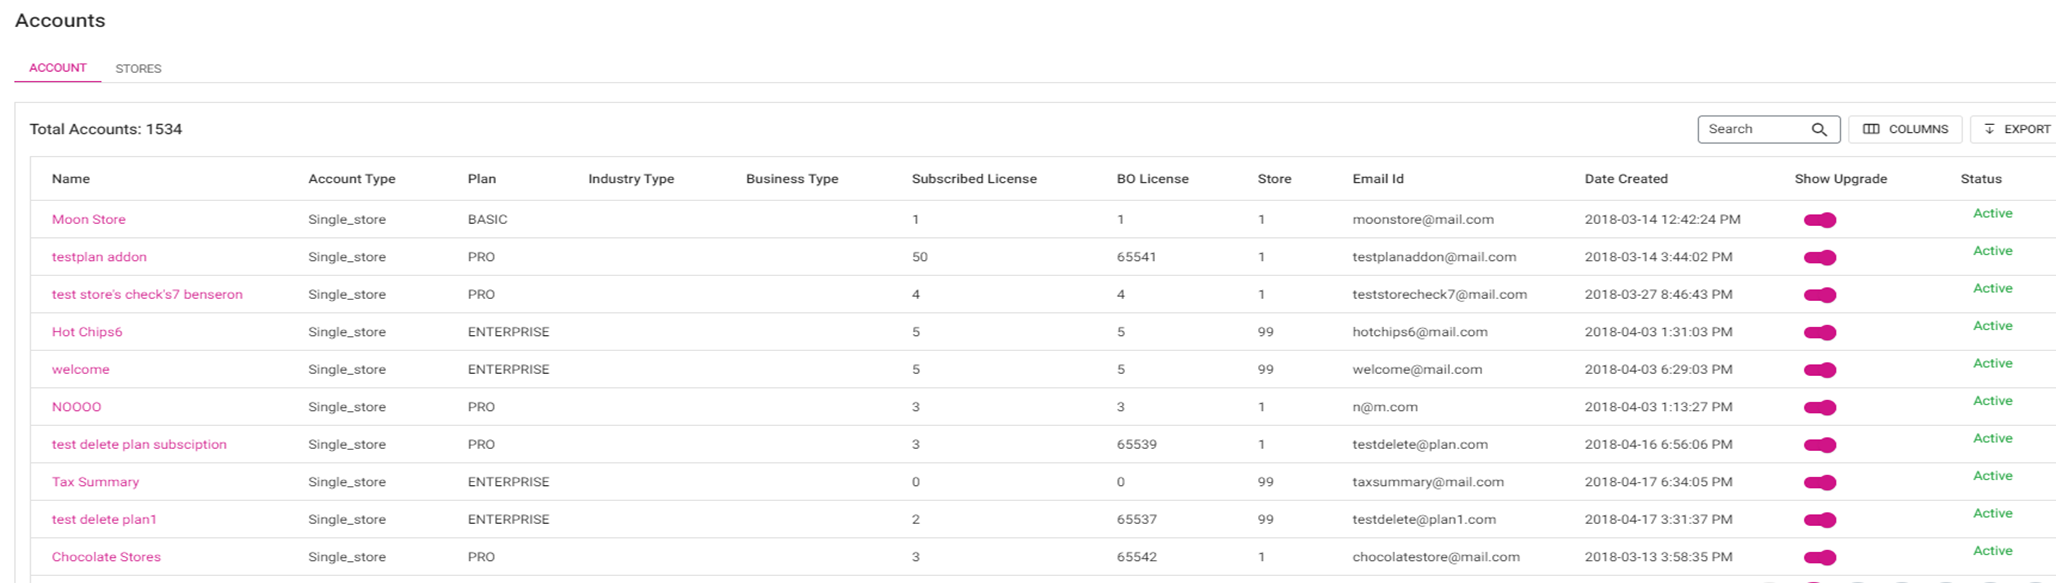
- Name: The account name of the store. This is clickable.
- Account Type: The type of the Account.
- Plan: The type of plan for this Account.
- Industry Type: The type of the industry of the Account.
- Business Type: The type of the business of the Account.
- Subscribed License: The number of Licenses subscribed to.
- BO License: The number of BO Licenses subscribed to.
- Store: The number of Stores available under the Account.
- Email: The Email Address of the Store.
- Creation Date: The date the Store Account was created.
- Show Upgrade Toggle: If enabled (slid to right and turned pink), the Store will be upgraded.
- Status: The status of the store.
When a Name is clicked, a page for that Account's details appears:
Account Details
Account Name: Account name will be pre-populated and greyed out. This will be non-editable field.
Phone Number: Phone Number will be pre-populated and greyed out. This will be non-editable field.
Email ID: Email ID will be pre-populated and greyed out. This will be non-editable field.
Last Login Token: The details will be pre-populated and non-editable field.
GDPR: The details will be pre-populated and non-editable field.
Store Address: Account address should be pre-populated if entered and non-editable field.
Link Account: You can link this Account to another Account from the dropdown list and can select multiple options. After making your selection(s), click Save.
Dealer: You can link this Account to another Dealer Account from the dropdown list and can select multiple options. After making your selection(s), click Save.
You can view and add linked Accounts and Dealers. By clicking Save the changes will be saved and the 'Account Linked Successfully' or 'Dealer Linked Successfully' confirmation pop-up appears.
Plan Details
Plan: This will display the type of plan for this Account (Basic, Pro, Enterprise).
Licenses: This will display the appropriate license count for this Account.
Stores: This will display the Active and Inactive stores under this Account.
Date Created: This displays which date this account has been created.
Last POS Access Date: This displays the last date when POS accessed for this account.
Subscription Details
Subscription ID: The subscription id for this account.
Customer ID: The customer id for this account.
Zoho Subscription Email: The zoho subscription email id for this account.
Features
When Features is clicked, a table appears and contains the following columns
- Name - The name of the feature.
- Status - The Status of the feature (Active or Inactive).
- Number of Stores - How many stores are Active with this feature.
POS License
POS License with Node id and iPad App Version will appear (which includes for all the stores).
Account Settings
- Account Level Gift Card - If enabled, Account level gift cards will be available for that particular Account.
- Account Level House Account - If enabled, Account Level House Account will be available for that particular account. By disabling it, Account Level House Account will not be available for that particular account.
- Enable Net Suite Integration - If enabled, Net Suite Integration will be available for that particular account.
- Cash Reward with Loyalty - If enabled, Cash Reward with Loyalty will be available for that particular account and the static message 'Please make sure to configure the cash and non-cash points in the Loyalty screen' will appear.
- Enable SMS Loyalty Confirmation - If enabled, Net Suite Integration will be available for that particular account. The new option Twilio Number will appear where you can enter the number and click Save.
- Customer Level Loyalty - If enabled, Customer Level Loyalty will be available for that particular account.
- Note: If SMS Loyalty Confirmation is enabled, then Customer Level Loyalty option will be enabled by default and greyed out. You cannot make changes.
- Discounted Loyalty - If enabled, Discounted Loyalty will be available for that particular account.
- Disable Marketing - If enabled, Disable Marketing will not be available for that particular account.
- Is FTP Enabled - If enabled, FTP will be available for that particular account. Enter the Host Name, Port, User Name and Password then click Save.
- Enable New Theme - If enabled, the new theme will be available for that particular account.
DB Information
Upon clicking Generate, the fields Generate Sales count and DB Size will appear.
Mail Chimp Details
Enter the Client ID and Client Secret in the provided fields to access Mail Chimp for that particular Account, then click Save.
Save
When all changes have been made, click Save.
Actions
When the Actions button with the vertical three dots is clicked, the following options appear:
- Upgrade Account - If selected, a new page with current (your) plan details will appear.
- Overview - The information Plan, Addons, Manage Plan Option, Amount Due, Due Date, Account Credits, Billing History and Payment Method appears.
- Upon clicking Manage plan option a new page with Plans and Addons will appear. Based on the plan and addons selected the Billing details will appear.
- In Billing details, click the plus (+) or minus (-) signs to increase/decrease the Quantity.
- Use Coupon Code: You can enter a Coupon Code in this field then click Apply to apply the Coupon.
- Total: Total amount will appear here. Apply Changes: when clicked, the Continue To Payment option will appear. Upon clicking Continue Payment option a Payment page will appear.
- By clicking Edit you can edit Order Summary.
- Show Recurring Changes: By clicking it all the selected Plans and Addons details will appear.
- Hide Recurring Changes: By clicking it all the selected Plans and Addons details will be hidden.
- Procced: When clicked, the Payment Information screen appears where you enter Card details and by clicking Pay the Amount will be paid. The below message along with the Go to Dashboard option will appear
- 'Thank You! Your payment has been successfully summited. Please allow a few minutes for the changes to be reflected in your account.'
- Go to Dashboard: When clicked, the Dashboard screen will appear.
- Billing History - If selected, the following options appear:
- Filter: A dropdown with the following options - This Month, Last 3 Months, Last 6 Months, Current Year, and Date Range.
- Apply: Upon clicking apply the Billing History for selected filter will appear.
- Date and Amount will appear.
- Download Invoice: When clicked, the Invoice will be downloaded in PDF format.
- Payment Method - If selected, the Payment Method screen appears where you can update the card details by entering Card Number, Country/Region, State, City, Address, and Zipcode - with the Update Card option. Under Any Questions, the predefined Questions and Answers will appear.
- Cancel Subscription - If selected, the Cancel Subscription page appears:
- Enter Comments for cancelling your subscription (if Undo is selected, the Cancel Subscription page will be closed).
- After entering the Comments, the Finish Cancellation option will be enabled. When Finish Cancellation is selected, a pop-up window 'Are you sure you want to cancel your subscription?' appears with No, Go Back and Yes, Cancel options. No, Go Back: By clicking it, the pop-up window will be closed. Yes, Cancel: By clicking it Notes Saved pop-up will appear.
- Show Stores - If selected, the Store Detail page appears (see the Stores tab)
- Archive - If selected, the Confirm Password pop-up appears. After entering the Password click Verify. The particular account will be archived.
- Inactive - If selected, the Confirm Password pop-up appears. After entering the password user should click on verify option. Then this account will be deactivated.
Login
Upon clicking Login, the Back Office page for that Account will be opened in a new screen.
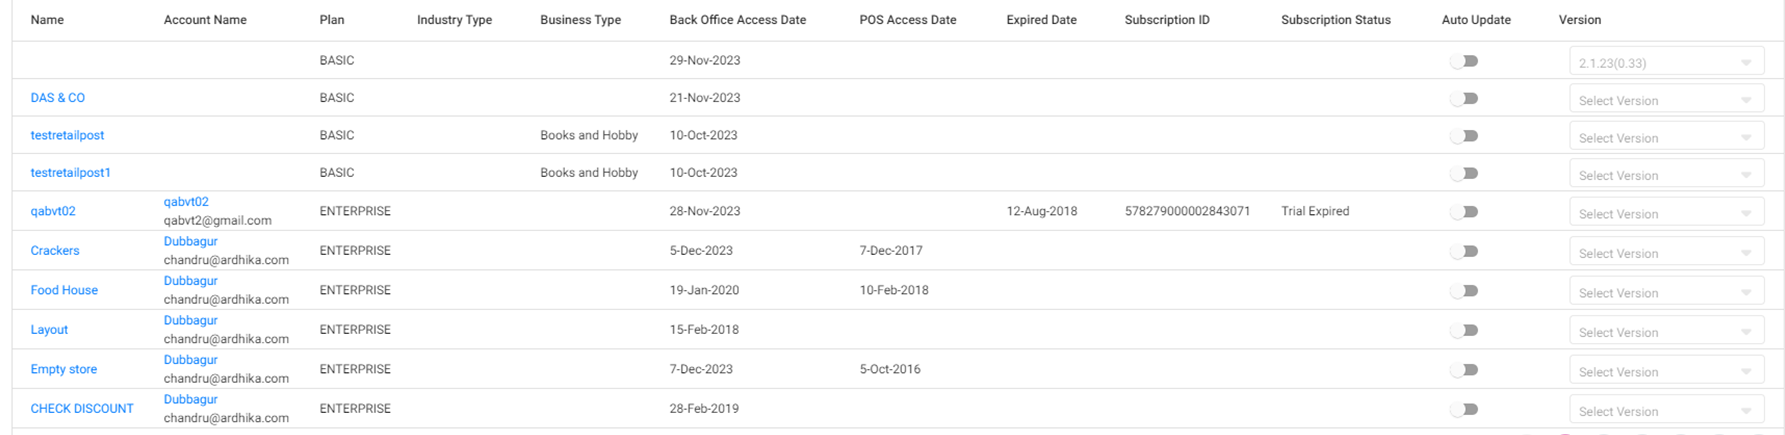
Stores
The Stores tab displays a table containing all Stores under this Enterprise. Select from the following filters:
- Back Office Access Date: Select a time period which a Store last accessed the BO.
- Last POS Access Date: Select a time period during which a Store last accessed the POS.
- Expiry Date: Select a time period for the subscription's expiration date.
- Subscription Status: Select from the list of a store's subscription status.
- Plan: Select from the list of the plan types a Store can be subscribed to.
- Industry Type: Select the type of Store (RETAIL or Restaurant).
- Business Type: Select a type of business from the dropdown. The results will be narrowed down to this type.
When Apply is clicked, the table is populated with results based on your selections:
Click on a Store Name, a new page appears for the Store's details. Clicking on individual sections relevant details of the stores will be available.
Store Details
- Store Name: Store name will be pre-populated and greyed out. This is non-editable.
- Phone Number: Phone Number will be pre-populated and greyed out. This is non-editable.
- Email ID: Email ID (Email Address) will be pre-populated and greyed out. This is non-editable.
- Date Created: The pre-populated date of creation of this store. This is non-editable.
- Last Retail Item Modified Date: The last modifier date of the Retail item for this store. This is non-editable.
- Last iPad Access Date: The last ipad access date for this store. This is non-editable.
- Store Address: The pre-populated (if entered) Account address should be pre-populated and is non-editable.
Features
If selected, this shows the relevant Names of features that are associated with this account along with the Status of the feature (Active or Inactive) and the Number of Stores that are active with this feature.
POS License
Displays the Node ID and iPad App Version for each License, which includes all Stores.
Store Settings
- Include Credit Card: By enabling it, User Id and Encryption Key will be available with update and confirm password options.
- User Id: Enter the user id in this field.
- Encryption Key: Enter the encryption key in this field.
- Apply the new User Id and Encryption Key clicking Update.
- Change Password: When clicked, you can change this password by entering the current password and new then confirm password option. Once the password is entered, click Save and this new password will be saved successfully.
- Include Gift Card: If enabled, Include Gift Card will be included for this store.
- Enable Multiple Cash Tenders: By enabling it, Multiple Cash Tenders will available.
- Enable Other Payment Options: By enabling it, Other Payment Options will available.
- EMV Settings: If EMV is disabled (default), then the Castle and Go and SPPax toggles will automatically be disabled and greyed out (unable to be changed).
- If the EMV toggle is enabled, then Castle and Go and SPPax toggles will be enabled. You can change the toggle status to either Yes or No for both.
- Give X Gift Card: If enabled the following fields will appear:
- User Id: Enter the user id.
- Primary URL: Enter the Primary URL in this field.
- Password: Enter the password in this field.
- Secondary URL: Enter the Secondary URL in this field.
- Confirm Password: Enter the password in this field.
- Update: Click to update your settings.
- House Account: If enabled, the House Account will be available.
- MPPG Credit Card: If enabled, the following fields will appear:
- Customer Code: Enter the Customer Code in this field.
- User Name: Enter the User Name in this field.
- Payment Gateway: Select the payment Gateway from the dropdown.
- Password: Enter the password in this field.
- MCC: Enter the MCC in this field.
- Clover Payment: If enabled, the Clover Payment will be available.
- Show Deposit In Sale Recap: If enabled, the following options will appear:
- Include Surcharge In Deposit: If enabled, the toggle surcharge will be included.
- Percentage: Enter the Percentage in this field.
- Update: Click to update your settings.
- SMS Configuration: Will be disabled by default. If enabled, you can configure SMS for this store:
- BID: Select the BID number.
- SMS Review Template ID: Enter the SMS review template ID.
- Email Review Template ID: Enter the Email review template ID.
- Save: Click to update your settings.
- Check Out: If enabled, the below details will be populated:
- Gateway Name: CreditCall will be selected by default.
- Terminal ID: Enter the terminal id here.
- Transaction Key: Enter the transaction key here.
- Country: Select the country from the drop-down list.
- Gateway URL: Enter the gateway URL here.
- Processor Name: By default, FirstData processor should be selected and these processor name should be editable.
- Merchant Name: Enter the merchant name here.
- Merchant Address: Enter the merchant address here.
- Auth Code: enter the auth code.
- Receipt Number ID: Enter the receipt number id here.
- Save: Click to update your settings.
- Membership: If enabled, then Membership will be available for that store.
- Mobile: If enabled, Mobile will be available for that store.
- Score: If enabled, Score will be available for that store.
ArchiveDB Information
- ArchiveDB Is Active: If enabled, the archive database information will be activated
- AWS Access Key ID: Provide this information
- AWS Secret Access Key: Provide this information
- AWS Region: Provide this information
- AWS S3 Bucket: Provide this information
- AWS S3 Storage Class: Provide this information
- Save: Click to update your settings.
DB Information
Upon clicking Generate, the Sales Count and DB Size will appear.
Actions
Under Actions (with a vertical 3 dot icon), the following options are available:
- Archive - A pop-up window with confirm password will appear. After entering the password click Verify. The particular store will be archived.
- Support - A screen where sub-tabs will be provided:
- Move Sales to Other Date
- Select the particular date and move that sales to another date. Select the particular sale date in the Choose Date filter then click Apply. The list of sales on that particular date will be listed in the table column.
- The table contains Receipt Number, Start Date, Employee, Sale Open Date and Gross Receipt details along with Check box for each and every sale item line.
- Select the relevant sale checkbox then click Update Business Date. The Update Business Date pop-up will appear where you can choose the Business Date to which this sale should be moved.
- If Update is selected, then the particular sale will be moved to the updated date, and the 'Sale Date updated successfully' message will appear.
- If Close is clicked, no changes will be made.
- Retail Deletion Tool - You can delete a particular Department, Category, Sub Category, or Retail Item.
- Select Entity Filter - Select an option from the dropdown.
- When an option is chosen then all available examples will be listed.
- You can choose either single item or multiple item (check box will be available) and then click on Delete option. When delete option is clicked, another pop-up will appear as "Are you sure you want to delete this item" along with Delete, Cancel and Close option. When Delete is clicked, then Department/ Category/ Sub Category/ Retail Item/ Retail Item deleted successfully message will appear.
- If an option is linked to another equivalent option then another pop-up will appear as the options are mapped with sales. To delete it may cause some report mismatch along with Delete, Cancel and Close options.
- Gift Card Import - You can upload the gift card import template from here for this store.
Login
Upon clicking Login, then you are moved into stores where Dashboard of the store will be available.
Related Articles
Retail Back Office: Linga Admin - Announcements
Navigation: Log in BO Admin, then select Announcement The Announcements page displays a listing of new information such as software updates for iPad, Web POS, Back Office, etc. when logging into Stores or Accounts during the Announcement's allotted ...Retail Back Office: Subscriptions & Upgrades - Summary
There are 2 plans available for a Retail Subscription: Pro and Enterprise. Add-Ons for Retail The 9 addons available for Retail: Alerts, CDS, Feedback, Insights, Inventory, Loyalty, Marketing, Schedules, and Stock. Billing for Subscription The ...Retail Back Office: Admin - Dealers
Navigation: Log in BO Admin, then select Dealers You can view the Dealers, Subscriptions and Payments options. Dealers will appear by default. Dealer Subscriptions Payments Dealer The Dealers page displays a table that contains the following columns: ...Retail POS: House Account Payments
Back Office Accounts Navigation: Log in to BO Admin, then select Accounts > Accounts Account Settings Account Level House Account - By enabling the toggle (set to YES), the Account Level House Account will be available for the specific Account. Store ...Retail Back Office: Scheduler
Shift Management can be performed on the Scheduler screen. Navigation: Log into Back Office for your Retail Store, then select Scheduler > Scheduler The Scheduler screen displays the following details and information: Note: The Scheduler screen ...