Retail Back Office: Admin - Dealers
Navigation: Log in BO Admin, then select Dealers
You can view the Dealers, Subscriptions and Payments options. Dealers will appear by default.
Dealer
Subscriptions
Payments
Dealer
The Dealers page displays a table that contains the following columns:
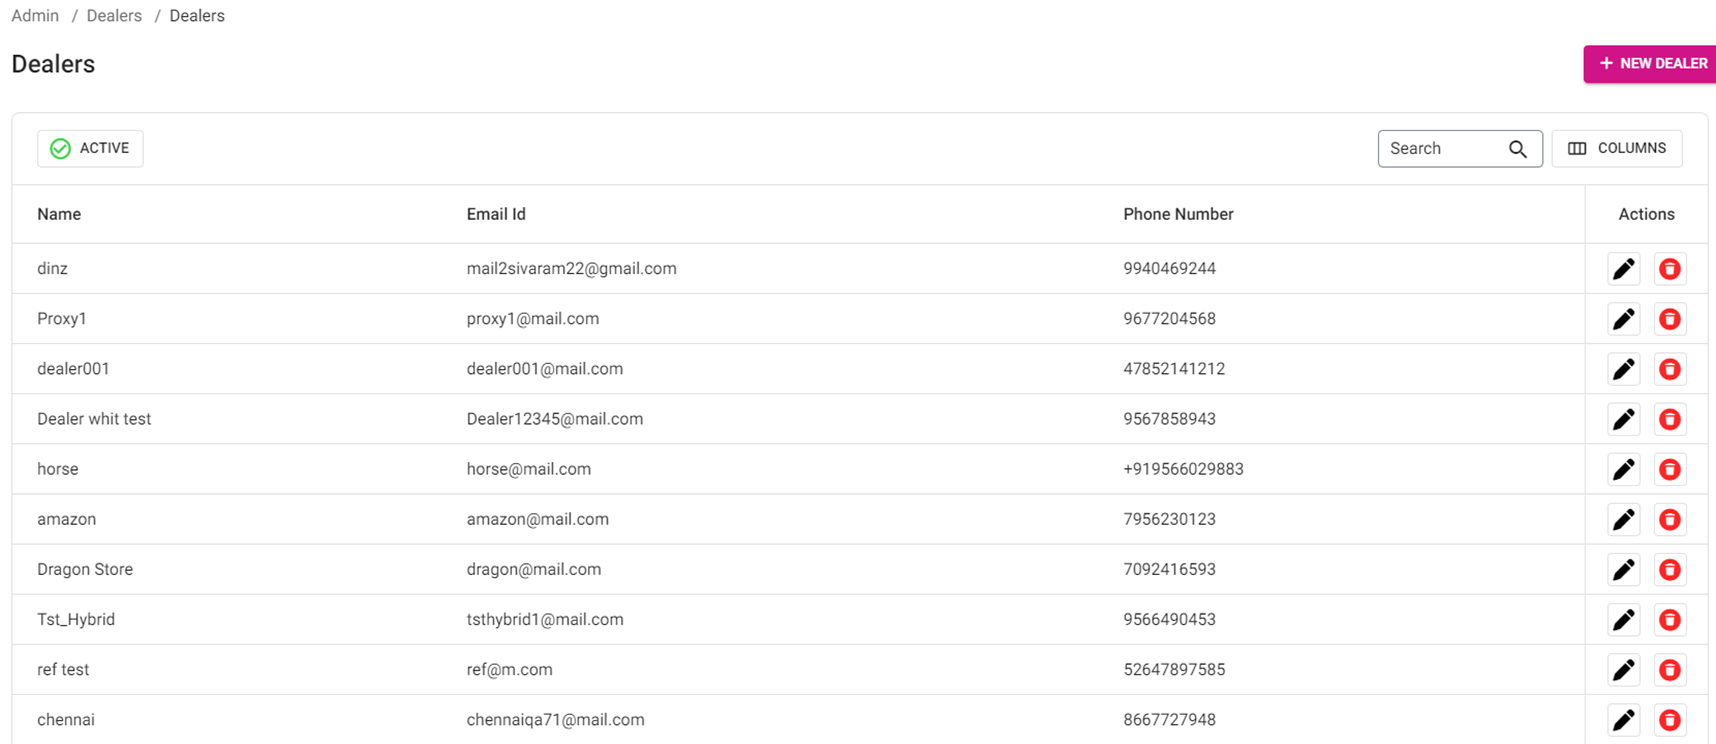
- Name: The name of the Dealer will be shown here.
- Email ID: The email of the Dealer will appear. Name configured will be displayed in POS
- Phone Number: The phone number of the Dealer will be shown.
- Actions: Displays two options:
- Edit: You can view Dealer window with the data which has been already created when edit is clicked. See the below instructions.
- Delete: The Delete pop-up appears. Select Delete to delete the respective Dealer (moved to Inactive status), or Cancel to keep the Dealer.
Create or Edit a Dealer
Click on the + Dealer button to create a new Dealer (or Actions > Edit to update an existing Dealer). The New/Update Dealer page appears. Enter (or update as needed) the below inforomation:
- General
- Name: (Mandatory) The name of the dealer (a maximum of 25 characters)
- Email: (Mandatory) The admin email id (can be changed if needed),
- Password: (Mandatory) The password for the admin mail id (can be changed if needed. It is recommended that the password contain letters, numbers and symbols.
- Confirm Password: (Mandatory) The same password must entered again for confirmation.
- Phone Number: The phone number of the dealer. The number entered must be at least 6 digits.
- Zoho Code: Select the zoho code from the dropdown. The corresponding Back Office and Dealer URL will be updated.
- For a new Customer: the new customer signup url text box will appear and upon clicking the URL it will open a new page with Plan details.
- Commission: (Mandatory) Select the commission as either Percentage or Amount.
- Upon selecting Percentage, the value will appear as Percentage with 2 decimal places.
- Upon selecting Amount, the value will appear as Amount. You can enter only number.
- Address
- Address Line 1: The street address.
- Address Line 2: Any additional street address info.
- City: The name of the city.
- State: The name of the state.
- Country: The name of the country.
- Zip Code: The country code (must be numbers only).
- Dealer Details
- Back Office URL: (Mandatory) The URL to access the Back Office.
- Purchase URL: (Mandatory) The Purchase URL.
- Dealer URL: (Mandatory) The field will be grayed out.
- Support URL: (Mandatory) The support URL will be entered.
- Support Phone Number: (Mandatory) The phone number will be displayed in POS as the support number. You must enter a between a minimum of 6 and maximum of 15 digits.
- Gift Card Sender Email: (Mandatory) The email address where purchased gift cards will be sent from.
- Icons and Themes
- The theme color can be selected from the given list, then click on the Set Theme button. The selected color will be updated. You will be moved to the main Dealer screen where list of dealers table is viewed.
- Save/Update - When all the fields are filled, click the Save/Update option. If any mandatory fields are not entered, then Save/Update will be greyed out.
Subscriptions
Navigation: Log in BO Admin then select Dealers > Subscription
The Subscription tab displays a Dealer dropdown which contains a list of dealers. Upon selecting a dealer, the relevant details will populate the table which contains the following columns:
- Customer: The name of the customer.
- Plan: The subscription plan which has been selected by the Dealer.
- Status: The status of the subscription.
- Created Date: The subscription plan created date, in [Year/Monthe/Date] format.
- Activated Date: The subscription plan activation date, in [Year/Monthe/Date] format.
- Amount: The amount of the subscription plan (in currency).
- Last Billed Date: The last billed amount plan date, in [Year/Monthe/Date] format.
- Next Billing Date: The next billing amount plan date, in [Year/Monthe/Date] format.
Payments
Navigation: Log in BO Admin then select Dealers > Payments
The Payments tab displays dropdowns for Dealers and Subscriptions. Select a Dealer from the dropdown, then a Subscription option. When a subscription is selected, the below containing the following columns is populated:
- Invoice: The invoice number.
- Amount: The amount of the subscription.
- Status: The status of the payment (Paid or Unpaid)
- Date: The date of the payment, in YYYY-MM-DD format.
- Commission Status: The status of commission.
- Commission %: The commission percentage.
- Commission: The commission value, based on the commission percentage.
- Actions: The PAY NOW button will be available. When clicked, the Payment screen appears which contains the following details: Customer Name, Amount Received, Commission % and Amount to be paid - with Save and Close options.
Related Articles
Retail Back Office: Admin - Accounts
Navigation: Log in BO Admin then select Accounts > Accounts The Accounts page is broken down into the following tabs: Account Stores Account The Accounts tab displays the total number of Accounts, along with a table containing rows representing each ...Retail Back Office: Linga Admin - Announcements
Navigation: Log in BO Admin, then select Announcement The Announcements page displays a listing of new information such as software updates for iPad, Web POS, Back Office, etc. when logging into Stores or Accounts during the Announcement's allotted ...Retail Back Office: Scheduler
Shift Management can be performed on the Scheduler screen. Navigation: Log into Back Office for your Retail Store, then select Scheduler > Scheduler The Scheduler screen displays the following details and information: Note: The Scheduler screen ...Retail Back Office: Employees Scheduler
Scheduler provides a view of Employees Details via the Employees screen. To Add, Edit or Delete Employee information - see the Users screen. Only Admin level users are authorized to manage Employee details. Navigation: Log into Back Office for your ...Retail Back Office: Requests Scheduler
Managers (Admin level) can approve requests for Time Off or Shift Swapping. Employees can approve Shift Swapping requests from their co-workers. Navigation: Log into Back Office for your Retail Store, then select Scheduler then Requests The Requests ...