Retail POS: Scale Hardware Settings
Navigation: Log in to POS. Select Operation then Hardware
Settings.

On the Hardware Settings page, select the Scale tab.
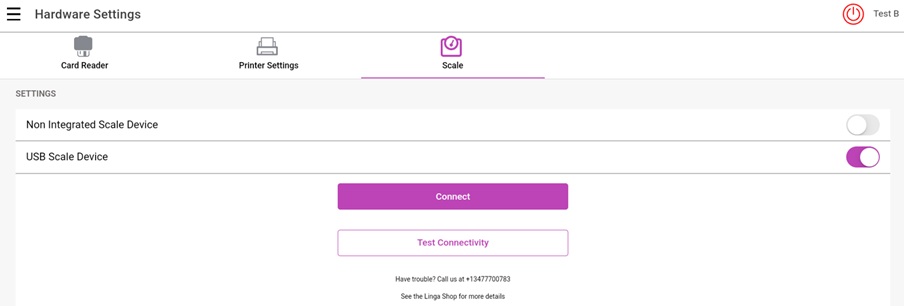
Toggles
The Scale tab displays two toggles: Non-Integrated Scale Device and USB Scale Device.
- If Non-Integrated Scale Device is enabled, the application won't check the scale device and allow you to enter the Weight manually. Also the USB Scale Device toggle will automatically be disabled.
- If the toggle is disabled, then the USB Scale Device toggle can be enabled and the application will check the Scale device.
- If a Scale device is not connected, the message 'Scale device is not connected' pop-up appears.
Connect Button
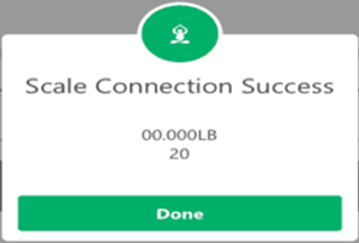
- If Connected, the Scale Connection
Success appears which displays the Weight.
- If Disconnected, the Scale Device is Not Connected appears.
Test Connectivity
If Test Connectivity is clicked and the Scale device is connected the 'Scale Connection Success' pop-up appears along with the detected weight (regardless of any weight on the scale).
Scenarios
Non-Integrated is Disabled and USB toggle is Disabled
A retail item is selected. If the Scale device is not connected, the 'Device is not
connected' pop up appears. Once OK is selected, you can enter the Weight manually in POS. Once Done is selected,
the Order screen appears where the Item's Name, Weight, Quantity and
Price will appear.
Non-Integrated toggle is Enabled and USB toggle is Disabled
The application will not look
for a scale device. You can place the scale Retail item on the Order screen and manually enter the Weight. Once Done is selected, the Order screen appears where the Item's Name, Weight, Quantity and Price will appear.
Non-Integrated toggle is Disabled and USB toggle is Enabled
- You must connect the Non-Integrated Scale Device to POS via USB.
- If the
Non-Integrated Scale Device toggle is disabled:
- If the scale is not connected, you can select a scale Retail item in order screen, the application will Receipt for a scale device and display 'Scale device is not connected' pop up will display. The weight can't be manually entered in POS and the manual weight entry screen won't appear.
- If the USB Scale Device toggle is enabled and the scale is connected successfully: when placing the Retail item on the scale device and clicking Get Weight, the weight will be displayed along with the placed Retail item weight and Price on the Order screen.
- When a Tare Group is assigned to a Retail Item: the values will be set as default and the Retail item will automatically placed on the Order screen. The manual weight entry screen won't appear.
- If the scale device is connected and the user selects a tare group assigned to a scale Retail item, but no weight is placed on the scale, the manual weight entry screen will be displayed. The user can then enter the weight manually, and once the 'Done' option is clicked, the screen below will be displayed.
- If 0.000 is entered then Done is clicked, then a pop-up with the message 'Item weight cannot be negative or zero' appears in POS.
Note:
- If the Non-Integrated Scale device toggle is enabled, The Get Weight and the Get Tare buttons are greyed-out.
- If the Non-Integrated Scale device toggle is disabled, the USB Scale Device is enabled then all the fields can be visible and clickable.
- The Scale Retail item only applies to Scale functionality.
- CAS Scale integration is currently available only for Android.
Related Articles
Retail POS: Hardware Settings Overview and Recommended Devices
In POS, select Operation then Hardware Settings. Note: Only employees with the proper role and permission settings have access to the Hardware Settings screen. The Hardware Settings screen displays the following tabs: Card Reader Printer Settings ...Retail POS: Operation - Print Labels
Setting Up a Label Printer Back Office Before printing labels in POS, you must first have Label Printers configured in Back Office. Navigation: Log into the Back Office for your Retail Store. Select Settings. Then under Hardware, select Label ...POS: Operation - Scale Hardware Settings
Back Office See the Receipt Printer Knowledge Article. Connecting the Printer to the Scale On the Scale: connect the DB9 male side of the cable to the highlighted port. Connect the port supply to the highlighted port. Connect the scale cable to the ...Retail POS: Printer Hardware Settings
Back Office For more information on Printer and Receipt Template settings, see the following Knowledge Articles: Receipt Printers Front End Receipt Template Label Template POS On the Hardware Settings page, select the Printer Settings tab. It ...Retail POS: Customer Display Hardware Settings
On the Hardware Settings screen, select the Card Reader tab. The screen displays the device name of the Customer Display which is connected to the POS. Back Office License Settings Navigation: Log into Enterprise, then select Settings. Under Licenses ...