POS: MPPG Payments
Configuration in Linga Admin
- Select Account > Stores, then select the Store for which the respective Payment needs to be enabled.
- Under the Store Settings section, enable the MPPG toggle.
- When you enable the MPPG credit card toggle, the MPPG details appear on the screen with the following fields: Customer Code, Username, Password, Payment Gateway and MCC.
- For Payment Gateway, select the processor TSYS, FDMS or Worldpay.
- Click Save.
- The Save button will be available once all Mandatory fields are filled in.
Configuration in Back Office
- The Payment Method MPPG Credit Card must be enabled in Back Office [under Settings > Payments > Payment Method].
- When Admin MPPG toggle is Enabled, the MPPG payment appears in Payment Settings under Store Settings.
- When Disabled, the MPPG payment won’t appear under Payment Settings.
- Under Payment Type in Add Payment method, the MPPG Credit Card payment type must be added.
- After selecting MPPG Credit Card as a Payment Method: you can configure the following fields:
- Mobile - Payment Name, Code, Priority, Open Cash Drawer, Sale or Authorize Payment Type.
- Tablet - Payment Name, Code, Priority, Open Cash Drawer, Sale or Authorize Payment Type, Debit, and Exempt Surcharge
Payment Surcharge
You can select and set up Surcharge Type in Payment Surcharge.
Surcharge
- You
can set up a customized Surcharge Name to appear on the POS Receipt.
- You can set up a Surcharge Percentage for MPPG payment.
Service Charge
- Service Charge is calculated based on card type for MPPG payments.
- Service Charge applies to Debit Card and Credit Card based transactions in BO settings.
- You are able to enter the Service Charge Percentage for MPPG.
- Service Charge applies to both Auth and Sale.
- The Service Charge for MPPG payments will be automatically deducted from the card, based on the Service Charge configured by the customer.
Dual Price
- The Reward will apply when the paying via Cash.
- Provide the Name, Dual Price Percentage, and Dual Price Tax Type for MPPG payments.
Batch Settings
- Set the Enable Auto Batch toggle to YES (Enabled). Then enter the Time the Batch will automatically run.
- If you enable the Print Batch Report, then the Batch report will be printed after submitting the Batch.
- Batch Submit Device - Select the device used to process Batch payments, including MPPG.
- For Default Batch Payment, select MPPG Credit Card.
- MPPG Credit Card is an option only when the MPPG Payment toggle is enabled in the Admin page.
- On the Batch screen, MPPG related payments will appear, and MPPG appears as a Type dropdown option.
- All Offline transactions (including MPPG) will appear under Batch in BO.
- Once Offline transactions are processed, all the processed transactions will be removed from the Batch screen under BO.
- If Offline transactions are available in multiple Nodes, all the Nodes must be online to process the Batch. If not, the Node only available in online will be batched. Tip adjust is not available for offline payment.
- When the Process Offline button is clicked, the POS will not validate POS Online/Offline status, and a generic message will appear.
- Please make sure all terminals are Online to process the payments.
- If a specific terminal is Offline, then payments will not be processed.
- For Offline transactions, Process Batch will process the Offline payment and Batch them.
- Once you click Process Offline, the Offline checks will be Processed and Batched, and the processed Offline checks will disappear from the Batch screen. Checks taken in Online mode it will continue with the existing process.
Receipt
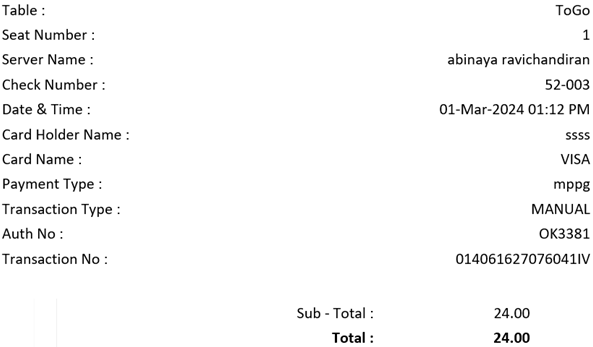
Note: The Receipt will support Star and Epson Printers and for both Text and Image. The following fields will be added to the receipt: Table & Seat Number, Server Name, Check Number, Transaction Type, Transaction Total, Transaction Currency, Transaction Number, Payment Type, Check Number, Masked Card Number, Date & Time, Card Holder Name, Card Name, Payment Type, and Auth No.
Managing the Payment
Hardware Settings
- In the Store's Admin settings, ensure the Payment Type MPPG is enabled (YES).
- On the Operations screen, select Hardware Settings.
- The Device Name is displayed in the Select A Bluetooth Card Reader section.
- When selecting the specific Device in POS, the device will be viewable as an option once it’s paired.
- Now you can select MPPG Credit Card payment for a sale, then you can either Swipe or Insert or Tap the Card on the terminal for processing the payment.
Payment
To Create a Sale:
- Select the Payment
option.
- The Payment screen appears, where you can see all the Payment options enabled in Back Office (BO) settings.
- Select MPPG Sale / MPPG Auth to perform payment through the Device.
- If the Tip screen is enabled, Customers are redirected to it to provide a Tip in Percentage (%), Custom amount or proceed with No Tip.
- Below the Tip section, the Signature line will be available based on settings in BO.
- After Tip selection, click Continue and the Card screen appears.
- After Tip and Signature, press Process Payment to be directed to the Card screen.
- On the Card screen, there are 3 options: Manual, Clear, and Process, with the Amount to be paid appearing. You can manually enter the Card details - or swipe or tap or insert the Card (EMV).
- If no device is connected, the ‘Card reader is not connected’ message will be displayed.
- After payment completion, the Show Digital Receipt screen will appear if enabled in BO.
- On the Digital Receipt screen, you can choose whether the Receipt / Bill is to be sent via SMS, Email or Print. You can choose any one of the options then press Send Receipt.
- The Receipt will be sent based on the selection, then the Order screen appears.
- The Service Charge will apply to both Sale and Auth.
Sale
- When a Sale is placed, the Payment Request is sent to the Server and the Amount is credited to the Merchant.
- Under the Payment section, the Payment Method MPPG Sale appears only when the Payment Type is enabled for the Store.
- After selecting MPPG Sale as the Payment Method, the Tip screen (if enabled) appears where you can provide the Tip and Signature, then click press Process Payment.
- The Card screen appears, displaying the Amount to be paid - with 4 options: Cancel, Manual, Clear, and Process.
- Manually enter the Card details or swipe/insert the Card in the Magtek device (EMV) to complete the payment.
Auth
- While creating Payment Method such as MPPG Credit Card, set Auth as the Payment Type.
- When the Sale is placed, the Payment will go to the Batch screen where the Tip can be adjusted and when Batch Submit is clicked, all payments will be processed.
- In the Payment section, MPPG Auth appears under Payment Methods when the Payment Type is enabled for the Store.
- After selecting MPPG Auth as the Payment Method, the Tip screen (if enabled) appears - where you can provide the Tip and Signature, then click press Process Payment.
- The Card screen appears, containing the Amount to be paid - with 4 options: Cancel, Manual, Clear, and Process.
- Manually enter the Card details or swipe/insert the Card (EMV) to complete the payment.
- If the Device is not connected, the message ‘Card reader is not connected’ appears.
- Service Charge will apply to both Sale and Auth.
Payment Scenarios
- Insert - Select Process. Insert the card in the card reader device then click Process. The payment will be processed on the card.
- Swipe - Swipe the card in the card reader device slot. Payment will begin processing.
- Tap - Tap the card and payment will start processing. If this fails, select the Manual method.
- Manual Card Details - After manually entering the Card details, click Process. The payment will be processed on the card.
Payment Success
When Process is clicked, the system will send a response to the server, which will respond that the Payment is processed (or not processed).
- If processed: the payment will be added, and a Confirmation will appear.
- If not processed: the request will be cancelled, and you are returned to the Card screen.
Cancel
If Cancel (below the transaction loading graphic) is pressed while payment is processing, the system checks whether the payment request was successful.
- If payment is successful before the cancellation request: the payment will be included on the Check.
- If payment failed or the Amount wasn’t processed: the payment processing should stop, and you are reverted to the Payment screen with message 'Cancelled by host'.
Time Out
If Process is pressed and Payment processing started
but a Card wasn’t swiped or inserted: the system will check for a Time Out
period of 2 minutes. After 2 minutes, the optional error message ‘TIMEOUT’
appears.
Void
- Void applies to both Sale and Auth.
- You can void the payment after it's completed. You must Delete the payment on the Payment screen and the full payment will be voided.
- Partial void is not possible. All payments on the Check must be deleted to void.
- After closing the Check, the Check will be under the Closed tab. You can reopen the Check and select Void. You are redirect to the Payment page where the message ‘Payment made on this check. Can you return this to [Customer Name]’ appears.
- If Manual Submit is enabled, the Check will not close and the system will redirect to Payment from there you can delete the payment and void the check.
- If a customer would like to remove an item from an unpaid Order, press Void. The message ‘All orders are voided’ appears and menu items on the check will be voided.
- If the Order has already been sent to the Kitchen, press Void. TheVoid Reason pop-up appears, containing Reasons previously defined in BO. You can select any one of pre-defined Reasons, or manually type in Void Reason.
- After providing the Void Reason and pressing Add, the Menu Item(s) will be voided.
- Void applies to both Sale and Auth.
Batch
You can complete the Auth transaction by clicking Submit Batch.
- On the Batch screen: all the successful and offline transactions appear, and Tips for the transaction can be changed or applied on the Batch screen before batching.
- MPPG Auth payments will appear on the BO Batch screen for batching.
- When the value is chosen in the Batch Submit Device in Back Office and you attempt to submit the MPPG Batch from the same Node, you will be able to submit the Batch without any intervention.
- When a Batch Submit Device is assigned in BO and you attempt to submit the MPPG Batch from a different Node, the warning message 'MPPG default batch device has been set to – [node]! Try batch device from specified device' appears.
Auto Batch
- After setting the Auto Batch Time in BO, all the successful payments will process, including offline transactions on the Batch screen.
- Auto Batch is available for MPPG payments.
Manual Batch
You must manually click Submit Batch.
- If there are offline transactions, you must first click Process Offline.
- Once all offline checks are processed, then click Submit Batch and the rest will be processed.
- If Submit Batch is selected before processing offline checks, the message ‘Run Process offline before batch’ appears.
- Under Default Batch Payment, MPPG is included only when the MPPG Payment toggle is enabled in Admin. You can select MPPG as the Default Batch Payment in BO.
- On the Batch screen, MPPG related payments appear along with MPPG as the Device.
- If the Batch is processing, the Submit button at the bottom of the screen will be disabled and the loading graphic will be displayed until the batch completes.
- After initiating a Batch, a Tip cannot be applied.
Batch Settle Date & Status
In Batch/Tip adjustment screen, the Settle Date and Status of the Batch will appear at the bottom-left of the screen.
Batch Status
The below statuses will appear on the Batch/Tip Adjustment screen:
- Batch Completed
- After the batch is processed, the Batch Completed status will appear at the bottom of the screen.
- The header Last Batch Started appears - with the Batch transaction's Day, Date and Time appearing below it, and the Status of the Batch below that.
- The Batch Completed status will appear in green.
- Batch In Progress
- If the Batch is processing, the Batch in Progress status will appear at the bottom of the screen.
- The header Last Batch Started appears - with the Batch transaction's Day, Date, Time, appearing below it, and the Status of the Batch below those.
- Batch In Progress status will appear in green.
- Batch Incomplete – Resubmit Batch
- If the batch processing is incomplete, the Batch incomplete – Resubmit Batch status will appear at the bottom of the screen.
- The header Last Batch Started appears - with the Batch transaction's Day, Date, Time, appearing below it, and the Status of the Batch below those.
- Batch incomplete – Resubmit Batch status will appear in red.
- Note: The Date and Time format configured in BO will be reflect on the Batch Settle Date. The Batch Status will appear for MPPG and Tempus payments.
Tip Adjustment
You can adjust the Tips of authorized Payments on the Batch screen, which displays all transactions.
- Select a Check No.
- On the Tip screen that appears, adjust the Tip on the Payment then press Continue.
- The adjusted Tip will be applied to the Check.
- Tips on Cash payments can be adjusted by using the Adjust option on the Payment screen.
- For Sale or Card payments, the Tip cannot be adjusted or changed.
- For a Check: if partial payment is made using MPPG Auth - then on the Payment screen, you can adjust the Tip of the partial payment by selecting the payment and select the Adjust option.
- Tips cannot be adjusted for offline payments. When an offline Check is selected for Tip adjustment, the message ‘Cannot apply tip for offline payment’ appears.
Refunds
Refund
A sale was placed on a performed Close Day and the Customer wants a Refund on the payment.
- Navigate to the Refund screen.
- Enter the Check’s Date and/or Check Number.
- Press Search, and it will appear.
- Select a Check then press Refund.
- On the Refund pop-up that appears:
- Enter the Payment Type (including MPPG)
- Enter the Amount to be refunded with the number pad.
- Enter the Reason for refund.
- After providing a Reason, select the Payment. The message ‘Do you want to refund? Confirm Yes or No’ appears.
- If you select Yes, the ‘Refund Success’ confirmation pop-up appears.
- If you select No, you remain on the same screen.
- If a Refund has already been issued, the message ‘Check is already refunded’ appears.
Refund Without Receipt
If you select Refund Without Receipt, the Refund pop-up appears.
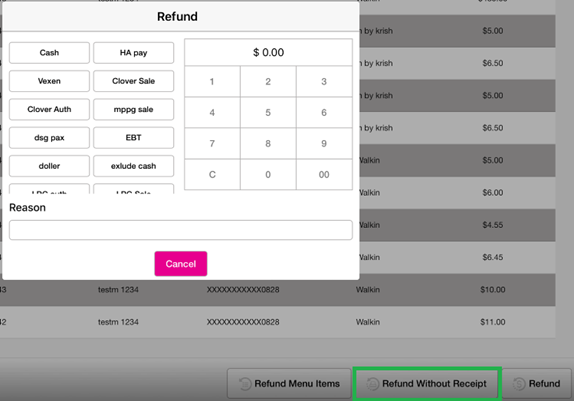
- On the Refund pop-up window, all the Payment Types are displayed (including MPPG).
- To select the Payment Type, you must first provide a Reason. Otherwise, the ‘Provide reason for Refund’ appears.
- The Amount to be refunded will not be displayed on the pop-up. The Amount must be manually entered.
- After providing the Reason, the message ‘Do you want to refund? Confirm’ appears with Yes or No options. If Yes is selected then select the Payment. If No is selected, you revert to the previous screen.
- For Payment Method:
- If Cash is selected, the Refund Success pop up appears.
- If Card Payment such as MPPG is selected, the Card screen appears where you can manually enter the Card details - or Swipe, Tap or Insert the Card (EMV). The Amount will be refunded to the Card and the Refund Success pop up appears.
Refund Menu Item
When Refund Menu Item is selected, you can select the
Item which the customer wants a refund on the amount. Select Refund Check or
Refund Item button at the bottom-right of the screen.
- After selecting Menu Item, the Refund pop-up will appear.
- To select the Payment Type, you must first provide a Reason. Otherwise, the ‘Provide reason for Refund’ appears.
- The Amount to be refunded will appear on the pop-up.
- After providing the Reason, a pop-up with the message ‘Do you want to refund? Confirm’ appears with Yes and No options.
- If Yes is selected, the Refund pop up will be closed and a success message will be displayed indicating the completion of the Refund process.
- If No is selected, you revert to the previous screen.
Manual Submit
Manual Submit functionality applies to MPPG payment.
- Under Payment Settings, the Manual Submit for Credit Card toggle will be available.
- In POS, the toggle will be available for Table and Bar Service Types.
- If the toggle is Enabled after completing a credit card transaction, the system will allow you to manually submit the Order to complete.
- If the toggle is Disabled, the system will work as usual.
- If Dine In or Bar Tab is selected as the Service Type and MPPG is selected as the payment: the Tip screen appears. Once the Tip is selected, the payment can be made.
- You can enter details manually - or by Swipe or Insert the Credit Card using the payment device.
- After processing the payment, screen will be directed to CC Receipt screen.
- If Send Receipt is selected, the CC Copy and Merchant Copy will be generated.
- If No Thanks is selected, the receipt will not be generated.
- After selecting No Thanks or Send Receipt, the Payment screen appears.
- On the Payment screen when Payment Status is clicked, the Adjust option will be changed into Tip which is used to change the Tip amount on the payment.
- If Tip is selected, the pop-up appears where you can update the tip on the payment.
- Press Submit to close the Check, and the Digital Receipt screen (where the Receipt will be generated) appears. The updated Tip will be reflected in the Receipt.
Offline Transaction
When the network is unavailable but the Allow Offline Payment toggle is enabled, making a Sale and processing the Payment will automatically enable the Offline Mode toggle.
If the Allow Offline Payments toggle is enabled and Offline Mode is disabled:
- If the network went to an offline state during payment processing, the device automatically moves to Offline Mode as the Offline Mode toggle was automatically enabled and payment will be taken offline, and the following notification appears at the bottom: ‘Your device is offline. Payments will be taken in offline mode. Make sure to authorize your offline payments Next network connectivity check will be done after 15mins’.
- During payment processing: if there is any network failure, the offline payment will be processed and the sale Payment will go into Batch. The below scenarios outline payment processing conditions:
- If Allow Offline Payments is disabled and Offline Mode toggle is disabled, the system will not be able to take any offline payments.
- If Allow Offline Payments is enabled and Offline Mode toggle is enabled, the following notification appears: ‘Your device is offline. Payments will be taken in offline mode. Make sure to authorize your offline payments Next network connectivity check will be done after 15mins’.
- If Allow Offline Payments is disabled and Offline Mode toggle is enabled, the following notification appears: ‘Your device is offline. Next network connectivity check will be done after 15mins’. Payments will not be processed no offline check will be processed but remaining offline functionality will work.
- When the system comes back online: payments taken in offline mode will be noted by light red highlight, which indicates these Checks must be processed offline and then batched. Failure transactions are marked by a dark red highlight.
- When there are offline transaction Checks, click Submit Batch. The system will display a pop-up with the message ‘Run Process offline before batch’.
- When Process Offline is pressed, any successful transactions (those without a colorized highlight) can be batched. If all the offline transactions are processed and there are no Checks to be processed offline, then the Process Offline button will be greyed out.
- Once the offline process is completed, you can Submit the Batch for other Checks.
- Offline transactions don't allow for Tip adjustment.
- After the Device comes online, the Check must be visible on the BO Batch screen.
- For processing offline Checks: all nodes must be in online mode. Otherwise, the POS will process only the specific Node checks which are online.
Authorizations
Pre-Auth
- Log into BO and select a Store, then navigate to Settings > Application > General Settings.
- Set the Enable Pre Auth toggle to YES (enabled). When enabled, the system will authorize a specified Amount prior to the Order.
- Enter the Pre-Auth Amount in the currency that is as per the Store’s settings.
- The Amount entered is the default Pre-Auth Amount value that will be shown in POS whenever the Customer tries to make pre auth.
- If BAR - TAB is selected as the Service Type, the Pre Auth field appears.
- Click the number entry field and the number pad pop-up appears where you can enter the Amount. The type of Currency (based on the Store’s settings) is shown before the number.
- Note: For MPPG payments, the minimum pre auth value will be 0.01.
- Upon pressing Process, the Pre Auth amount will be processed and the confirmation message ‘Your card [Card number] is Authorized’ appears.
- When Extended Pre Auth is disabled, even when the Sale amount exceeds the Pre Auth amount the Sale will be completed.
- Note: For Pre Auth and Extended Pre Auth, the respective Pre-Auth Payment screen will appear.
- After Pre-Auth Payment is successful, the Service Type can't be changed. It can be deleted on the Payment screen.
- If the Customer has enabled the MPPG payment gateway - after clicking the pre auth amount, it will show the MPPG payment gateway.
Extended Pre-Auth
If Extended Pre Auth is enabled and the Check Amount exceed the Pre-Auth Amount, the system will request to do Extended Pre-Auth.
- If the Check Amount is less than or equal to the Pre-Auth Amount, the sale will be completed without requesting additional Pre-Auth.
- If the Menu Item Value is more than the set Pre-Auth Amount, A pop-up is shown with the message ‘The check amount exceeded the pre auth amount do you want to pre auth the additional amount’ with Yes and No buttons.
- If Yes is clicked, the Pre Auth pop-up appears. The extended Pre-Auth Amount can be customized by typing the exact value of the amount exceeded or above than the Check Value but must not be less than the Check Value.
- If No is clicked, the Extended Pre Auth will be cancelled.
- If Extended Pre Auth is disabled and the Check is more than the set Pre-Auth Amount, the Extended Pre Auth functionality will not work. The sale will be completed without any additional Pre-Auth Requested pop-up.
- If Process is selected for the Extended Pre Auth with a previously existing Pre-Auth Amount or less than that, then a pop-up appears with the message: ‘Amount should be greater than existing pre auth amount [previous Pre-Auth Amount]’.
The successfully made Pre-Auth Payment will appear on the Payment screen.
- The formula to calculate the Pre-Auth Value is = Increased Pre-Auth Value - Previous Pre-Auth Value
- Example: the default Pre-Auth Value will be $100 - so if Customer uses $10, on the next Pre Auth the $10 difference will be shown on the Payment screen.
Anytime Pre Auth
The POS custom button is available under Application Settings. Upon clicking the dropdown many icons are shown. This option is to customize the POS as needed.
- Only when pre auth is enabled in the Application Settings, the pre auth will appear in the dropdown.
- When the anytime pre auth option is set in custom button, it can be viewed on POS.
- If pre auth is selected as custom button, the same will be displayed only in bar tab and other service type will show modify button.
- Upon opening a bar tab service type is selected the pre auth option will be asked. You can cancel the pre auth by clicking exit.
- After adding Menu Items to the Check: to add pre auth value to the Check - choose pre auth by clicking the anytime pre auth icon on the bottom of the POS screen.
- Note: Only when a pre auth is added from the POS Custom option in application settings, the Pre auth field will appear.
- Upon clicking the number field, the number pad will appear to enter the number value.
- The Currency value and symbol appears before the number - based on the Store's settings.
- Upon clicking the process, the pre auth amount will be processed.
- Close the pre auth window by clicking Exit.
- Multiple pre auths will not be possible (Anytime pre auth). When attempting to do multiple pre auths, a pop up with the message 'Pre auth is already available on check, you can remove the existing and do another pre auth' appears.
- When extended pre auth is enabled.
- When the Customer adds a Menu Item and then initiates anytime pre auth when the amount is less than the sale amount, the system will request to do pre auth more than the sale amount.
- In hardware settings when the card reader is not connected the following error sentence should be shown in pre auth screen payment. The following error message will be shown-The card reader is not connected.
MPPG is available on Android and iPad
Receipt
- The below Receipts are supported for Star and Epson Printers and for both Text and Image.
- Only the last 4 digits of the Credit Card used for payment will be displayed on receipts.
- These Receipts apply to Frontend, Merchant Copy, Customer Copy and Itemized receipts.
Related Articles
Retail POS: MPPG Payments
Configuration in Linga Admin Select Account > Stores, then select the Store for which the respective Payment needs to be enabled. Under the Store Settings section, enable the MPPG toggle. When you enable the MPPG credit card toggle, the MPPG details ...Retail POS: SPPax Payments
Back Office (BO) BO Admin Requirements Navigation: Log into BO then select Admin > Stores Under Admin Store(s): When enabling the SPPAX toggle (setting to Yes), the SPPAX Details screen appears. Enter the mandatory details (pax device serial number) ...POS: Payments - Offline Mode
POS Navigation: Log into POS, then select POS Operations > POS Settings On the POS Settings page: the Offline Mode toggle appears and will be disabled by default. It is for switching the device from Online to Offline. If enabled, then the system ...POS: SPPAX Payments
Back Office (BO) BO Admin Requirements Navigation: Log into BO then select Admin > Stores Under Admin Store(s): When enabling the SPPAX toggle (setting to Yes), the SPPAX Details screen appears. Enter the mandatory details (pax device serial number) ...POS: Ingenico Payments
Note: Ingenico is available only on Native iPad in Canada. Back Office Admin Navigation: Login to BO then select Account > Store Under the Store's Settings, ensure the Ingenico option is enabled (set to YES). Back Office Payment Methods Note: ...