Retail Back Office: Front End Receipt Template Settings
Navigation: Sign into the Back Office for your Retail Store. On the left-side Navigation Panel, select Settings. On the Settings page, under Printer Templates click Front End Receipt.
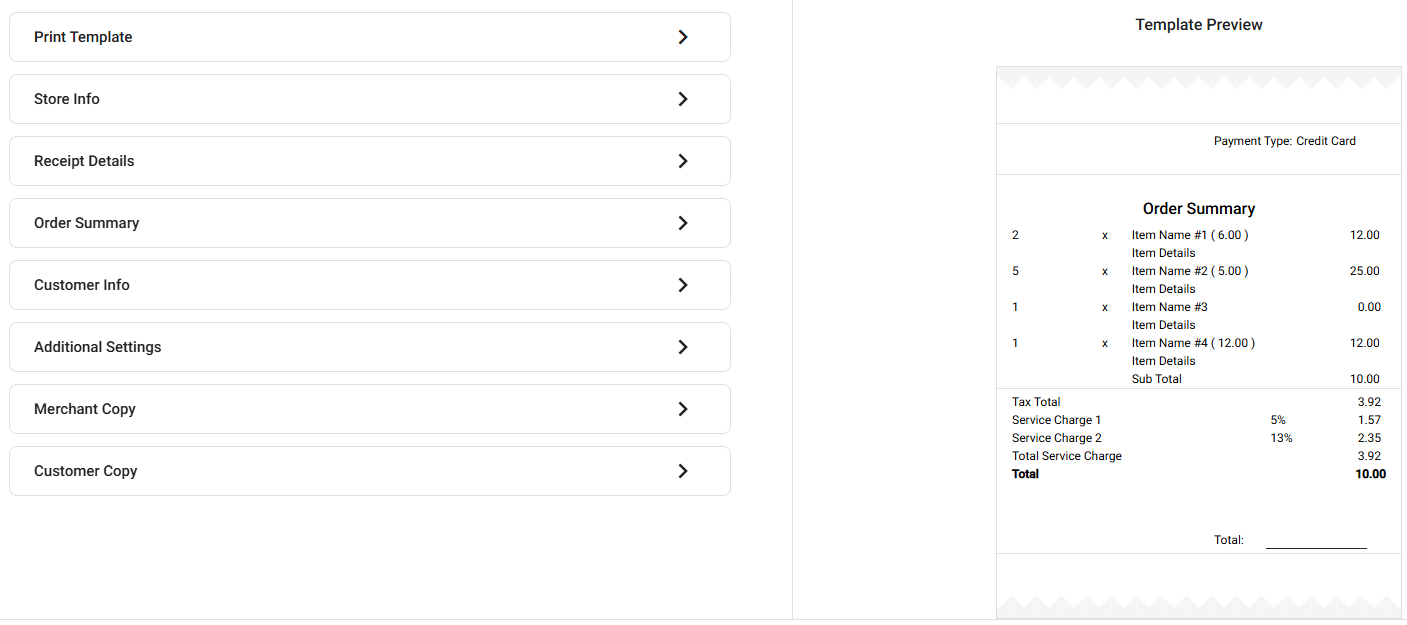
The Front End Receipt settings page is for configuring what you would like to include on the Customer Receipt, and is broken down by receipt sections along with a Template Preview to the right.
Print Template
- Select the Font Size (Small or Medium).
- Choose a Template from the dropdown (Default or New). This indicates which template any updates will be applied to when you click Update.
Store Info
The below fields appear in order (from top to bottom, based on the information entered in Settings > Store Info).
- Store Logo. If selected, click the Upload New Image button and select your file.
- jpg or .png
- Maximum of 2 MB
- 400x400 resolution
- Store Name – If selected, displays the Store Name.
- Address – If selected, displays the Address set in Store Information.
- Email – If selected, displays the Email Address set in Store Information.
- Phone Number – If selected, displays the Phone Number set in Store Information.
- Header Notes – If selected, enter any additional information you’d like to appear at the header of the receipt such as a signature tagline or a thank you.
- Note: if Block 1 is selected for Receipt Number (under Receipt Details), it will appear at the bottom of this section.
Receipt Details
- Receipt Number – If selected, then select which Box it appears in:
- Block 1 – Receipt Number appears at the bottom of the Store Info section.
- Set the Font Size (Normal [same size as normal receipt text] or Large).
- Above receipt image displays the Receipt Number in Block 1, Normal sized font.
- Block 2 – Receipt Number appears at the top left of the Receipt Details section.
- Receipt Open Employee – The name of the Employee who opened the transaction on the left column.
- Receipt Close Employee – The name of the Employee who closed the transaction, across from Open.
- Open Date & Time – The Day, Month, Year, and Time the Open Employee opened the sale.
- Close Date & Time – The Day, Month, Year, and Time the Close Employee closed out the sale, across from the Open Date & Time.
- Customer Name - The name of the Customer the sale belongs to.
Order Summary
- Tax Summary – A breakdown of the specific Taxes applied to the sale, or the Total Taxes. The Tax Summary will appear below the Order Summary listing of items on the transaction.
- Hide Inclusive Tax – If selected, any inclusive tax will not be included in Total Tax / Tax Summary.
- Cash Discount - Any Cash Discount applied to the sale (if Customer paid via Cash and the Store has a Cash Discount available). It will appear above the listed Taxes.
- Receipt Total - Appears between Discount and Taxes.
- Tender Details - A breakdown of the forms of payment used towards the sale will appear.
- Show Membership Balance – Displays the balance of accrued Membership credits.
- Discount under the Menu Item – Displays each Discount under the item it was applied to.
- Print Receipt in Primary & Secondary Languages – Produces 2 copies of the receipt – 1 for each assigned Language in Store Settings.
- Single Quantity Price Inside Braces - Displays the individual value of each item above 0.00 next to the name.
Customer Info
The Customer’s Contact Information, as entered when ordering. It appears below the Card Details.
- Customer Name – Displays the Customer’s Name.
- Address – Displays the Customer’s Mailing Address.
- Phone Number – Displays the Customer’s Phone Number (10 digits).
- Email – Displays the Customer’s Email Address, as entered when ordering.
- Customer Notes – Displays any Note entered in the field, such as a ‘Have a nice day!’.
- Note: Any Customer Note will appear in the bottom section, below their info.
- Note: The Special Notes is selected under the Additional Settings section.
Additional Settings
- Signature – Adds the line for the Customer to Sign the receipt.
- Show E-Invoice QR – Displays the QR Code for the Customer to pay the bill online (directly below the E-Voice URL.
- Special Notes – Includes any special instructions provided by the Customer when ordering (Example: extra cheese, less spice, etc.). This will appear under the Contact Info.
- Loyalty Amount – Includes any $ balance Amount on the Customer’s Loyalty Account. It will appear as a line item under the Total of the Tax Summary.
- Barcode – Adds a barcode representing the transaction at the bottom of the receipt.
- Cut Paper After Each Print – Automatically cuts the paper after each receipt printing.
- Show Remaining Balance – Displays any remaining balance on the bill at the time of the receipt printing.
- Show QR Payment – Displays the QR Code for the Customer to access the receipt online.
Merchant Copy
These settings apply to the Merchant’s copy of the receipt only.
- Print GC Balance – Includes the remaining balance of the gift card used on the transaction.
- Print HA Balance – Includes the remaining balance of the House Account.
- Print Tab Name – Print’s the name of the person who accrued the tab.
- Print Membership Balance – Print’s the remaining balance of accrued Membership credits.
Customer Copy
These settings apply to the Customer’s copy of the receipt only.
- Print GC Balance – Includes the remaining balance of any gift card used on the transaction.
- Print HA Balance – Includes the remaining balance of any House Account.
- Print Membership Balance – Print’s the remaining balance of accrued Membership credits.
Related Articles
Retail POS: Printer Hardware Settings
Back Office For more information on Printer and Receipt Template settings, see the following Knowledge Articles: Receipt Printers Front End Receipt Template Label Template POS On the Hardware Settings page, select the Printer Settings tab. It ...Back Office: Front End Receipt Template Settings
Navigation: Sign into the Back Office for your Store. On the left side, select Settings. On the Settings page, under Printer Templates select Front End Receipt. The Front End Receipt page is broken down into sections along with a Template Preview. ...Retail POS: Membership Payments
Membership gives the ability to organize Customers into Loyal Customers. By using Membership Account, you will be able to organize and apply Tax exemptions to Members of the group, maintain the account balance, and issue allowances. Membership ...Retail Back Office: Email Receipt Template Settings
Navigation: Sign into the Back Office for your Retail Store. On the left-side Navigation Panel, click Settings. On the Settings page, under Printer Templates select Email Receipt Template. The Email Receipt Template page is for configuring what you ...Back Office: Kitchen Printer Receipt Template Settings
Navigation: Sign into the Back Office for your Store. On the left side, click Settings. On the Settings page, under Printer Templates click Kitchen Printer Templates. The Kitchen Printer Template page contains multiple Template customization options, ...