Back Office: Kitchen Printer Hardware Settings
Navigation: Sign
into the Back Office for your store. On
the left-side, click Settings. On the Settings page, under Hardware select Kitchen Printers. The Kitchen Printers page appears.
The Kitchen Printers settings page is broken down by the Printers and Settings tabs.
Printers
Settings
Printers
The Printers tab contains information about Kitchen Printers that are currently part of your network, as well as the option to set up new Kitchen Printers.
- To create a new Kitchen Printer, click + New Kitchen Printer.
- To Edit an existing Kitchen Printer, click the Pencil. To Delete it, click the Trash Can.
- Select the Printer Type (Printer, KDS, Driver).
- Printer
- Select the Printer Model from the dropdown.
- Enter the Name and IP Address of the printer.
- Enable Service Type Restrictions – If YES, select the Service Type(s) allowed to access the Kitchen Printer.
- Click Show All to reveal all the available Service Types.
- Apply to All Categories – If YES, select whether to Apply to All Menu Items.
- Alternate Printer – If YES, select the Alternate Kitchen Printer to be used when the above identified Printer isn't available.
- Once all selections have been made, click Save.
- KDS
- Enter the Name and IP Address of the Kitchen Display Screen.
- Select whether this is an Expo Device – If YES, enter the:
- Expo Printer IP Address
- Queue Device IP Address
- Enable Service Type Restriction – If YES, select:
- What Service Types are allowed to access the Kitchen Display Screen.
- Click Show All to reveal all the available Service Types.
- Whether or not you want to Print ToGo Items (at the bottom, below Apply To All…).
- Apply to all Categories – If YES, then select whether to Apply to all menu items.
- Runner
Configuring this allows the Kitchen Printer to print Runner Receipts. - Select the Printer Model from the dropdown.
- Enter the Name of the Printer as it will appear in Back Office and POS.
- Enter the IP Address to connect to the Kitchen Printer.
- Driver
Configuring this allows the Kitchen Printer to print Driver Receipts. - Select the Printer Model from the dropdown.
- Enter the Name and IP Address of the printer.
- Enable Service Type Restriction – If YES, select:
- What Service Types are allowed to access the Kitchen Printer.
- Whether or not you want to Print ToGo Items (at the bottom, below Apply To All…).
- Apply to all Categories – If YES, then select whether to Apply to all menu items.
- Alternate Printer – If YES, select the Alternate Kitchen Printer that will be used if the one currently being added isn't available.
- Partial Order Display - If YES, select the Order Type(s) this printer will be allowed to print from an Order.
- Once all selections have been made, click Save or Update. You're returned to the main Kitchen Printers page under the Printers tab. If a new Printer was created, it will be added as a row in the table.
Settings
The Settings tab is for updating the settings of all Kitchen Printers within the Store. Select
whether any of the following will apply when printing to the kitchen:
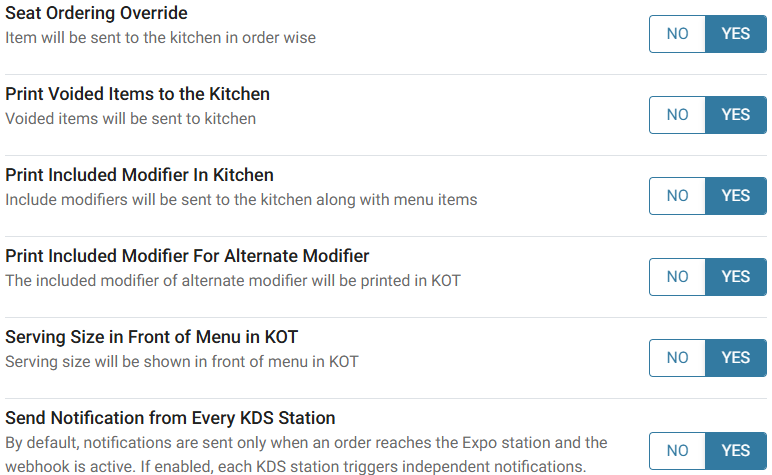
- Seat Ordering Override - Ticket will be sent to the Kitchen Printer and sorted as part of order processing.
- Print Voided Items to the Kitchen - Voided items will also be sent to the Kitchen Printer.
- Print Included Modifier In Kitchen - Included Modifiers will be printed with Menu Items.
- If YES, then select whether print the Included Modifier For Alternate Modifier - The included modifier of alternate modifier will be printed.
- Serving Size in Front of Menu in KOT - Serving size will be shown in front of the Menu.
- Send Notification from Every KDS Station - If set to YES, each KDS station triggers independent notifications.
- If any Settings have been updated, click Update at the upper-right.
- If no updates have been made, then the button will be greyed out and won't be clickable.
Related Articles
Back Office: Label Printer Hardware Settings
Sign into the Back Office. On the left-side Navigation Panel, click Settings. On the Settings page, under Hardware click Label Printers. The Label Printers page appears. To add a new Label Printer, click + New Label Printer (or to edit an existing ...Retail POS: Printer Hardware Settings
Back Office For more information on Printer and Receipt Template settings, see the following Knowledge Articles: Receipt Printers Front End Receipt Template Label Template POS On the Hardware Settings page, select the Printer Settings tab. It ...POS: Operation - Printer Hardware Settings
Back Office For more information on Printer and Receipt Template settings, see the following Knowledge Articles: Receipt Printers Kitchen Printers Kitchen Receipt Template Assigning a Kitchen Printer to a Menu Item Navigation: Log into BO, select a ...POS: Operation - Scale Hardware Settings
Back Office See the Receipt Printer Knowledge Article. Connecting the Printer to the Scale On the Scale: connect the DB9 male side of the cable to the highlighted port. Connect the port supply to the highlighted port. Connect the scale cable to the ...Back Office: User Management - Roles
Navigation: Sign into the Back Office and select a Store. On the left-side navigation panel, select User Management then Roles. Create or Update a Role On the Roles page, click + New Role at the top-right. You can update a Role by clicking the ...