POS: Operation - Customer Display Hardware Settings
Back Office
CDS Back Office Settings
For more information, see the CDS Back Office Settings Knowledge Article.
License Settings
Navigation: Log into Enterprise, then select Licenses > License Settings
To integrate CDS with the POS of a Store: the License for CDS (Customer Display) for that Store must be enabled.
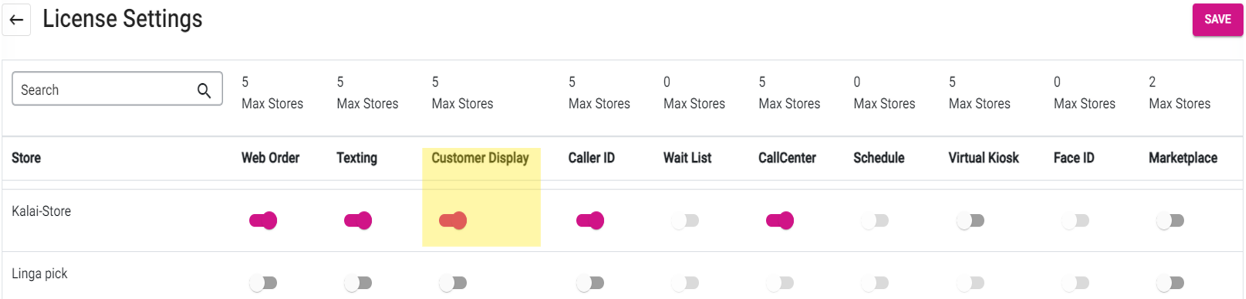
- In v6: When the toggle is disabled in BO, the Customer Display tab will not be available in Hardware Settings.
Installation and Integration in CDS and POS
- Download and install the Linga CDS application.
- The above link is for External. For Internal, download 2.0.1 on the Special page.
- Once installed, you can view the configuration instruction in the CDS app.
- For an External CDS: enter the CDS IP Address in the POS, under Operations > Hardware Settings > Customer Display.
- If an incorrect IP Address is entered, the message 'Invalid IP Address' message appears.
- After entering the correct IP Address, click Connect. It will automatically connect to CDS, and the message 'The CDS has been successfully connected' appears.
- If the toggle is disabled, the message 'The CDS has been Disconnected' will appear in POS. The Connected button will be greyed out and disabled.
- When the CDS Wi-Fi is disconnected, the 'The CDS has been Disconnected' message appears in POS.
- When the CDS Wi-Fi is disconnected or the power is down: the 'The CDS has been Disconnected' message will appear in on all iPad screens.
- Similarly, when the Wi-Fi is re-connected, it will automatically restore the connection to POS.
- Troubleshooting: Sometimes, you must re-enter the hardware and CDS, then press Connect again if it gets disconnected. Note that the IP Address may change due to another device taking it.
- Note: it is our policy that all devices must be hardwired.
Scenarios in POS
- If a user disconnects then moves to another settings, the IP Address in the Customer Display IP Address field won't be displayed.
- If the user moves to another setting in the Hardware settings, IP address in the Customer display Ip address field will be displayed.
- If user sign out from account or close the app. CDS will be disconnected.
- If user log in or log out in POS. CDS stay connected.
- When the user locks the CDS screen, CDS will be disconnected from POS.
Advertisements in CDS
Navigation: Log into Enterprise and select Advertisements
You can add Advertisements in BO which will be reflected in CDS.
- Configure the CDS Advertisement.
- After configuring the settings, click Save and the settings will we be saved.
- The toggle will be enabled under CDS Settings in Back Office (Show Advertisements toggle).
CDS When Connected to POS
- In CDS, the Check Number is displayed on the top left corner of the CDS and the Customer's Name will appear in the center and the Date will appear at the top-right corner of the CDS screen. Price is displayed at center. Advertisements will be displayed at Left side of the screen and payment; Menu item & price will be displayed on right.
- POS Payment details will be reflected in CDS.
Example:
- In POS if there is a Discount it will appear in CDS.
- In POS if there is a Tip it will appear in CDS.
- In POS if there is Gratuity it will appear in CDS.
- In POS if there is a Cash price (when Dual Price is configured in BO) it will appear in CDS.
- In POS if there is a Partial payment the payment made will be appear in the Paid amount (when partial payment made through Cash, Cash price will be shown in CDS for the proportional Cash payment).
- In POS if there is a Split payment the Split payment made will appear in the Paid amount.
- In POS if there is a Service Charge, it won't appear in CDS.
- In POS if there is a Cash Discount (Surcharge), then it won't appear in CDS.
- In POS if there is a Gift Card Recharge it will appear under the Menu section in CDS.
Customers Signing Up on CDS
CDS is connected with POS.
POS
- Walkin is selected in POS:
- Enter the Customer's Name.
CDS
The Customer enters their following information:
- Enter their Phone Number (mandatory). Then press -> Next at the bottom-right (press X Clear at the bottom-left to clear out the number(s) and start over).
- Enter their Name. Then press -> Submit at the bottom-right (they can also Skip if desired). They can also press <- Previous to revert to the Phone Number screen. Note: if a Name isn't entered, don't press Submit.
- Once submitted, the details will be saved for the Customer. They will be attached to the Store and the notification will appear in CDS.
Orders in CDS
Once CDS is integrated with POS, then any order is places in POS end will be displayed in CDS along with its order and Check total.
Payments in CDS
Payments Using Cash
Once CDS is integrated with POS: an Order placed from the POS end will appear in CDS along with its Order and Check Total. Payment is made and the payment will be reflected in the Paid amount in CDS.
POS Screens
CDS Screens
The Cash price will appear in POS as well as in CDS for Stores for which the Dual Price has been configured in Back Office.
Payment using CC / GC / HA / Membership
Once CDS is integrated with POS: an Order placed from the POS end will appear in CDS along with its Order and Check Total.
- A Card form of payment method is selected.
- On the Card Type pop-up that appears, select an option.
- On the ADD A TIP pop-up that appears, select a Tip option then press Process Payment.
- After processing: if the signature pad toggle in POS Settings is enabled, the Please Sign Here pop-up appears.
- For v6, it will appear within the Tip screen.
Payments Using Loyalty
Once the CDS is integrated with POS: when an Order is placed from the POS, it will appear in CDS along with its Order and Check Total.
- The Customer must be attached to the Order for their Loyalty information to appear and to be able to use Loyalty as payment.
- Loyalty is selected as the payment method, then Submit is pressed.
- Payment is made and payment will be reflected in the Paid amount in CDS.
- $3.30 is the amount to be paid once the Loyalty payment is successful.
- $3.30 will be reflected in Paid Amount in CDS.
Payment Using Card Readers and Terminals (Magtek, LPG, SPPAX)
Once the CDS is integrated with POS: when an Order is placed from the POS, it will appear in CDS along with its Order and Check Total.
- A Card Reader payment type is selected.
- In POS: when Tip screen appears in CDS the Add a Tip pop up appears. You can select the Tip then press Process Payment.
- The proportional Tip can be selected from CDS and the same will be reflected in POS as well and vice versa.
- After clicking Process Payment from the Card screen: the Card screen will appear in CDS.
- MPPG
- MPPG - tdynamo
- In POS: the continuous Loader will appear with the message 'Start EMV Transaction. PRESENT CARD.'
- Once the Card is Swiped/tapped/inserted, the loader with message 'Connecting to Processor' will be displayed.
- In CDS: the message 'Connecting to processor, please do not remove the card' will appear on the CDS. User Swipe or inserts or tap the card in Card reader and the payment is made and the payment will be reflected in the CDS Paid Amount.
- Once payment is completed, the following screen will appear:
Payments Using LPG
Once the CDS is integrated with POS: when an Order is placed from the POS, it will appear in CDS along with its Order and Check Total.
- A payment option is selected and LPG is selected as the payment method.
- Once the payment method is selected: the Tip screen will appear (in CDS the Add A Tip pop-up will appear where the Customer can select the Tip then press Process Payment. Select the proportional Tip from CDS and the same will be reflected in POS as well and vice-versa.
- After clicking Process Payment from the Card screen in POS, the Insert/Tap/Swipe screen will appear in CDS (the CARD ENTRY_PROMPTED loading message will appear in POS).
- Once the Card is tapped/inserted/swiped, the Online Authorisation loading screen will appear in POS.
- In CDS: the 'connecting to processor, please do not remove the card' notification will appear on CDS. After tapping/inserting/swiping the card in the Card reader and the payment is made, it will be reflected in the CDS Paid Amount.
Note:
- LPG does not apply to native iPad. Only for version 6.
- CDS impacts will be available for version 6, but not for native iPad.
Payments Using SPPAX
Once the CDS is integrated with POS: when an Order is placed from the POS, it will appear in CDS along with its Order and Check Total.
- A payment option is selected and SPPAX is selected as the payment method.
- Once the payment method is selected the Add A Tip screen appears in POS, and in CDS the Apply tip pop up will appear. The Customer can select the Tip then press Process Payment. The same proportional Tip from CDS will be reflected in POS.
- After clicking Process Payment, the Insert/Tap/Swipe the Card screen will appear in POS for PAX devices. After clicking Process Payment from the card screen, the 'Tap, Insert, or Swipe your Card' screen will appear in CDS for the PAX device.
- Note: this is an example image and won't appear in CDS.
- In CDS, the 'connecting to processor, please do not remove the card' notification will appear on the CDS screen. After swiping/inserting/tapping the Card in the Card Reader, the payment is made and the payment will be reflected in the CDS Paid Amount.
Payment Summary (with and without Tip)
In CDS
In CDS, the Tip will be included along with Overall Total (Tip + Check Total) and Paid Amount (with Tip) will apply only if there is a Tip.
When Tip is not applied for the Check then the following fields will appear: Sub Total, Tax, Discount, Gratuity, Total (Sub total + Tax + Gratuity - Discount), and Paid Amount.
With Tip in POS
Same Check Without Tip in CDS
Same Check With Tip in CDS
- When Tip is applied to the Check, then the following fields will appear: Sub Total, Tax, Discount, Gratuity, Total (Sub total + Tax + Gratuity – Discount), Tip, Overall Total (Tip + Check Total), Paid Amount (with Tip) (example $50 + $5 - as on Payment screen). Note: Zero tax will not appear in CDS, only when the Tax is more than 0 it will appear in CDS (it will appear in POS).
- When a Tip is applied, the line items such as Tip, Overall Total (Tip + Check Total) and Paid Amount (with Tip) will appear.
Note: The Tip amount will not be added to the top in POS and CDS.
Digital Receipts in CDS
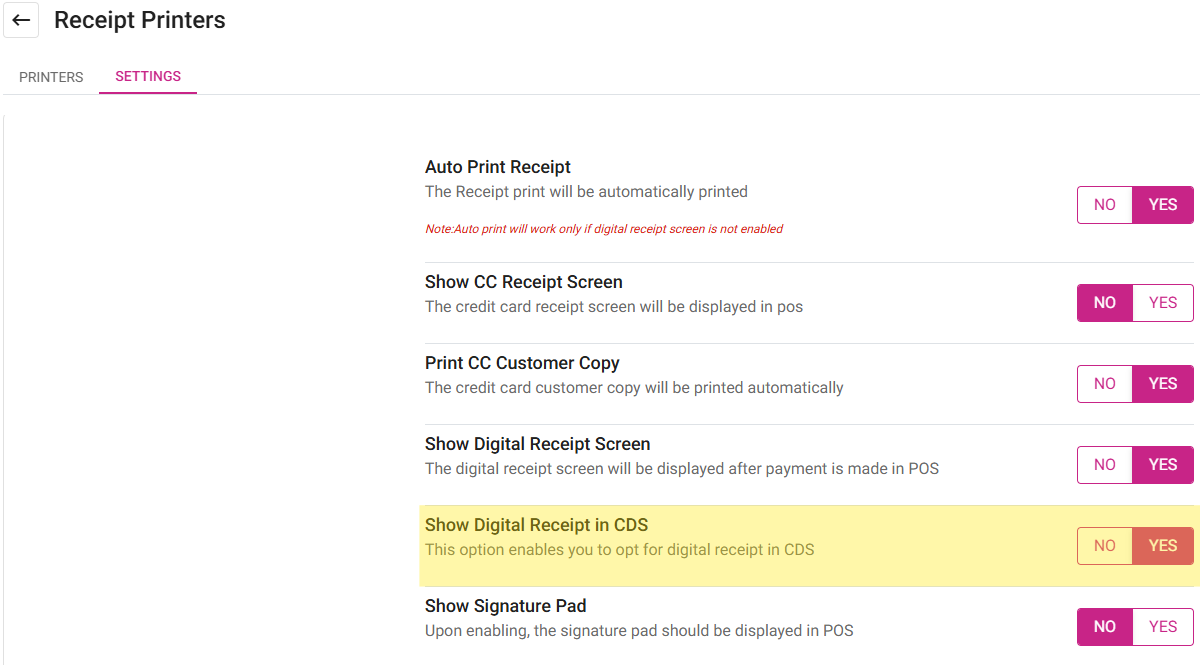
Back Office
Navigation: Log into BO, select a Store, then select Settings > Hardware > Receipt Printers
On the Receipt Printers settings page: under the Settings tab, the Show Digital Receipt in CDS toggle must be enabled (set to YES). When enabled, the Digital Receipt Screen will appear in CDS.
Implementation in CDS
In the CDS display: on the Receipt screen the following icons are displayed:
Text Receipt
If Text Receipt is selected, the Customer will:
- Enter their Phone Number, then press Done.
- The Country Code is included to the left - and is set as per the store’s country settings in Back Office.
- If incorrect numbers were entered: use the back arrow <-- symbol button for clearing the number (one digit per button press).
- To clear the entire sequence, press the Clear button.
- To switch to a different mode (Email or not at all), press the < Back button.
- The amount to be paid is shown at the top for easy notification.
- If an incorrect number is entered then Done is pressed, it will be denoted invalid.
- The 'receipt has been sent via text message' screen appears which shows the amount paid at the top.
- A countdown timer will appear at the bottom for the screen to auto-close, or press the x at the top-right corner to close it manually.
Email Receipt
If Email Receipt is selected, the Customer will:
- Enter their Email Address, then press Done. The Receipt will be sent to the entered Email Address.
- When you select the Your Email Here line, the keypad will open.
- A valid Email Address must be entered before pressing Done and submitting.
- To switch to a different mode (Email or not at all), press the < Back button.
- The amount to be paid is shown at the top for easy notification.
- The 'receipt has been sent via email' screen appears which shows the amount paid at the top.
- A countdown timer will appear at the bottom for the screen to auto-close, or press the x at the top-right corner to close it manually.
Print Receipt
If Print Receipt is selected:
- The 'receipt has been printed' screen appears which shows the amount paid at the top.
- A countdown timer will appear at the bottom for the screen to auto-close, or press the x at the top-right corner to close it manually.
No Receipt
If No Receipt is selected:
- The 'please come again' screen appears which shows the amount paid at the top.
- A countdown timer will appear at the bottom for the screen to auto-close, or press the x at the top-right corner to close it manually.
Implementation in POS
Note: If the Digital Receipt in POS is being used, the 'thank you' message screen appears in CDS after the Receipt message is sent.
The below screen will be available until the Customer selects a Receipt Type (Email, Text, Print, No receipt), provides input and pressed Done.
Text Receipt
- The entered Phone Number from the Customer in CDS will be populated on the POS screens as well.
- The Send Receipt option in the POS will be disabled until the Customer enters the Phone Number and presses Done.
- When the Customer requests for a Receipt from POS, the Send Receipt option will be available.
Email Receipt
- The entered Email Address from the Customer in CDS will be populated on the POS screens as well.
- The Send Receipt option in the POS will be disabled until the Customer enters the Email Address and presses Done.
- When the Customer requests for a Receipt from POS, the Send Receipt option will be available.
Print Receipt
- The Send Receipt option in the POS will be disabled.
- When the Customer requests for a Receipt from POS, the Send Receipt option will be available.
No Receipt
You are returned to the Order Type screen.
Related Articles
Retail POS: Hardware Settings Overview and Recommended Devices
In POS, select Operation then Hardware Settings. Note: Only employees with the proper role and permission settings have access to the Hardware Settings screen. The Hardware Settings screen displays the following tabs: Card Reader Printer Settings ...Retail POS: Customer Display Hardware Settings
On the Hardware Settings screen, select the Card Reader tab. The screen displays the device name of the Customer Display which is connected to the POS. Back Office License Settings Navigation: Log into Enterprise, then select Settings. Under Licenses ...POS: Operation - Scale Hardware Settings
Back Office See the Receipt Printer Knowledge Article. Connecting the Printer to the Scale On the Scale: connect the DB9 male side of the cable to the highlighted port. Connect the port supply to the highlighted port. Connect the scale cable to the ...POS: Operation - Printer Hardware Settings
Back Office For more information on Printer and Receipt Template settings, see the following Knowledge Articles: Receipt Printers Kitchen Printers Kitchen Receipt Template Assigning a Kitchen Printer to a Menu Item Navigation: Log into BO, select a ...Retail POS: Scale Hardware Settings
Navigation: Log in to POS. Select Operation then Hardware Settings. On the Hardware Settings page, select the Scale tab. Toggles The Scale tab displays two toggles: Non-Integrated Scale Device and USB Scale Device. If Non-Integrated Scale Device is ...